MongoDB高阶技术 1. 聚合操作 聚合操作处理数据并返回结果集(如 求和、去重等)。聚合操作可以操作多个文档,然后对数据进行处理,返回结果集。
聚合操作主要分为三个方法:
单一聚合
聚合管道
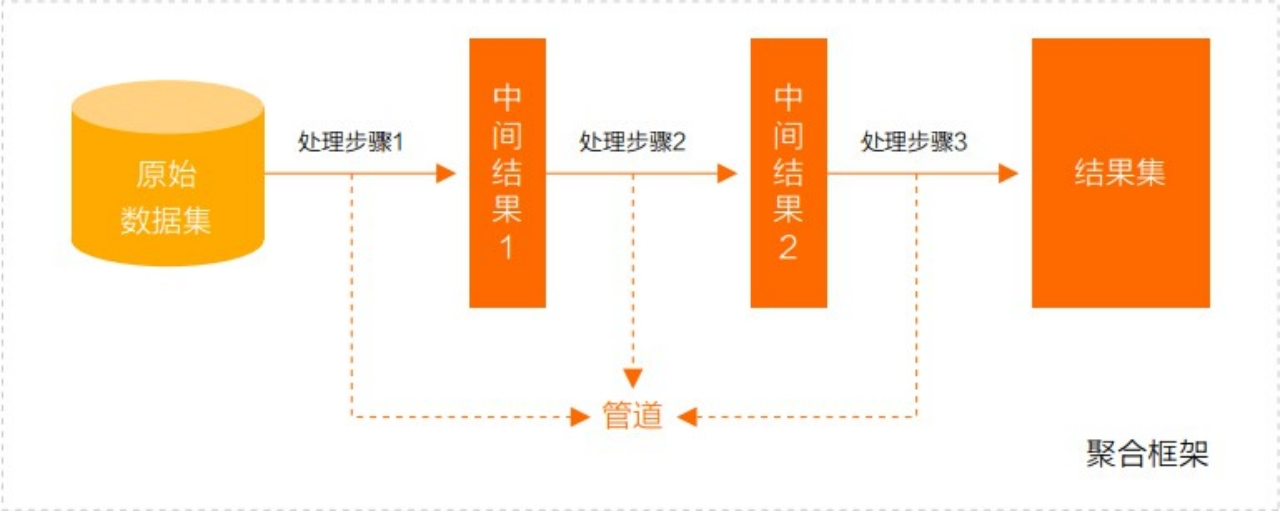
聚合管道是一个数据聚合的框架,基于流水线概念,文档进入流水线处理,把上一个节点处理结果用于下一个节点的数据源继续处理,最终返回结果集。
MapReduce(用于大数据)
处理每个文档并向每个输入文档发射一个或多个对象的map阶 段,以及reduce组合map操作的输出阶段。
1)单一聚合 MongoDB提供三种聚合函数,使用简单但是缺少灵活性和功能性。
函数 描述
db.collection.estimatedDocumentCount()
忽略查询条件,返回集合中所有文档的总数量
db.collection.count()
可以根据条件在集合中进行求和
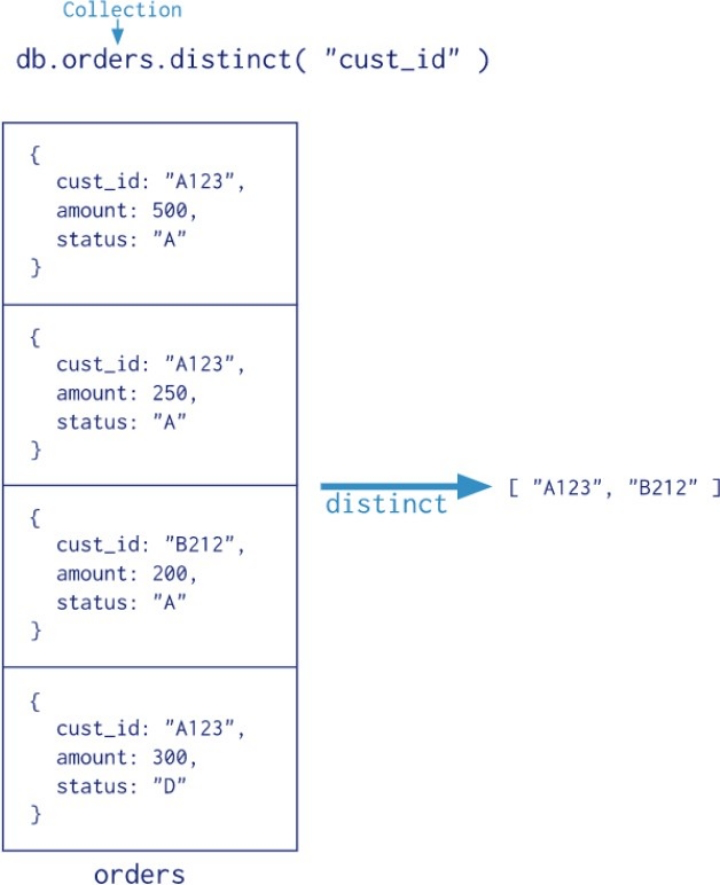
db.collection.distinct()
可以根据条件在集合中进行去重,并通过数组的形式返回数据
db.orders.distinct(“cust_id”) 根据cust_id 去重,去重结果:A123、B212
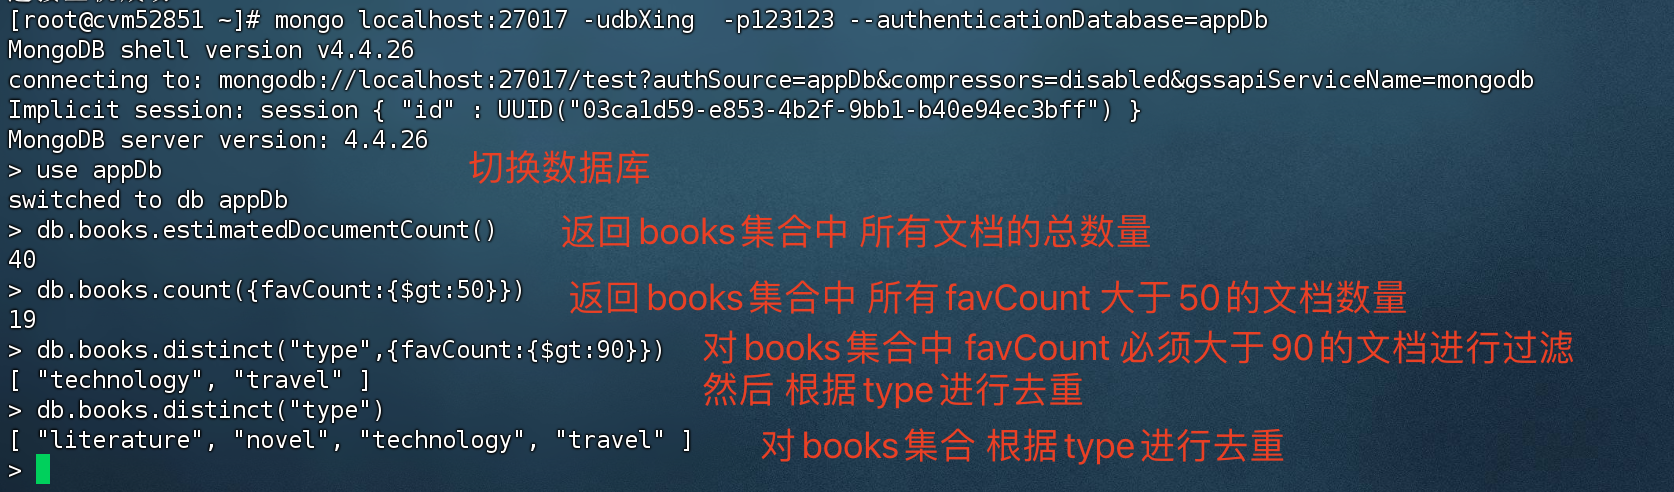
单一聚合实验
1
2
3
4
5
6
7
8
#检索books集合中所有文档的计数 db.books.estimatedDocumentCount() # 检索books集合中 所有favCount 大于50 的文档数量(求和) db.books.count ({favCount:{$gt:50 }}) # 根据type进行去重 db.books.distinct("type") # 返回收藏数大于90 的文档,然后根据type 进行去重 db.books.distinct("type",{favCount:{$gt:90 }})
2)聚合管道 MongoDB 聚合框架(Aggregation Framework)是一个计算框架,它可以:
作用在一个或几个集合上;
对集合中的数据进行的一系列运算;
将这些数据转化为期待的数据形式;
聚合框架更类似于 SQL中的GROUP BY、LEFT JOIN 、AS 别名等功能。
管道(Pipeline)和阶段(Stage)
整个聚合运算过程称为管道(Pipeline),它是由多个阶段(Stage)组成的,每个阶段都可以对文档进行运算,并将文档输送给下一个阶段。
聚合管道操作语法 1 db.collection.aggregate([$stage1, $stage2, ...$stageN], {options})
[$stage ……] 一组数据聚合阶段。除$out、$Merge和$geonear阶段之外,每个阶段都可以在管道中 出现多次。
options 可选,聚合操作的其他参数。包含:查询计划、是否使用临时文件、 游标、最大操作时 间、读写策略、强制索引等等
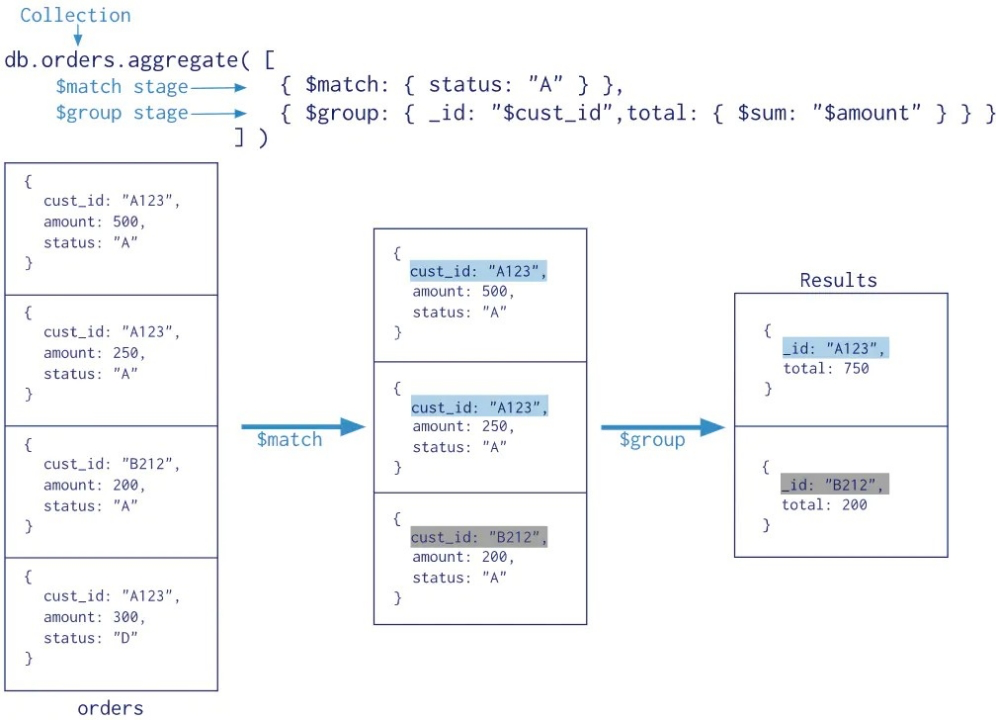
$match 匹配数据 status = A,剩余 3个文档
$group 根据cust_id 分组查询,剩余2条文档
total $sum求和
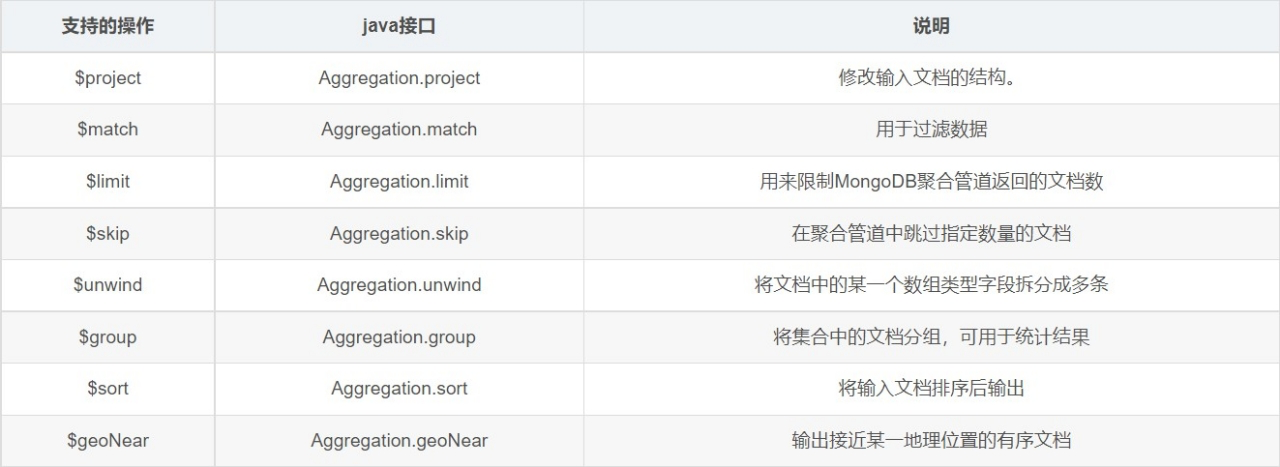
常用的管道聚合阶段
阶段 描述 SQL等价运算符
$match
筛选条件
WHERE 条件查询
$project
投影
AS 别名
$lookup
左外连接
LEFT OUTER JOIN
$sort
排序
ORDER BY
$group
分组
GROUP BY
$skip/$limit
分页
$unwind
展开数组
$graphLookup
图搜索
$facet/$bucket
分面搜索
数据准备
1
2
3
4
5
6
7
8
9
10
11
12
13
14
15
16
17
18
19
20
var tags = ["nosql" ,"mongodb" ,"document" ,"developer" ,"popular" ];var types = ["technology" ,"sociality" ,"travel" ,"novel" ,"literature" ];var books=[];for (var i=0 ;i<50 ;i++){ var typeIdx = Math .floor (Math .random ()*types.length ); var tagIdx = Math .floor (Math .random ()*tags.length ); var tagIdx2 = Math .floor (Math .random ()*tags.length ); var favCount = Math .floor (Math .random ()*100 ); var username = "xx00" +Math .floor (Math .random ()*10 ); var age = 20 + Math .floor (Math .random ()*15 ); var book = { title : "book-" +i, type : types[typeIdx], tag : [tags[tagIdx],tags[tagIdx2]], favCount : favCount, author : {name :username,age :age} }; books.push (book) } db.books .insertMany (books);
导入后的数据:
$project 该函数有两个功能:
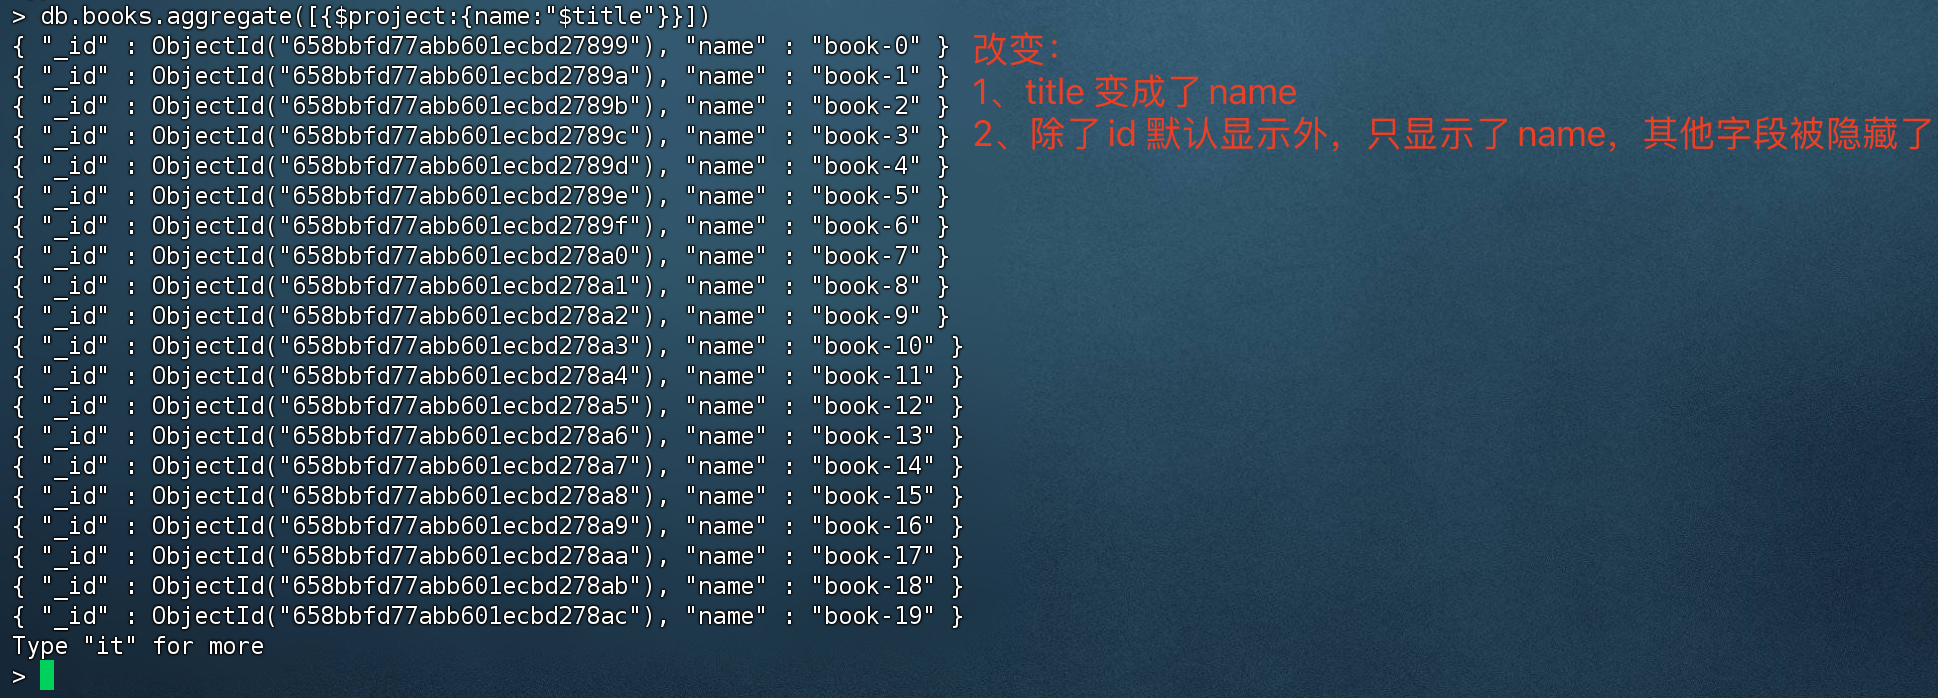
1、投影操作, 将原始字段投影成指定名称, 如将集合中的 title 投影成 name,可以理解为 SQL中的 as 别名
2、可以返回 指定的字段(或者说 排除不想要的字段),类似于SQL的 select xxx
1 > db.books.aggregate([{$project:{name:"$title"}}])
指定想要返回的字段(或者说 排除不想返回的字段):
1
2
# value 为0 的代表隐藏,为1 代表显示 。除了_id外,其他字段如果不写的话默认都是隐藏。 > db.books.aggregate([{$project:{name:"$title",_id:0 ,type:1 ,author:1 }}])
从嵌套字段内 排除字段
上面的测试数据中,author作者字段里面嵌套了 name、age,我们也可以实现 只返回name。
1
2
3
4
5
# 投影,将 title 投影成name ;指定返回的字段。 author.name 嵌套数据也可以指定返回字段。 > db.books.aggregate([{$project:{name:"$title",_id:0 ,type:1 ,"author.name":1 }}])# 这种方式也可以实现同样效果 > db.books.aggregate([{$project:{name:"$title",_id:0 ,type:1 ,author:{name:1 }}}])
$match match 类似于SQL的where,建议把match放到管道最前端
1
2
# 只查询type = technology的文档 > db.books.aggregate([{$match :{type:"technology"}}])
$count 求和并返回结果
1
2
> db.books.aggregate([{$match :{type:"technology"}},{$count:"type_count"}]){ "type_count" : 6 }
根据查询条件 type = technology 进行求和,并以 type_count字段返回求和结果
管道内,第一阶段 $match 会先匹配数据,并传给下一阶段,第二阶段 $count 会根据结果集 进行求和
$group 根据指定的表达式条件进行分组,并将分组后的结果传给下一阶段。
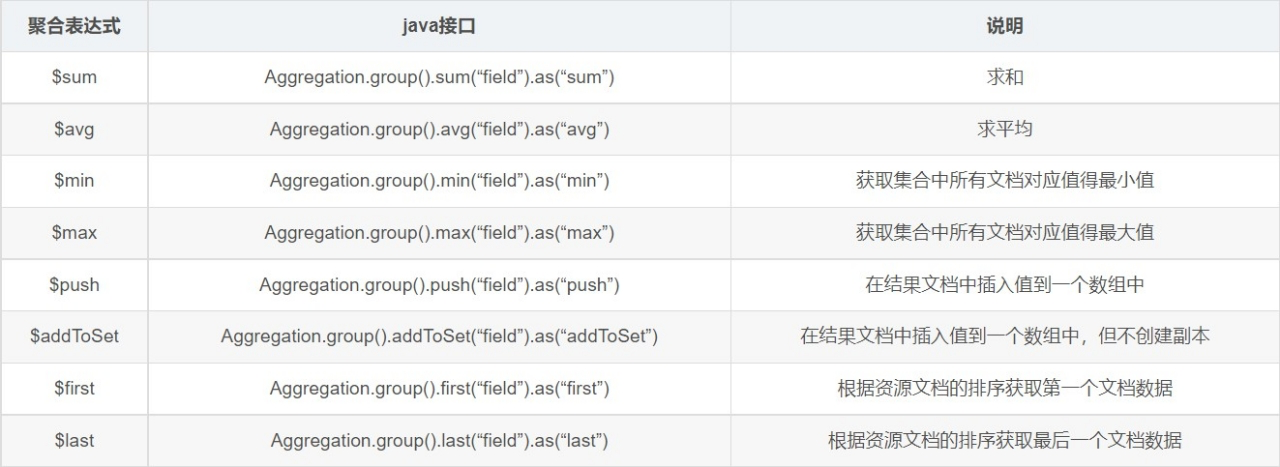
accumulator操作符
名称 描述 类比 sql
$avg
计算均值
avg
$first
返回每组第一个文档,如果有排序,按照排序,如果没有按照默认的存储的顺序的第一个文档。
limit 0,1
$last
返回每组最后一个文档,如果有排序,按照排序,如果没有按照默认的存储的顺序的最后个文档。
-
$max
根据分组,获取集合中所有文档对应值得最大值。
max
$min
根据分组,获取集合中所有文档对应值得最小值。
min
$push
将指定的表达式的值添加到一个数组中。
-
$addToSet
将表达式的值添加到一个集合中(无重复值,无序)。
java 的set
$sum
计算总和
sum
$stdDevPop
返回输入值的总体标准偏差(population standard deviation)
-
$stdDevSamp
返回输入值的样本标准偏差(the sample standard deviation)
-
$group允许最大内存100M,如果超过则会报错,如果要处理超大数据的话,可以设置 allowDiskUse = true,$group操作产生的数据会写入到硬盘中。
book的数量,收藏总数和平均值
1
2
3
4
5
6
> db.books.aggregate([ {$group :{_id:null ,count:{$sum:1 },pop:{$sum:"$favCount"},avg: {$avg:"$favCount"}}} ]) { "_id" : null , "count" : 50 , "pop" : 2258 , "avg" : 45.16 }
$group 分组,_id 为null 意思是 只有一个组,count:{$sum:1} 根据分组结果进行求和
pop:{$sum:”$favCount”} 根据收藏数进行求和
avg:{$avg:”$favCount”} 根据收藏数求平均值
统计每个作者的book收藏总数
1
2
3
4
5
6
# 先根据author.name 作者名称进行分组,分组之后的结果 根据favCount 通过$sum函数进行求和 > db.books.aggregate([ {$group :{_id:"$author.name",pop:{$sum:"$favCount"}}} ]) { "_id" : "author.name", "pop" : 2258 }
统计每个作者的每本book的收藏数
1
2
3
4
5
6
7
8
9
10
11
12
13
14
15
16
17
18
19
20
21
22
23
24
25
26
# 先根据author.name和title 进行分组(每个作者每本书),然后 进行求和,求和的结果集名称 pop > db.books.aggregate([ {$group :{_id:{name:"$author.name",title:"$title"},pop:{$sum:"$favCount"}}} ]) { "_id" : { "name" : "xx002", "title" : "book-17" }, "pop" : 70 } { "_id" : { "name" : "xx002", "title" : "book-29" }, "pop" : 11 } { "_id" : { "name" : "xx001", "title" : "book-12" }, "pop" : 80 } { "_id" : { "name" : "xx001", "title" : "book-25" }, "pop" : 64 } { "_id" : { "name" : "xx006", "title" : "book-38" }, "pop" : 34 } { "_id" : { "name" : "xx003", "title" : "book-14" }, "pop" : 17 } { "_id" : { "name" : "xx008", "title" : "book-49" }, "pop" : 6 } { "_id" : { "name" : "xx001", "title" : "book-34" }, "pop" : 21 } { "_id" : { "name" : "xx004", "title" : "book-35" }, "pop" : 88 } { "_id" : { "name" : "xx008", "title" : "book-5" }, "pop" : 3 } { "_id" : { "name" : "xx009", "title" : "book-13" }, "pop" : 78 } { "_id" : { "name" : "xx000", "title" : "book-7" }, "pop" : 92 } { "_id" : { "name" : "xx007", "title" : "book-2" }, "pop" : 92 } { "_id" : { "name" : "xx000", "title" : "book-4" }, "pop" : 34 } { "_id" : { "name" : "xx000", "title" : "book-9" }, "pop" : 14 } { "_id" : { "name" : "xx007", "title" : "book-1" }, "pop" : 26 } { "_id" : { "name" : "xx000", "title" : "book-27" }, "pop" : 87 } { "_id" : { "name" : "xx004", "title" : "book-31" }, "pop" : 42 } { "_id" : { "name" : "xx002", "title" : "book-36" }, "pop" : 12 } { "_id" : { "name" : "xx009", "title" : "book-22" }, "pop" : 90 } Type "it" for more
每个作者的book的type合集
1
2
3
4
5
6
7
8
9
10
11
12
13
14
15
# 根据author.name进行分组,下一阶段 使用$addToSet 把type类型 添加到一个set 集合(无序 不重复) > db.books.aggregate([ {$group :{_id:"$author.name",type:{$addToSet:"$type"}}} ]) { "_id" : "xx004", "type" : [ "travel", "sociality", "literature", "novel" ] } { "_id" : "xx008", "type" : [ "travel", "sociality", "literature" ] } { "_id" : "xx003", "type" : [ "technology", "sociality" ] } { "_id" : "xx002", "type" : [ "novel", "literature", "sociality", "travel" ] } { "_id" : "xx006", "type" : [ "literature" ] } { "_id" : "xx007", "type" : [ "travel", "technology", "sociality", "novel" ] } { "_id" : "xx005", "type" : [ "sociality" ] } { "_id" : "xx001", "type" : [ "technology", "sociality", "literature", "novel" ] } { "_id" : "xx000", "type" : [ "travel", "sociality", "literature", "novel" ] } { "_id" : "xx009", "type" : [ "novel", "technology", "travel" ] }
$group 根据作者名称进行分组,把分组的结果 传递给下一阶段
$addToSet 将type类型添加到set集合
$unwind
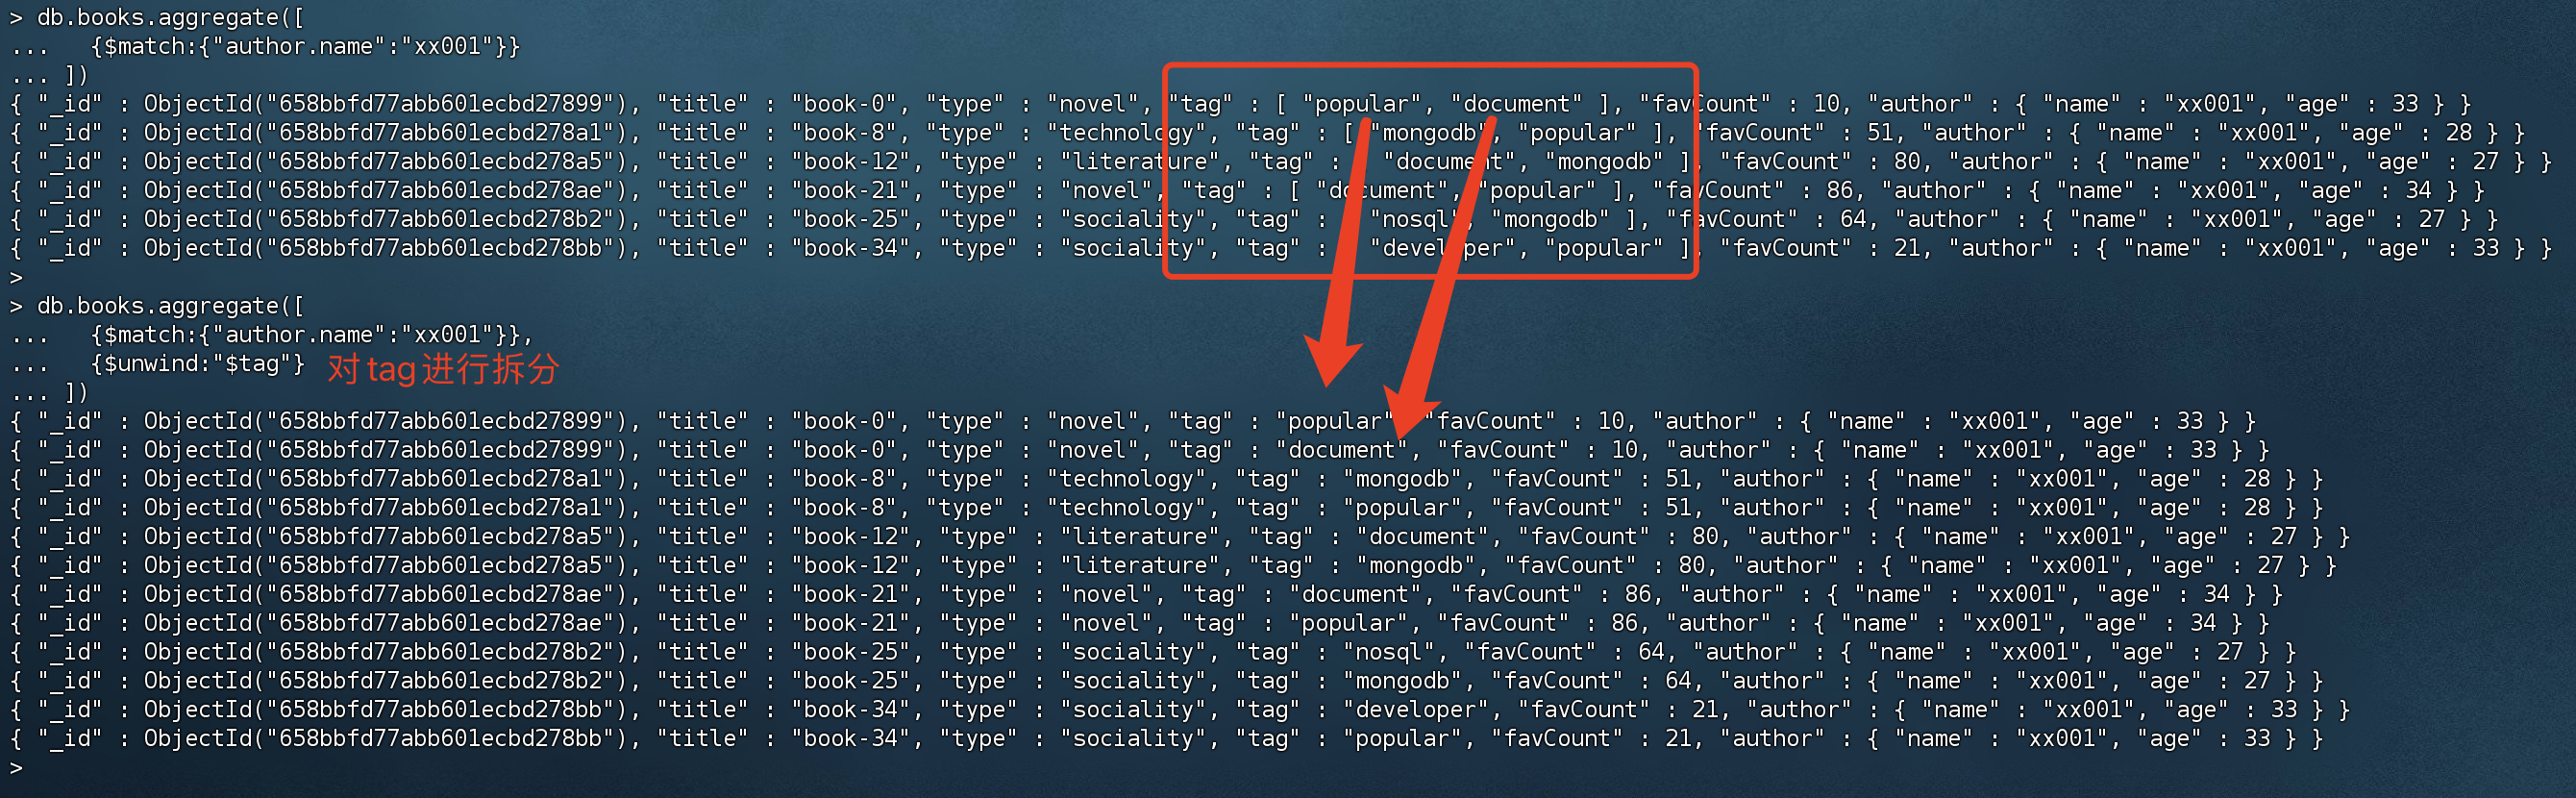
将作者 xx001的book的tag数组拆分成单个文档
1
2
3
4
> db.books.aggregate([ {$match :{"author.name":"xx001"}}, {$unwind:"$tag"} ])
tag 标签参数是个数组,里面存了多个标签,可以通过unwind 拆分成单个文档,其他参数则按照原有的来。
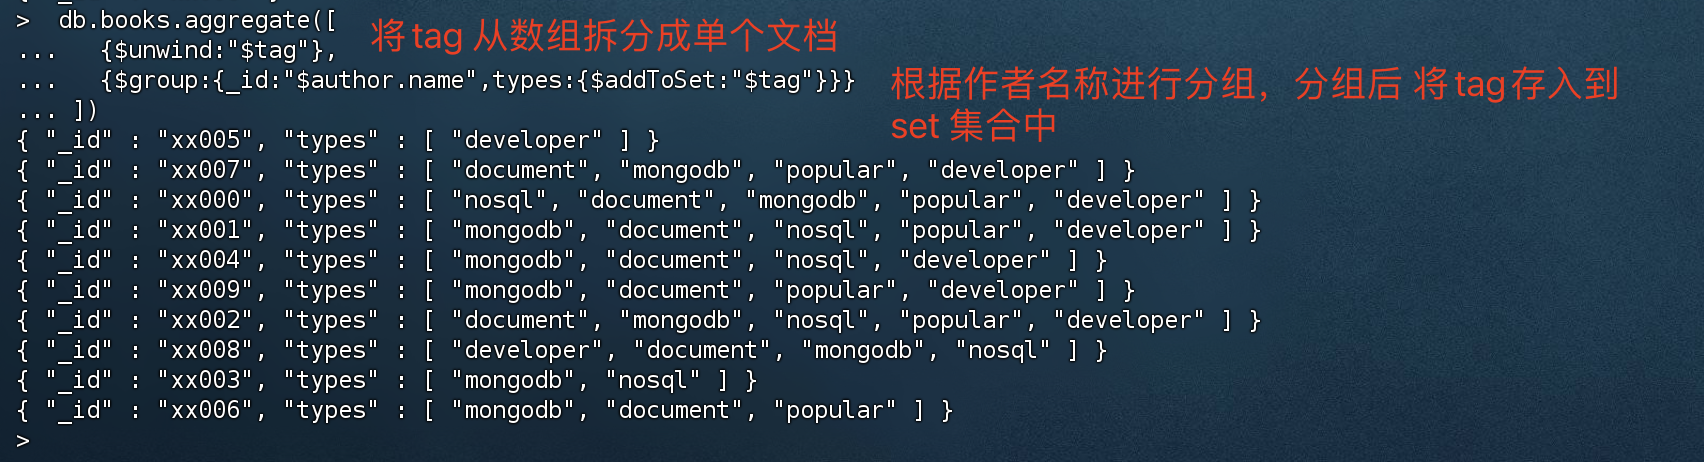
查询出每个作者的book的tag集合
1
2
3
4
> db.books.aggregate([ {$unwind:"$tag"}, {$group :{_id:"$author.name",types:{$addToSet:"$tag"}}} ])
1、将tag 从数组拆分成单个文档
2、根据拆分后的结果,根据作者名称进行分组,分组后 将tag存入到set集合中
$limit 限制传递到管道中下一阶段的文档数,如 limit 20 那么传递给下一阶段的只有20条文档。
1
2
3
4
> db.books.aggregate([ {$match :{"tag":"mongodb"}}, {$limit : 5 } ])
注意:当$sort 和$limit同时出现时,要区分清楚 sort在limit前还是limit后,不同的位置导致结果不同(先排序后分页,还是先分页后排序)。
$skip 跳过指定数量的文档,将剩余文档传递给管道的下一阶段。注意,这里的skip是文档数量,而不是分页数量。
1
2
3
4
5
> db.books.aggregate([ {$match :{"tag":"mongodb"}}, {$limit : 5 }, {$skip : 1 } ])
$sort 对文档进行排序
1
2
3
4
5
6
> db.books.aggregate([ {$match :{"tag":"mongodb"}}, {$limit : 5 }, {$skip : 1 }, {$sort : {favCount:-1 ,title:1 }} ])
对字段设置排序的话,-1 代表降序,1 代表升序
$lookup(关联表查询) 通过$lookup可以实现 多表关联查询。经过$lookup后生成新的数组。
1
2
3
4
5
6
7
8
db.collection.aggregate([{ $lookup: { from : "<collection to join>", localField: "<field from the input documents>", foreignField: "<field from the documents of the from collection>", as : "<output array field>" } })
该方法等同于MySQL的关联表查询,只需要注意 from(被join的表),以及join 条件即可。
属性 作用
from
同一个数据库下等待被Join的集合。 类似于 left join 后面的表名
localField
类似于left join 里面的左边集合关联条件(on a = b) ,如果没有值的话,则为null
foreignField
类似于left join 里面的右边集合关联条件(on a = b) ,如果没有值的话,则为null
as
为输出文档的新增值命名。如果输入的集合中已存在该值,则会覆盖掉
数据准备
1
2
3
4
5
6
7
8
9
10
11
12
13
14
15
# 插入用户集合 db.customer.insert({customerCode:1 ,name:"customer1",phone:"13112345678",address:"test1"}) db.customer.insert({customerCode:2 ,name:"customer2",phone:"13112345679",address:"test2"}) # 插入订单,2 条订单记录,订单记录关联 用户1 、用户2 (customerCode) db.order.insert({orderId:1 ,orderCode:"order001",customerCode:1 ,price:200 }) db.order.insert({orderId:2 ,orderCode:"order002",customerCode:2 ,price:400 }) # 插入订单详情,订单详情关联订单id(orderId) db.orderItem.insert({itemId:1 ,productName:"apples",qutity:2 ,orderId:1 }) db.orderItem.insert({itemId:2 ,productName:"oranges",qutity:2 ,orderId:1 }) db.orderItem.insert({itemId:3 ,productName:"mangoes",qutity:2 ,orderId:1 }) db.orderItem.insert({itemId:4 ,productName:"apples",qutity:2 ,orderId:2 }) db.orderItem.insert({itemId:5 ,productName:"oranges",qutity:2 ,orderId:2 }) db.orderItem.insert({itemId:6 ,productName:"mangoes",qutity:2 ,orderId:2 })
查询用户表 并关联 订单表
1
2
3
4
5
6
7
8
9
10
11
12
db.customer.aggregate([ { $lookup: { from : "order", localField: "customerCode", foreignField: "customerCode", as : "customerOrder" } } ]).pretty() # .pretty() 格式化结果集,方便我们观看结果
查询用户表,关联order表,关联字段 customerCode,as 重命名关联结果。
查询订单表并关联 用户表
1
2
3
4
5
6
7
8
9
10
db.order.aggregate([ { $lookup: { from : "customer", localField: "customerCode", foreignField: "customerCode", as : "customer" } } ]).pretty()
聚合操作示例(一) 统计每个分类的book文档数量
1
2
3
4
5
6
7
8
9
> db.books.aggregate([ {$group :{_id:"$type",total:{$sum:1 } }} ]) { "_id" : "technology", "total" : 6 } { "_id" : "travel", "total" : 11 } { "_id" : "literature", "total" : 11 } { "_id" : "sociality", "total" : 12 } { "_id" : "novel", "total" : 10 }
以type 进行group分组,然后 sum 进行累加,参数为1 。 所以会把 type同一个类型的数量统计出来。
根据标签进行拆分,统计每个标签的收藏数(favCount)并进行降序排序
1
2
3
4
5
6
7
8
9
10
11
12
> db.books.aggregate([ {$match :{favCount:{$gt:0 } }}, {$unwind:"$tag"}, {$group :{_id:"$tag",total:{$sum:"$favCount" } } }, {$sort:{total:-1 } } ]) { "_id" : "document", "total" : 1368 } { "_id" : "popular", "total" : 834 } { "_id" : "developer", "total" : 795 } { "_id" : "mongodb", "total" : 790 } { "_id" : "nosql", "total" : 729 }
$match,先过滤掉 小于或等于0的文档
$unwind,由于需要统计每个标签的收藏数,但是标签是个数组,所以需要通过unwind 进行拆分
$group,通过分组查询,根据tag进行分组,$sum 根据favCount进行累加
$sort排序
区间统计book文档收藏数[0,10),[10,60),[60,80),[80,100),[100,+∞)
1
2
3
4
5
6
7
8
9
10
11
12
13
db.books.aggregate([{ $bucket:{ groupBy:"$favCount", boundaries:[0 ,10 ,60 ,80 ,100 ], default :"other", output:{"count":{$sum:1 }} } }]) { "_id" : 0 , "count" : 6 } { "_id" : 10 , "count" : 24 } { "_id" : 60 , "count" : 9 } { "_id" : 80 , "count" : 11 }
$bucket 是关键字,意思是 启动区间统计
boundaries 统计的区间, 0-10,10-60,60-80,80-100等等
聚合操作示例(二)
根据美国的州和城市来做一系列聚合操作实验,所以我们要先导入 州和城市的数据。
导入邮政编码数据集 :https://media.mongodb.org/zips.json
导入工具 mongoimport 下载地址(https://www.mongodb.com/try/download/database-tools)
1
2
3
4
5
6
7
8
9
10
11
12
13
# 下载工具 [root@cvm52851 ~]# wget https://fastdl.mongodb.org/tools/db/mongodb-database-tools-rhel80-x86_64-100.9.4.tgz [root@cvm52851 ~]# tar -xvf mongodb-database-tools-rhel80-x86_64-100.9.4.tgz [root@cvm52851 ~]# cd mongodb-database-tools-rhel80-x86_64-100.9.4/bin # 下载数据集 [root@cvm52851 bin]# wget https://media.mongodb.org/zips.json # 启动工具导入 [root@cvm52851 bin]# ./mongoimport -h localhost -d appDb -u dbXing -p 123123 --authenticationDatabase=appDb -c zips --file zips.json # 导入成功的提示 2024-01-07T17:40:54.286+0800 0 document(s) imported successfully. 0 document(s) failed to import.
-h 主机地址
-u 用户名
-p 密码
-d 数据库名称
-authenticationDatabase 认证数据库
-c 导入的数据库中的集合名称
-file 导入的文件名
返回人口超过1000万的州 1 2 3 4 5 6 7 8 9 10 11 12 db.zips.aggregate([ {$group :{_id:"$state",total:{$sum:"$pop"} }}, {$match :{total:{$gt:1000 * 1000 * 10 } }} ]) { "_id" : "IL", "total" : 11427576 } { "_id" : "CA", "total" : 29754890 } { "_id" : "FL", "total" : 12686644 } { "_id" : "NY", "total" : 17990402 } { "_id" : "PA", "total" : 11881643 } { "_id" : "OH", "total" : 10846517 } { "_id" : "TX", "total" : 16984601 }
$group按state进行分组查询后,$sum根据pop字段进行累加
$match 匹配total 总人口超过1000w的州
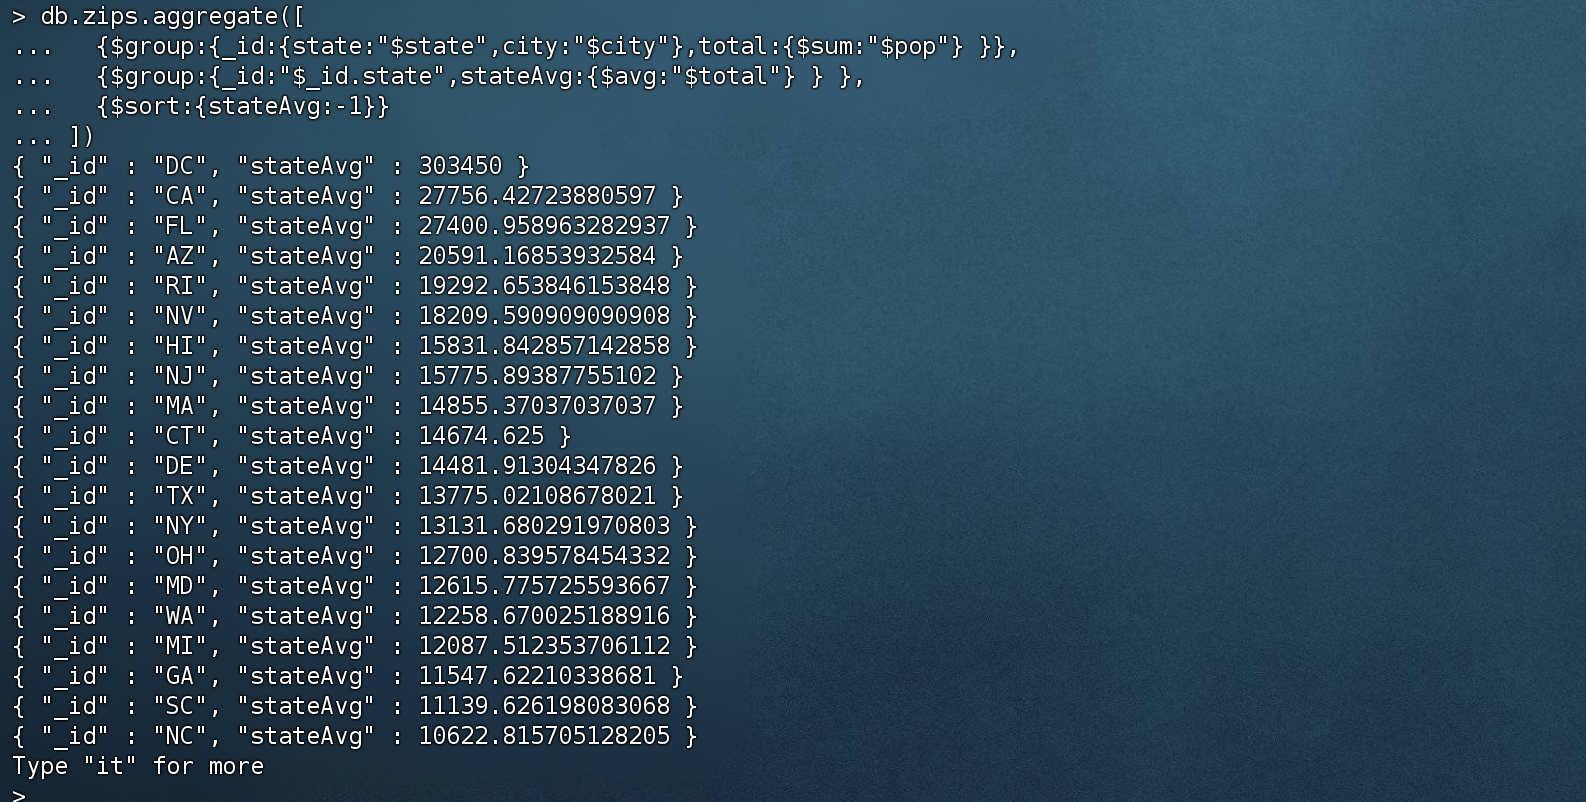
返回各州平均城市人口 1 2 3 4 5 db.zips.aggregate([ {$group :{_id:{state:"$state",city:"$city"},total:{$sum:"$pop"} }}, {$group :{_id:"$_id.state",stateAvg:{$avg:"$total"} } }, {$sort:{stateAvg:-1 }} ])
$group按state、city 进行分组查询后,$sum根据pop字段进行累加
$group 按上一阶段的结果的state进行分组,$avg 分组后 求平均值
$sort 根据stateAvg 进行降序
按州返回最大和最小的城市 1 2 db.zips.aggregate( [ { $group : { _id: { state: "$state", city: "$city" }, pop: { $sum: "$pop" } } }, { $sort: { pop: 1 } }, { $group : { _id : "$_id.state", biggestCity: { $last : "$_id.city" }, biggestPop: { $last : "$pop" }, smallestCity: { $first : "$_id.city" }, smallestPop: { $first : "$pop" } } }, { $project: { _id: 0 , state: "$_id", biggestCity: { name: "$biggestCity", pop: "$biggestPop" }, smallestCity: { name: "$smallestCity", pop: "$smallestPop" } } }, { $sort: { state: 1 } } ] )
3)SpringBoot中实现聚合操作 MongoTemplate提供了aggregate方法来实现对数据的聚合操作。
基于聚合管道mongodb提供的可操作的内容:
基于聚合操作Aggregation.group,mongodb提供可选的表达式
聚合操作示例二 - 返回人口超过1000万的州
1 2 3 4 5 6 7 8 9 10 11 12 13 14 15 16 17 18 19 20 @RunWith(SpringRunner.class) @org .springframework.boot.test.context.SpringBootTest(classes = {MongoApplication.class})public class SpringBootTest { @Autowired MongoTemplate mongoTemplate; @org .junit.Test public void case1 () { GroupOperation groupOperation = Aggregation.group("state" ).sum("pop" ).as("total" ); MatchOperation matchOperation = Aggregation.match(Criteria.where("total" ).gt(10 *1000 *1000 )); TypedAggregation<Zips> aggregation = Aggregation.newAggregation(Zips.class, groupOperation, matchOperation); AggregationResults<Map> results = mongoTemplate.aggregate(aggregation, Map.class); System.out.println(results.getMappedResults()); } }
AggregationResults 通过mongoTemplate查询之后返回的对象,我们可以封装成其他实体类,这里为了省事用了Map
聚合操作示例二 - 返回各州平均城市人口
1 2 3 4 5 6 7 8 9 10 11 12 13 14 15 16 17 18 19 20 21 22 @RunWith(SpringRunner.class) @org .springframework.boot.test.context.SpringBootTest(classes = {MongoApplication.class})public class SpringBootTest { @Autowired MongoTemplate mongoTemplate; @org .junit.Test public void case2 () { GroupOperation groupOperation = Aggregation.group("state" ,"city" ).sum("pop" ).as("total" ); GroupOperation groupOperation2 = Aggregation.group("_id.state" ).avg("total" ).as("cityAvg" ); SortOperation sortOperation = Aggregation.sort(Sort.Direction.DESC, "cityAvg" ); TypedAggregation<Zips> aggregation = Aggregation.newAggregation(Zips.class, groupOperation, groupOperation2,sortOperation); AggregationResults<Map> results = mongoTemplate.aggregate(aggregation, Map.class); System.out.println(results.getMappedResults()); } }
2. MongoDB索引 MongoDB索引是一种用来快速查询数据的数据结构
MongoDB支持各种丰富的索引类型
不使用索引的话,会扫描全部文档进行匹配,而使用索引的话通过索引找到对应的文档
MongoDB索引和MySQL的索引非常相似,基本一致,学习成本很低。
1)索引的分类
按照索引包含字段数,可以分为 单键索引和复合索引(组合索引)
按照索引字段的类型,可以分为主键索引和非主键索引
主键索引又叫 聚簇索引,索引节点 包含了完整的数据记录
非主键索引又叫 稀疏索引,索引节点 只包含了 指向 聚簇索引的地址指针,而不包含数据记录
按照索引的特性不同,又可以分为唯一索引、稀疏索引、文本索引、地理空间索引等
2)索引操作 创建索引 创建索引语法格式
1 db.collection.createIndex(keys, options)
注意:3.0.0 版本前创建索引方法为 db.collection.ensureIndex()
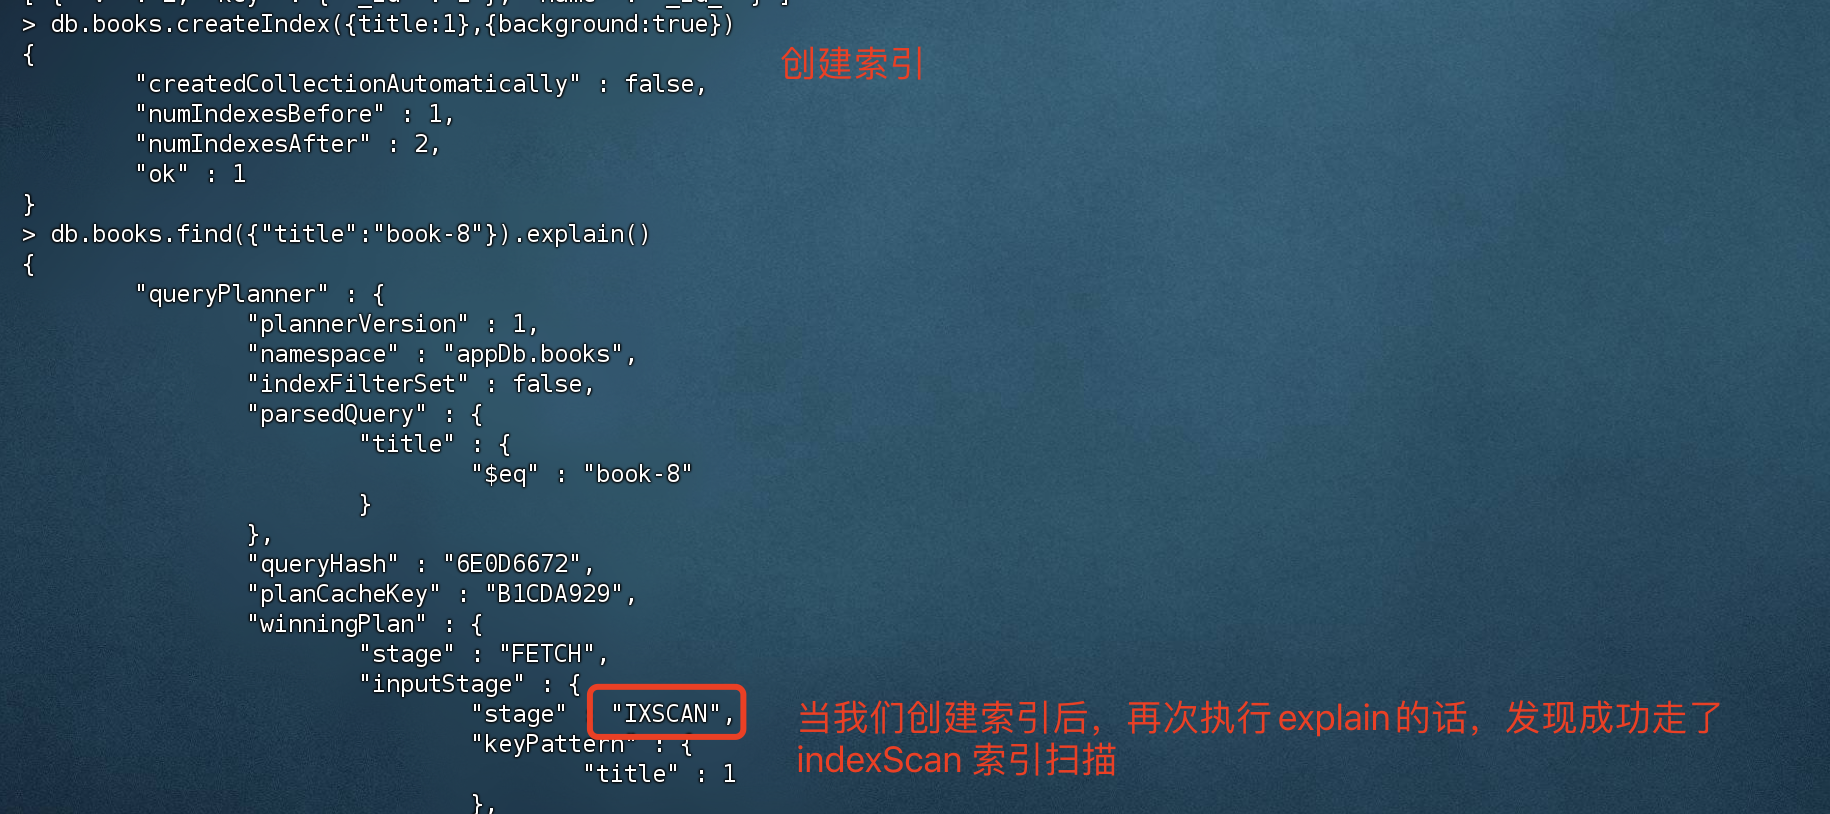
1 2 3 4 5 6 7 8 9 10 11 # 以后台的形式创建索引 > db.books.createIndex({title:1 },{background:true }){ "createdCollectionAutomatically" : false , "numIndexesBefore" : 1 , "numIndexesAfter" : 2 , "ok" : 1 } # 创建唯一索引,注意:如果存在非唯一值,会创建失败 > db.books.createIndex({type:1 },{unique :true })
查看索引 1 2 3 4 5 6 7 8 9 10 11 12 13 14 15 16 17 18 19 20 21 22 23 24 25 26 27 28 29 30 31 32 33 34 35 # 查看所有的索引 > db.books.getIndexes()[ { "v" : 2 , "key" : { "_id" : 1 }, "name" : "_id_" }, { "v" : 2 , "key" : { "title" : 1 }, # 索引名称 "name" : "title_1", "background" : true } ] # 查看索引key值 > db.books.getIndexKeys()[ { "_id" : 1 }, { "title" : 1 } ] # 查看索引占用空间,后面的参数 是可选参数,0 - 显示所有索引占用空间 , 1 - 显示所有索引占用空间 > db.books.totalIndexSize(0 )45056 # 显示所有索引占用空间 > db.books.totalIndexSize(1 )_id_ 24576 title_1 20480 45056
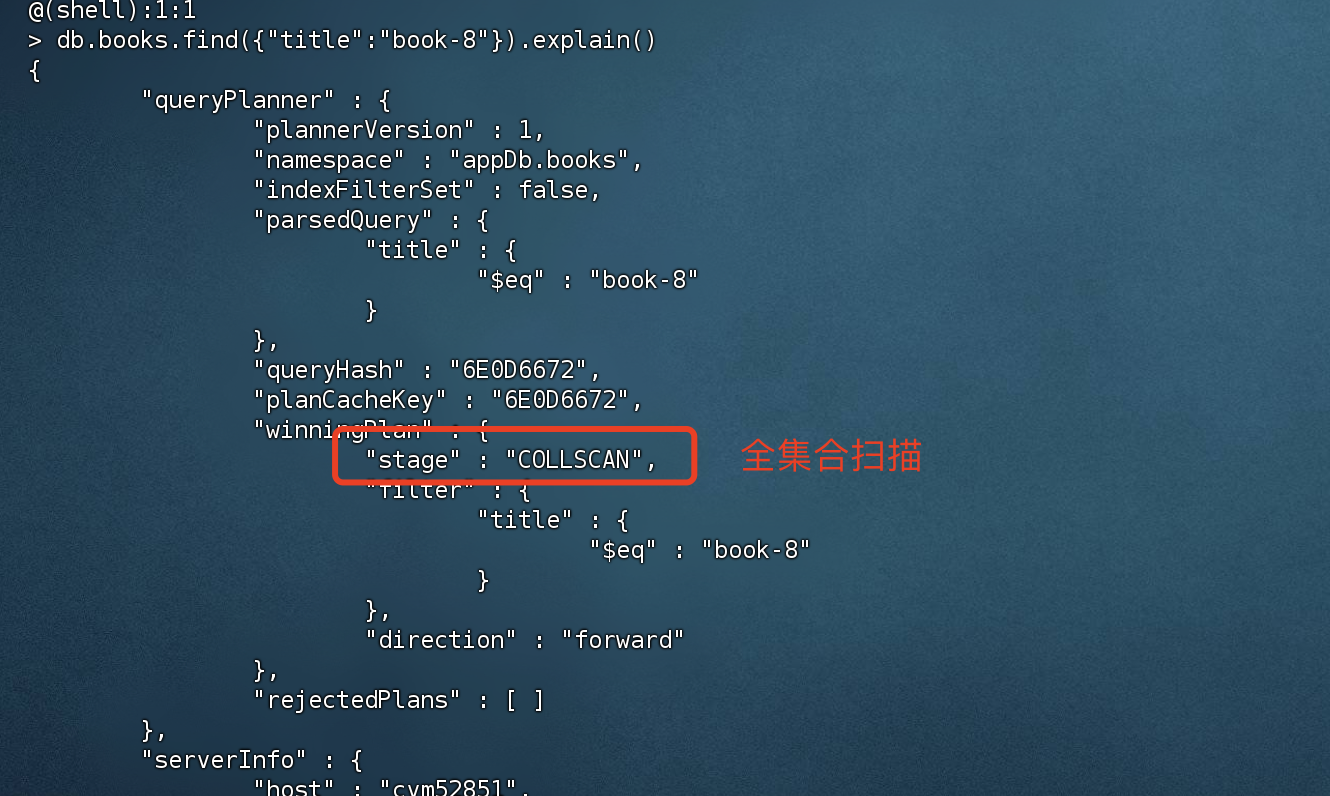
查看索引是否生效
我们可以通过explain() 执行计划去查看是否走了索引。
没有创建索引的话,查询title的话 使用的是全集合扫描。
当创建索引后,执行explain的话,发现成功走了索引扫描。
删除索引 1 2 3 4 5 6 7 8 9 10 11 12 # 删除集合的 指定索引,value 是索引名称 > db.books.dropIndex("title_1"){ "nIndexesWas" : 2 , "ok" : 1 } # 删除集合中的所有索引 > db.books.dropIndexes(){ "nIndexesWas" : 1 , "msg" : "non-_id indexes dropped for collection", "ok" : 1 }
注意:删除指定索引时,指定的value 是索引对应的名称(name)
3)索引类型 单键索引 顾名思义,为单个字段创建的索引就是 单键索引。
1 2 3 4 5 6 7 8 # 以后台的形式创建索引 > db.books.createIndex({title:1 },{background:true }){ "createdCollectionAutomatically" : false , "numIndexesBefore" : 1 , "numIndexesAfter" : 2 , "ok" : 1 }
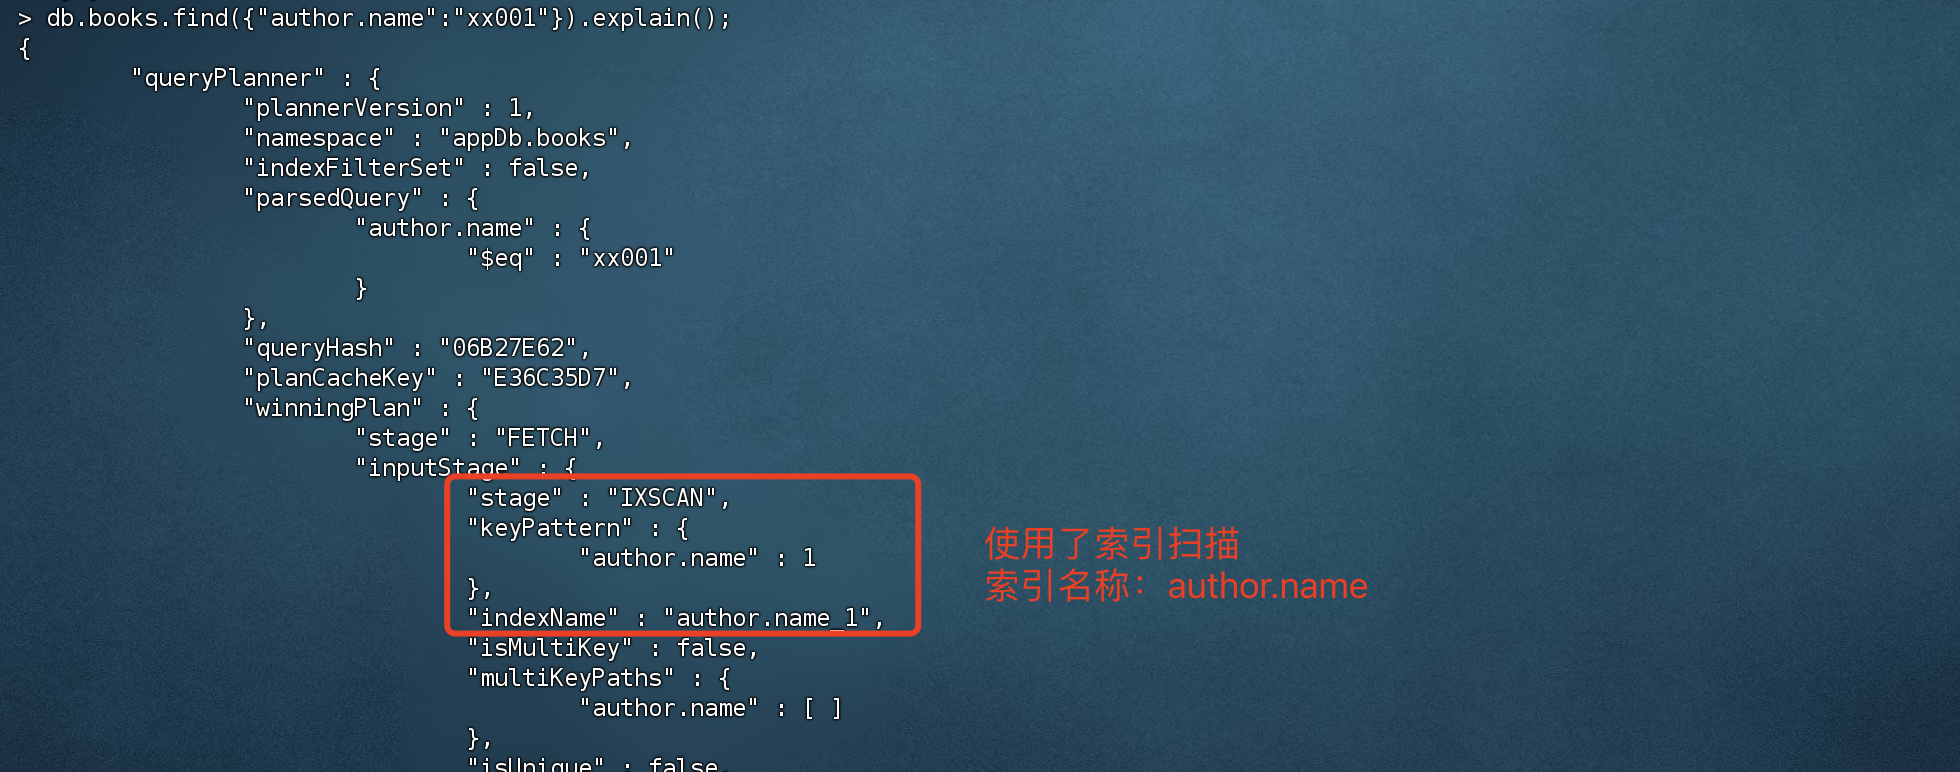
对内嵌文档字段 创建索引
1 2 3 4 5 6 7 > db.books.createIndex({"author.name":1 },{background:true }){ "createdCollectionAutomatically" : false , "numIndexesBefore" : 2 , "numIndexesAfter" : 3 , "ok" : 1 }
使用任务计划查询看看是否使用了索引
复合索引(联合索引) 复合索引是多个字段组合而成的索引,可以参考MySQL的复合索引。查询的时候要遵循 最左匹配原则,因为创建索时 是按最左的字段排序的,如果不遵循最左原则的话,会无法走索引。
创建索引
1 2 # 创建复合索引,type和favCount 都以升序排序 > db.books.createIndex({type:1 ,favCount:1 })
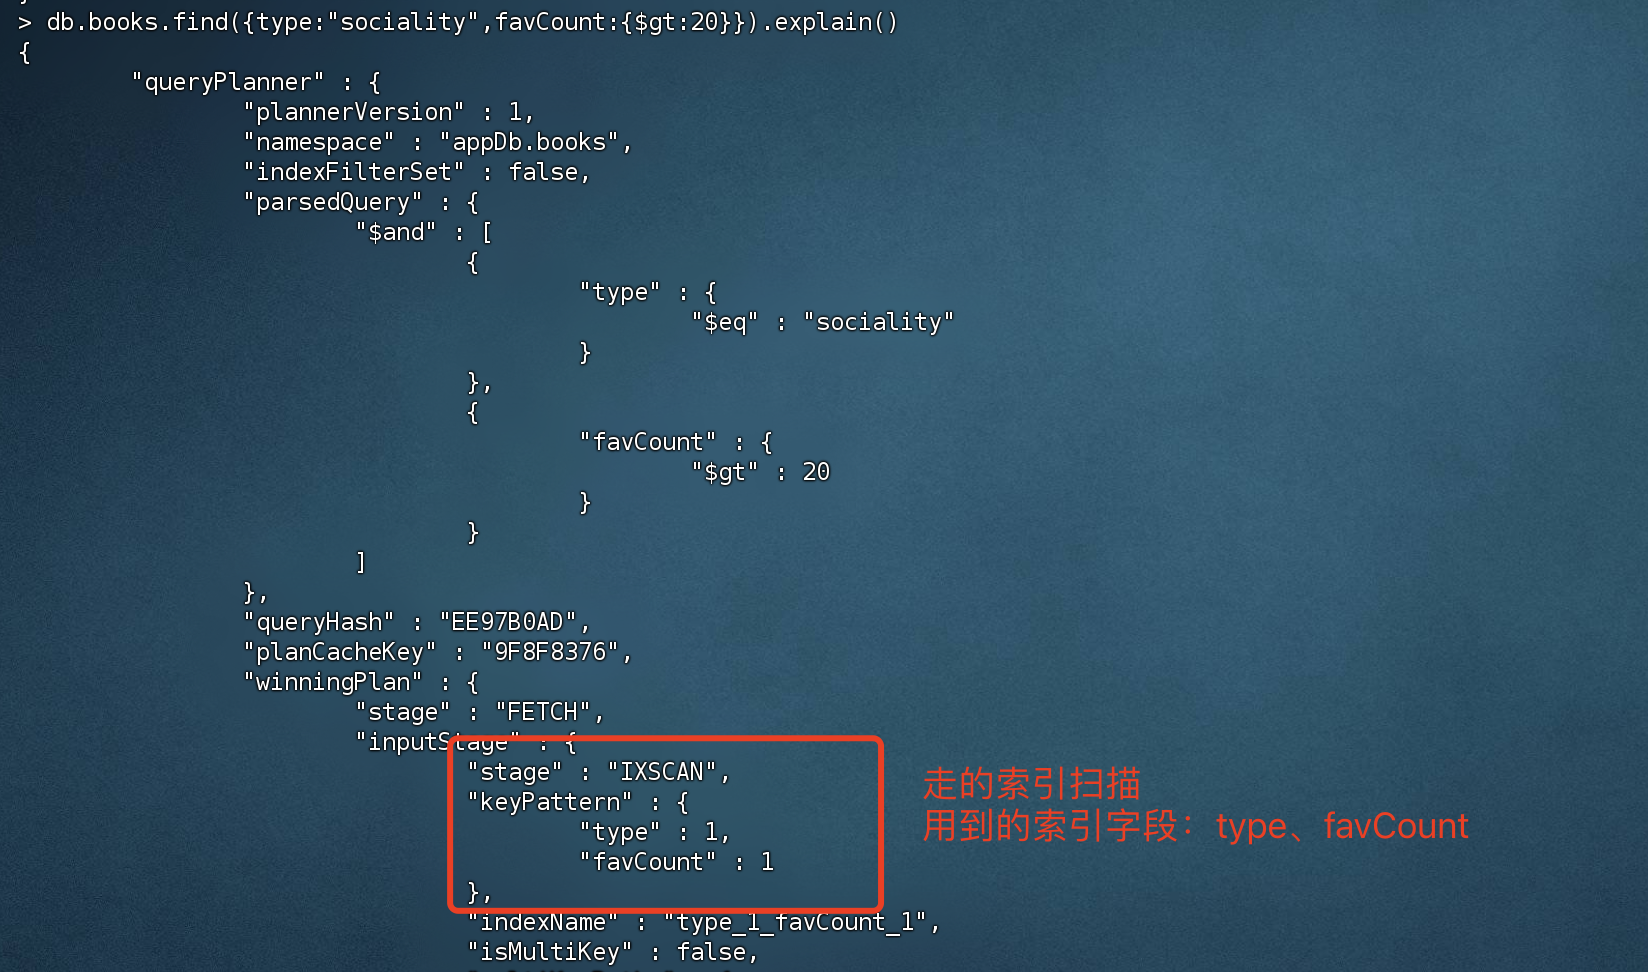
最左原则查询
1 2 3 # 符合最左匹配原则查询 > db.books.find({type:"sociality",favCount:{$gt:20 }}).explain()
不符合最左匹配查询
1 2 # 不符合最左匹配查询,直接跳过最左侧的 type字段 > db.books.find({favCount:{$gt:20 }}).explain()
创建联合索引顺序:type,favCount,而查询的时候 直接跳过了 type,自然无法走索引
多键索引(Multikey Index) 在数组的属性上建立索引
准备数据
1 2 3 4 5 6 7 8 9 10 # 批量插入多条测试数据 db.inventory.insertMany([ { _id: 5 , type: "food", item: "aaa", ratings: [ 5 , 8 , 9 ] }, { _id: 6 , type: "food", item: "bbb", ratings: [ 5 , 9 ] }, { _id: 7 , type: "food", item: "ccc", ratings: [ 9 , 5 , 8 ] }, { _id: 8 , type: "food", item: "ddd", ratings: [ 9 , 5 ] }, { _id: 9 , type: "food", item: "eee", ratings: [ 5 , 9 , 5 ] } ]) { "acknowledged" : true , "insertedIds" : [ 5 , 6 , 7 , 8 , 9 ] }
创建多键索引
1 2 3 4 5 6 7 8 # 创建多键索引 > db.inventory.createIndex({ratings:1 }){ "createdCollectionAutomatically" : false , "numIndexesBefore" : 1 , "numIndexesAfter" : 2 , "ok" : 1 }
注意:多键索引并非复合索引,不要混淆概念。符合索引是联合多个字段创建的,而多键索引 是在数组的属性上创建索引。
创建 复合索引(含多键索引)
1 2 3 4 5 6 7 8 # 创建复合索引的话,复合索引只能允许存在一个 多键索引 > db.inventory.createIndex({item:1 ,ratings:1 }){ "createdCollectionAutomatically" : false , "numIndexesBefore" : 2 , "numIndexesAfter" : 3 , "ok" : 1 }
注意:复合索引只能允许存在一个 多键索引。
嵌入文档的索引数组
准备数据
1 2 3 4 5 6 7 8 9 10 11 12 13 14 15 16 17 18 19 20 21 22 23 24 25 26 27 28 29 30 31 # 批量插入多条嵌套数组的数据 db.inventory.insertMany([ { _id: 1 , item: "abc", stock: [ { size: "S", color: "red", quantity: 25 }, { size: "S", color: "blue", quantity: 10 }, { size: "M", color: "blue", quantity: 50 } ] }, { _id: 2 , item: "def", stock: [ { size: "S", color: "blue", quantity: 20 }, { size: "M", color: "blue", quantity: 5 }, { size: "M", color: "black", quantity: 10 }, { size: "L", color: "red", quantity: 2 } ] }, { _id: 3 , item: "ijk", stock: [ { size: "M", color: "blue", quantity: 15 }, { size: "L", color: "blue", quantity: 100 }, { size: "L", color: "red", quantity: 25 } ] } ])
在嵌套数组上 创建 多键索引
1 2 3 4 5 6 7 8 # 在嵌套数组上 创建 多键索引 > db.inventory.createIndex( { "stock.size": 1 , "stock.quantity": 1 } ){ "createdCollectionAutomatically" : false , "numIndexesBefore" : 3 , "numIndexesAfter" : 4 , "ok" : 1 }
1 2 # 查询 inventory集合,条件:stock.size = S 并且 quantity 大于25 > db.inventory.find({"stock.size":"S","stock.quantity":{$gt:25 }})
地理空间索引(Geospatial Index) 在互联网中,地理空间检索是非常常用的,而MongoDB地理空间索引(2dsphereindex)就是专门用于实现位置检索的一种特殊索引。
如何实现查询 附近商家 1 2 3 4 5 6 7 8 9 # 插入商家和定位信息 db.restaurant.insert({ restaurantId: 0 , restaurantName:"兰州牛肉面", location : { type: "Point", coordinates: [ -73.97 , 40.77 ] } })
创建一个地理空间索引 - 2d
1 2 3 4 5 6 7 8 # 创建 地里空间索引,字段 location ,类型2 dsphere(地理空间索引) > db.restaurant.createIndex({location : "2dsphere"}){ "createdCollectionAutomatically" : false , "numIndexesBefore" : 1 , "numIndexesAfter" : 2 , "ok" : 1 }
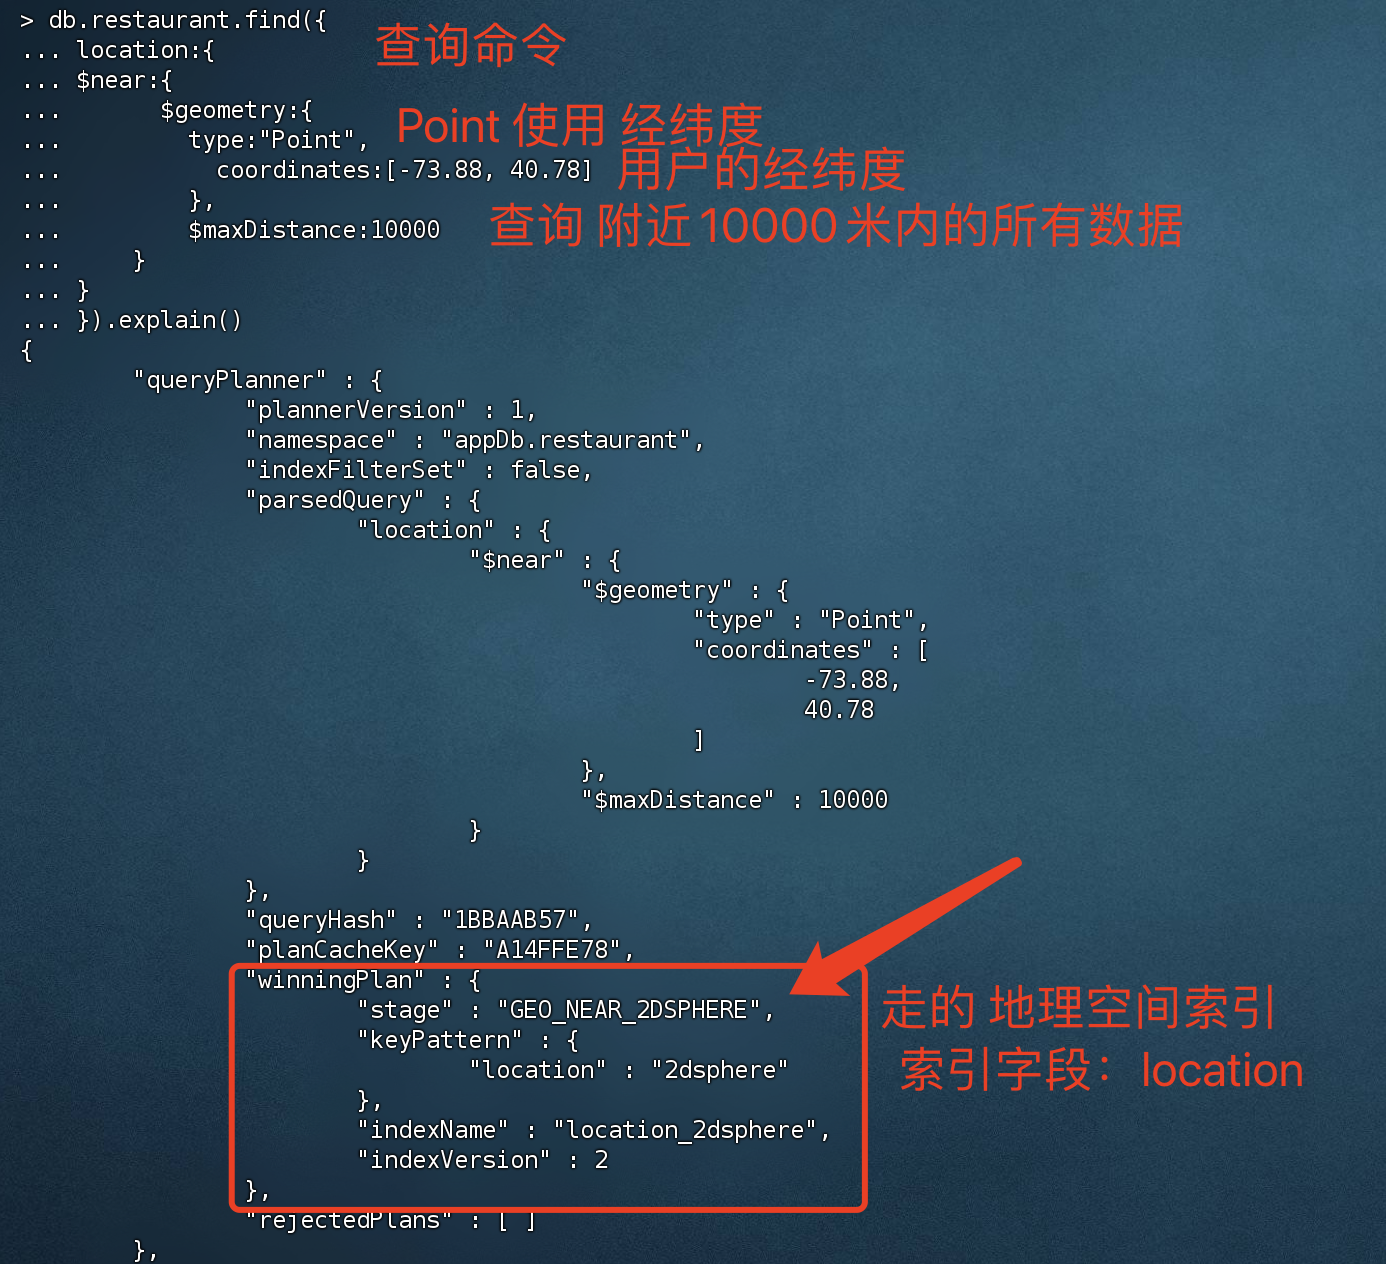
根据经纬度 查询附近10000米的商家信息
1 2 3 4 5 6 7 8 9 10 11 12 13 14 db.restaurant.find({ location:{ $near:{ $geometry:{ type:"Point", coordinates:[-73.88 , 40.78 ] }, $maxDistance:10000 } } }) # 查询结果 { "_id" : ObjectId("659caea6e268f34c178d2071"), "restaurantId" : 0 , "restaurantName" : "兰州牛肉面", "location" : { "type" : "Point", "coordinates" : [ -73.97 , 40.77 ] } }
全文索引(Text Indexes) MongoDB支持简易的分词检索,且官方仅支持英文检索,不支持中文分词。如果项目中需要用到中文分词,建议还是使用elasticsearch
注意:一个集合只能创建一个 全文索引
准备数据
1 2 3 4 5 6 7 8 9 10 11 12 13 14 15 16 17 18 19 20 21 22 db.stores.insert( [ { _id: 1 , name: "Java Hut", description: "Coffee and cakes" }, { _id: 2 , name: "Burger Buns", description: "Gourmet hamburgers" }, { _id: 3 , name: "Coffee Shop", description: "Just coffee" }, { _id: 4 , name: "Clothes Clothes Clothes", description: "Discount clothing" }, { _id: 5 , name: "Java Shopping", description: "Indonesian goods" } ] ) # 插入成功 BulkWriteResult({ "writeErrors" : [ ], "writeConcernErrors" : [ ], "nInserted" : 5 , "nUpserted" : 0 , "nMatched" : 0 , "nModified" : 0 , "nRemoved" : 0 , "upserted" : [ ] })
创建复合索引 - 全文索引
1 2 3 4 5 6 7 8 # 创建复合 全文检索索引,key 是字段名,value 是固定格式text,代表是全文索引 > db.stores.createIndex({name:"text",description:"text"}){ "createdCollectionAutomatically" : false , "numIndexesBefore" : 1 , "numIndexesAfter" : 2 , "ok" : 1 }
1、key 是要创建索引的字段名,value 是固定格式text,代表是全文索引
2、创建了全文索引后,会根据字段名进行分词 进行倒排索引排序,后续使用$text查询时 会直接从索引树里面查找
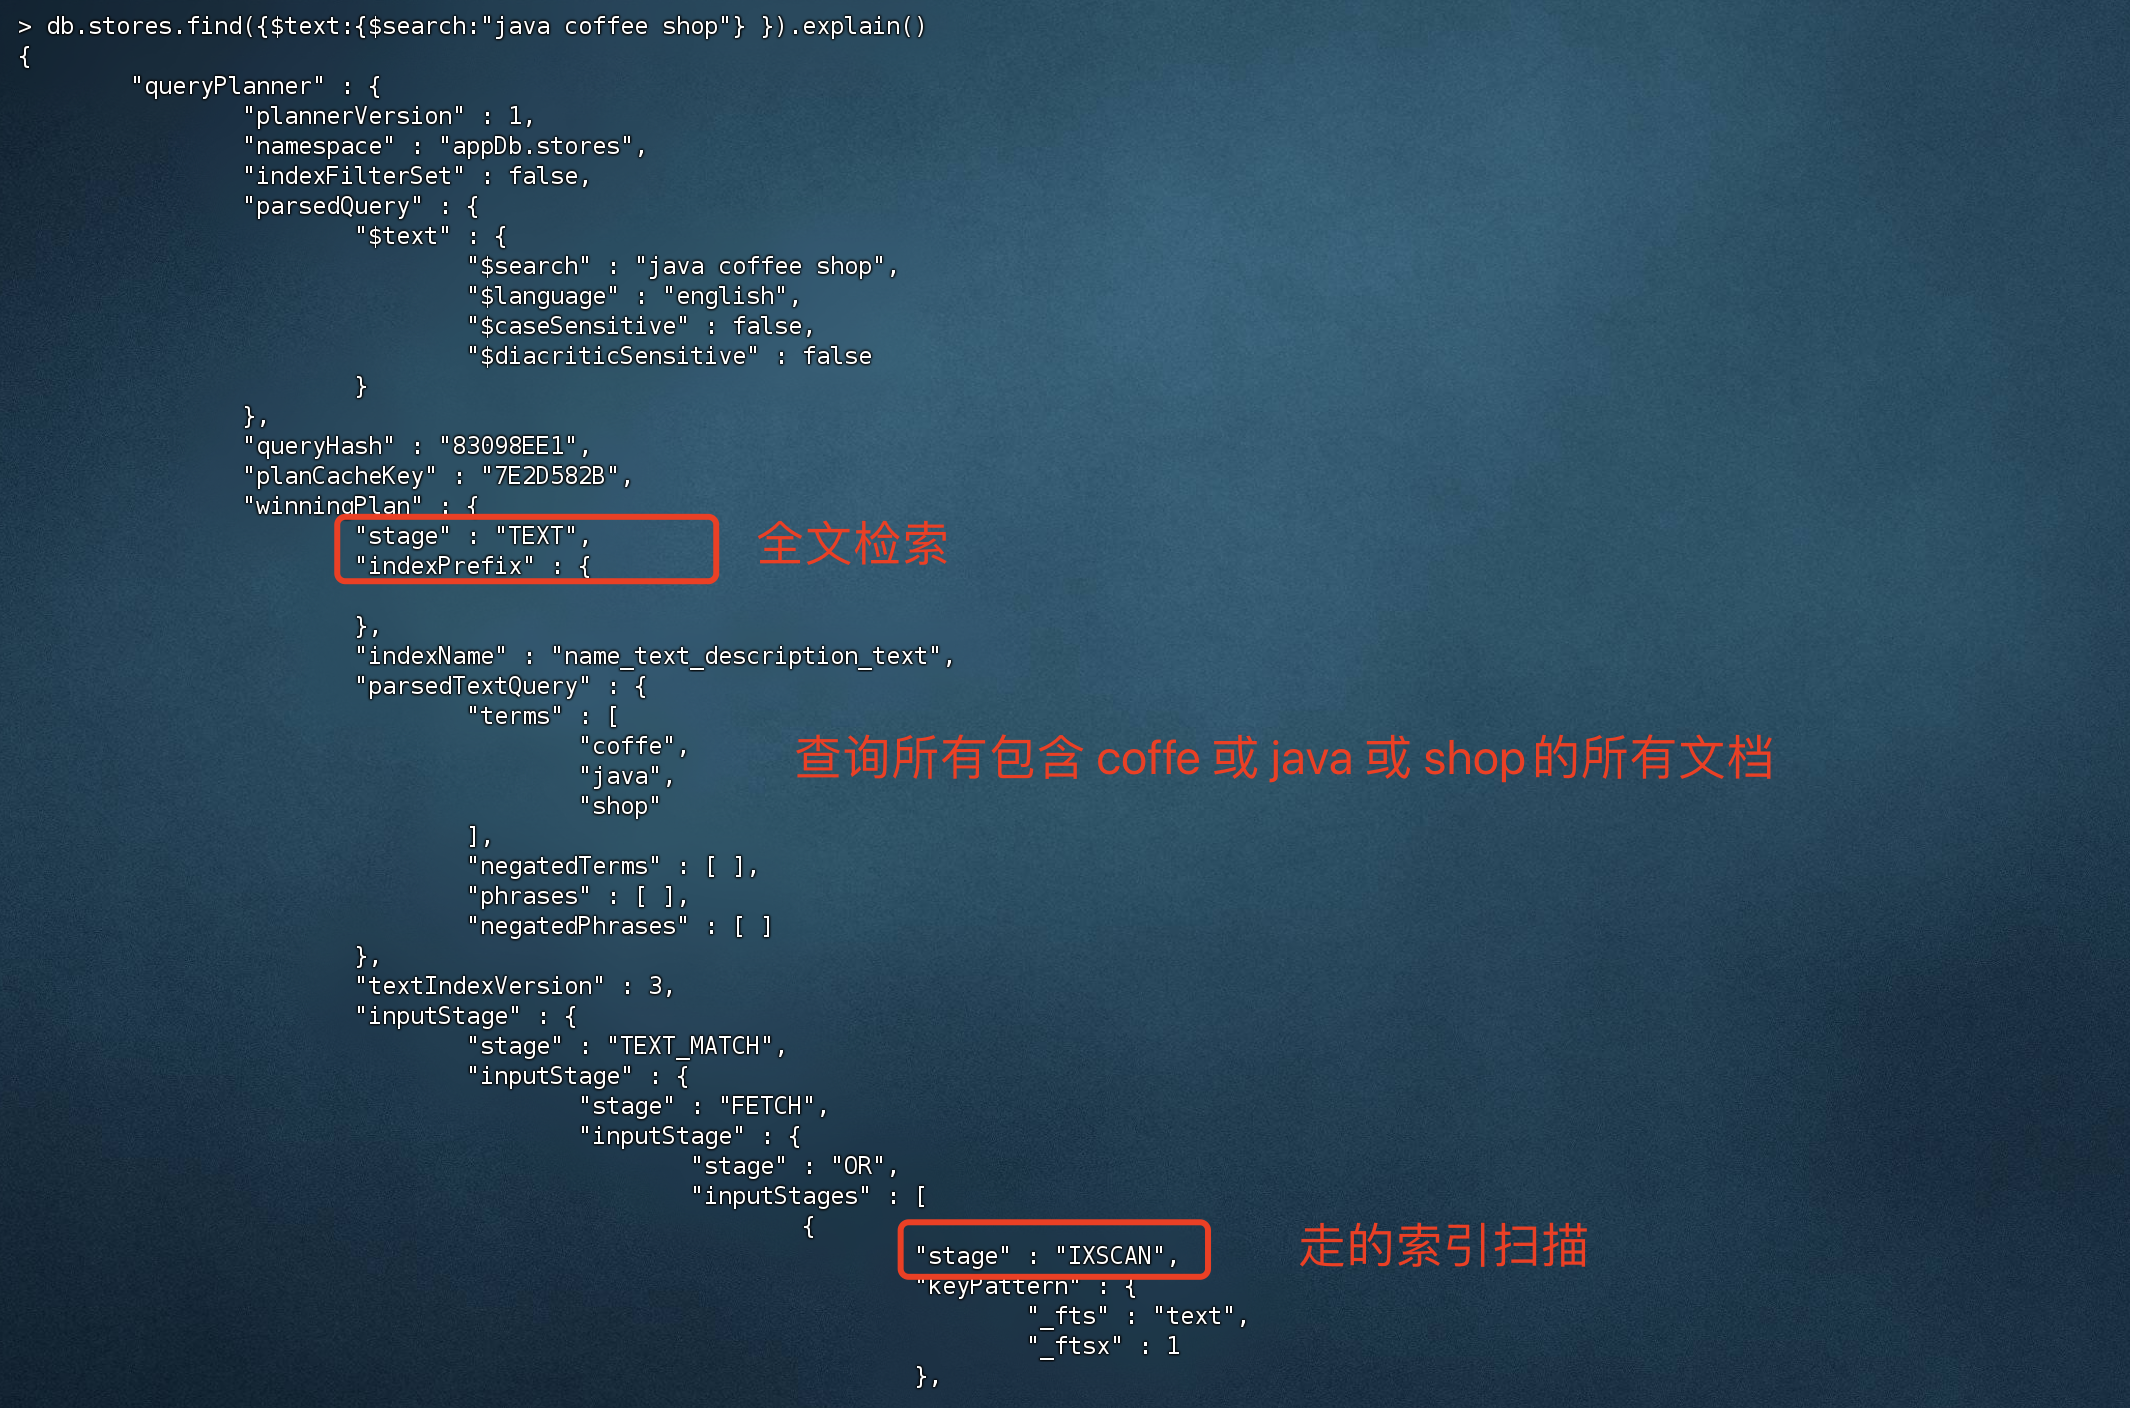
通过$text操作符 查询数据中包含 “java”、”coffee”、”shop”的文档
1 2 3 4 5 6 7 # $text 全文检索操作符,查询的关键字用空格隔开,之间的关系是 or ,查询包含 java or coffe or shop的文档 > db.stores.find({$text:{$search :"java coffee shop"} })# 查询结果 { "_id" : 3 , "name" : "Coffee Shop", "description" : "Just coffee" } { "_id" : 1 , "name" : "Java Hut", "description" : "Coffee and cakes" } { "_id" : 5 , "name" : "Java Shopping", "description" : "Indonesian goods" }
$text 全文检索操作符,关键字用空格隔开,之间的关系是 or,查询包含 java 或 coffe 或 shop的文档
由于创建是复合索引,关键字会在 name和description 里面进行查询
通过执行计划可以看出,成功走了索引
Hash索引(Hashed Indexes) 哈希索引只支持精确匹配,不支持范围查询。如果确定该索引只用于 等值查询,可以创建哈希索引来提升查询效率。
1 > db.users.createIndex({username : 'hashed' })
通配符索引(Wildcard Indexes) 由于MongoDB文档可以动态改变,存在一些不可预知的字段结构,为了提高这部分字段的查询速度,可以为其创建 通配符索引。
插入准备数据
1 2 3 4 5 6 7 8 9 10 11 12 13 14 15 16 17 18 19 20 21 22 23 24 25 26 27 28 29 30 31 32 33 34 35 36 37 38 db.products.insert([ { "product_name" : "Spy Coat", "product_attributes" : { "material" : [ "Tweed", "Wool", "Leather" ], "size" : { "length" : 72 , "units" : "inches" } } }, { "product_name" : "Spy Pen", "product_attributes" : { "colors" : [ "Blue", "Black" ], "secret_feature" : { "name" : "laser", "power" : "1000", "units" : "watts", } } }, { "product_name" : "Spy Book" } ]) # 插入结果 BulkWriteResult({ "writeErrors" : [ ], "writeConcernErrors" : [ ], "nInserted" : 3 , "nUpserted" : 0 , "nMatched" : 0 , "nModified" : 0 , "nRemoved" : 0 , "upserted" : [ ] })
创建通配符索引
1 2 3 4 5 6 7 8 # 规格参数,规格参数是动态可变的,所以我们为其创建通配符 product_attributes.$* * 代表这个字段后面的字段都会被匹配到 > db.products.createIndex( { "product_attributes.$**" : 1 } ){ "createdCollectionAutomatically" : false , "numIndexesBefore" : 1 , "numIndexesAfter" : 2 , "ok" : 1 }
product_attributes.$**:代表这个字段后面的字段都会被匹配到
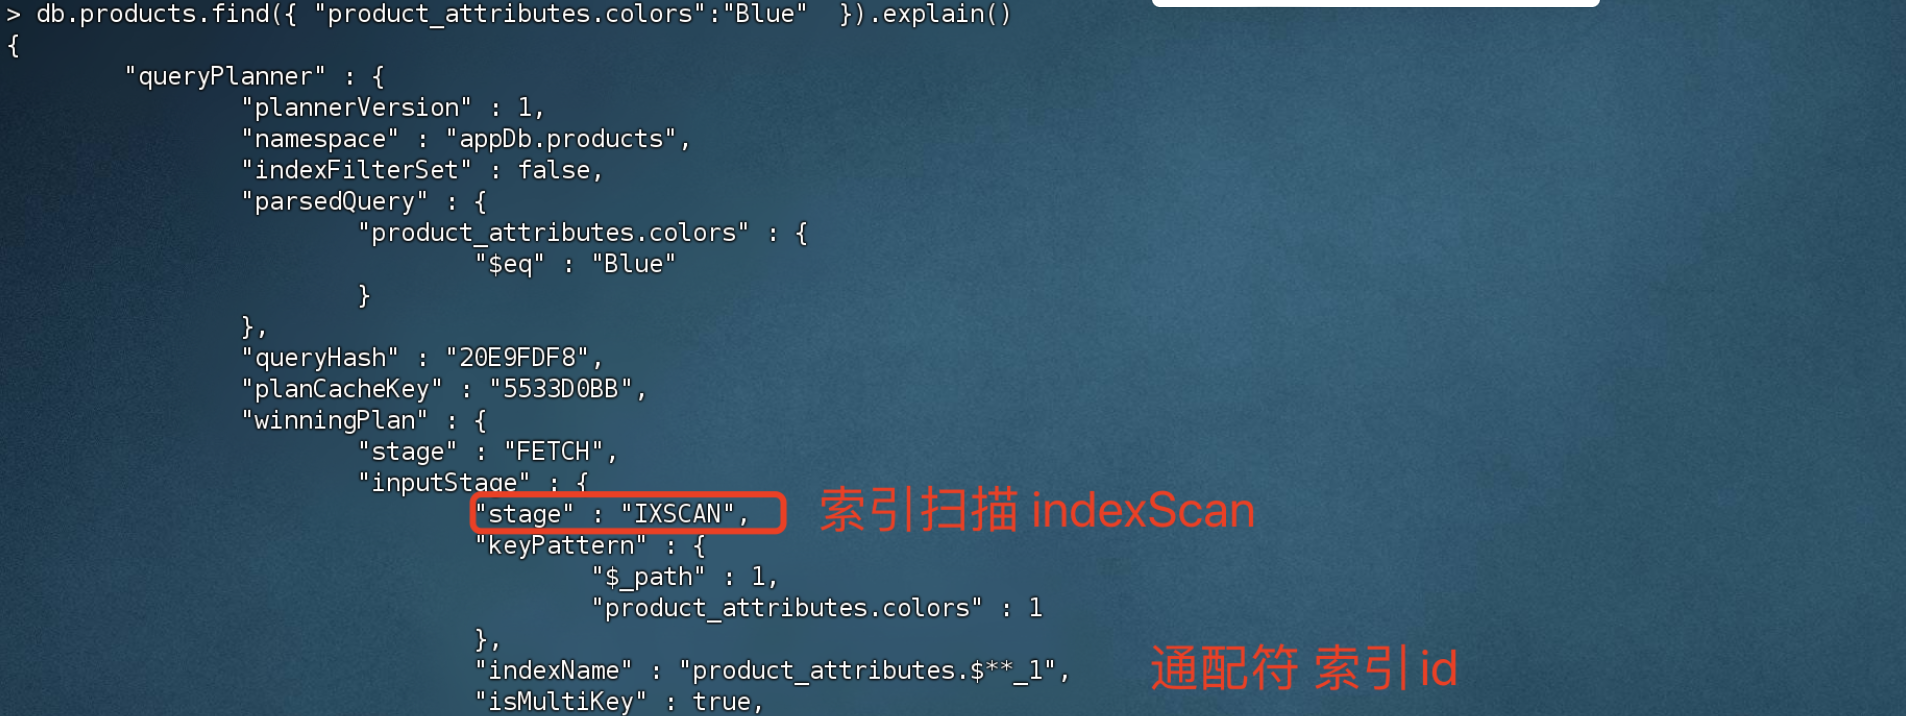
通过匹配符索引 查询 length大于50的数据
1 2 3 4 5 # 查询length 大于50 的数据,由于是product_attributes字段下的,会被通配符索引匹配到 > db.products.find({"product_attributes.size.length":{$gt:50 } })# 查询结果 { "_id" : ObjectId("659ccf6152ef6967235d5313"), "product_name" : "Spy Coat", "product_attributes" : { "material" : [ "Tweed", "Wool", "Leather" ], "size" : { "length" : 72 , "units" : "inches" } } }
通过匹配符索引 查询 material = Tweed 的数据
1 2 3 4 > db.products.find({"product_attributes.material": "Tweed" })# 查询结果 { "_id" : ObjectId("659ccf6152ef6967235d5313"), "product_name" : "Spy Coat", "product_attributes" : { "material" : [ "Tweed", "Wool", "Leather" ], "size" : { "length" : 72 , "units" : "inches" } } }
通过匹配符索引 查询 size.units = inches 的数据
1 2 3 4 > db.products.find({"product_attributes.size.units": "inches" })# 查询结果 { "_id" : ObjectId("659ccf6152ef6967235d5313"), "product_name" : "Spy Coat", "product_attributes" : { "material" : [ "Tweed", "Wool", "Leather" ], "size" : { "length" : 72 , "units" : "inches" } } }
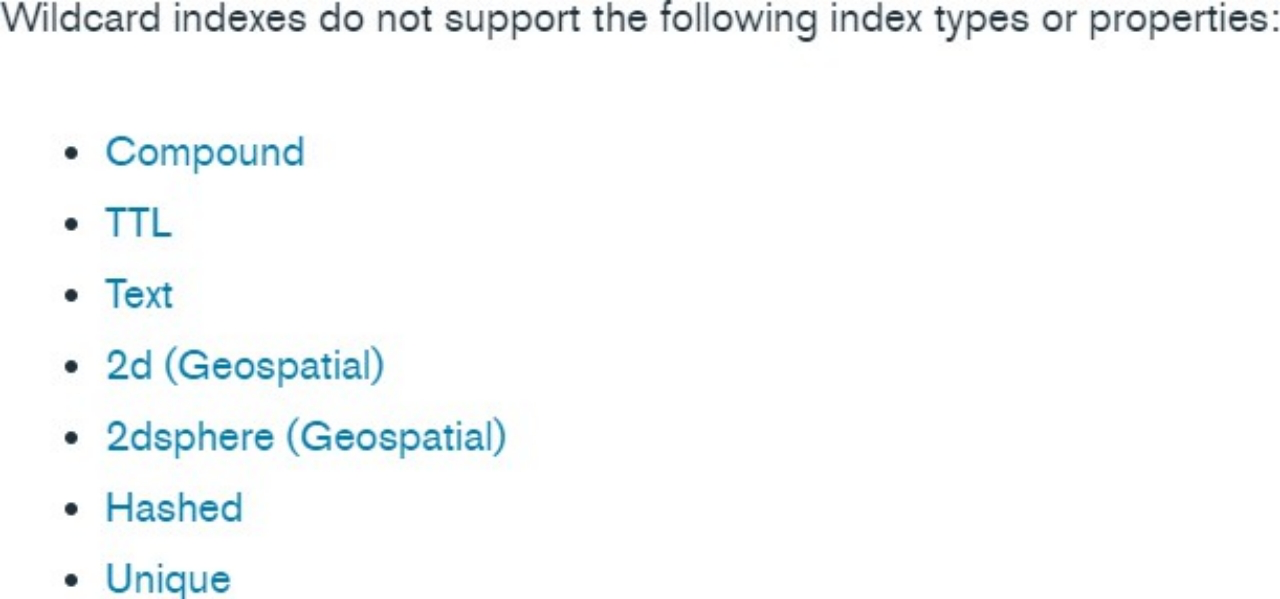
使用通配符索引注意事项
通配符索引不兼容 以下索引,无法与他们一起创建复合索引
通配符索引属于稀疏索引,无法索引空字段
通配符索引是为文档或数组 内容本身生成的索引
4)索引属性 唯一索引(Unique Indexes) 在生产环境中,重复的脏数据必然带来一定的麻烦,为此对于一些要求 唯一的字段,如 订单号,用户名等 可以给他设置成 唯一索引,确保该字段在集合中是唯一的。
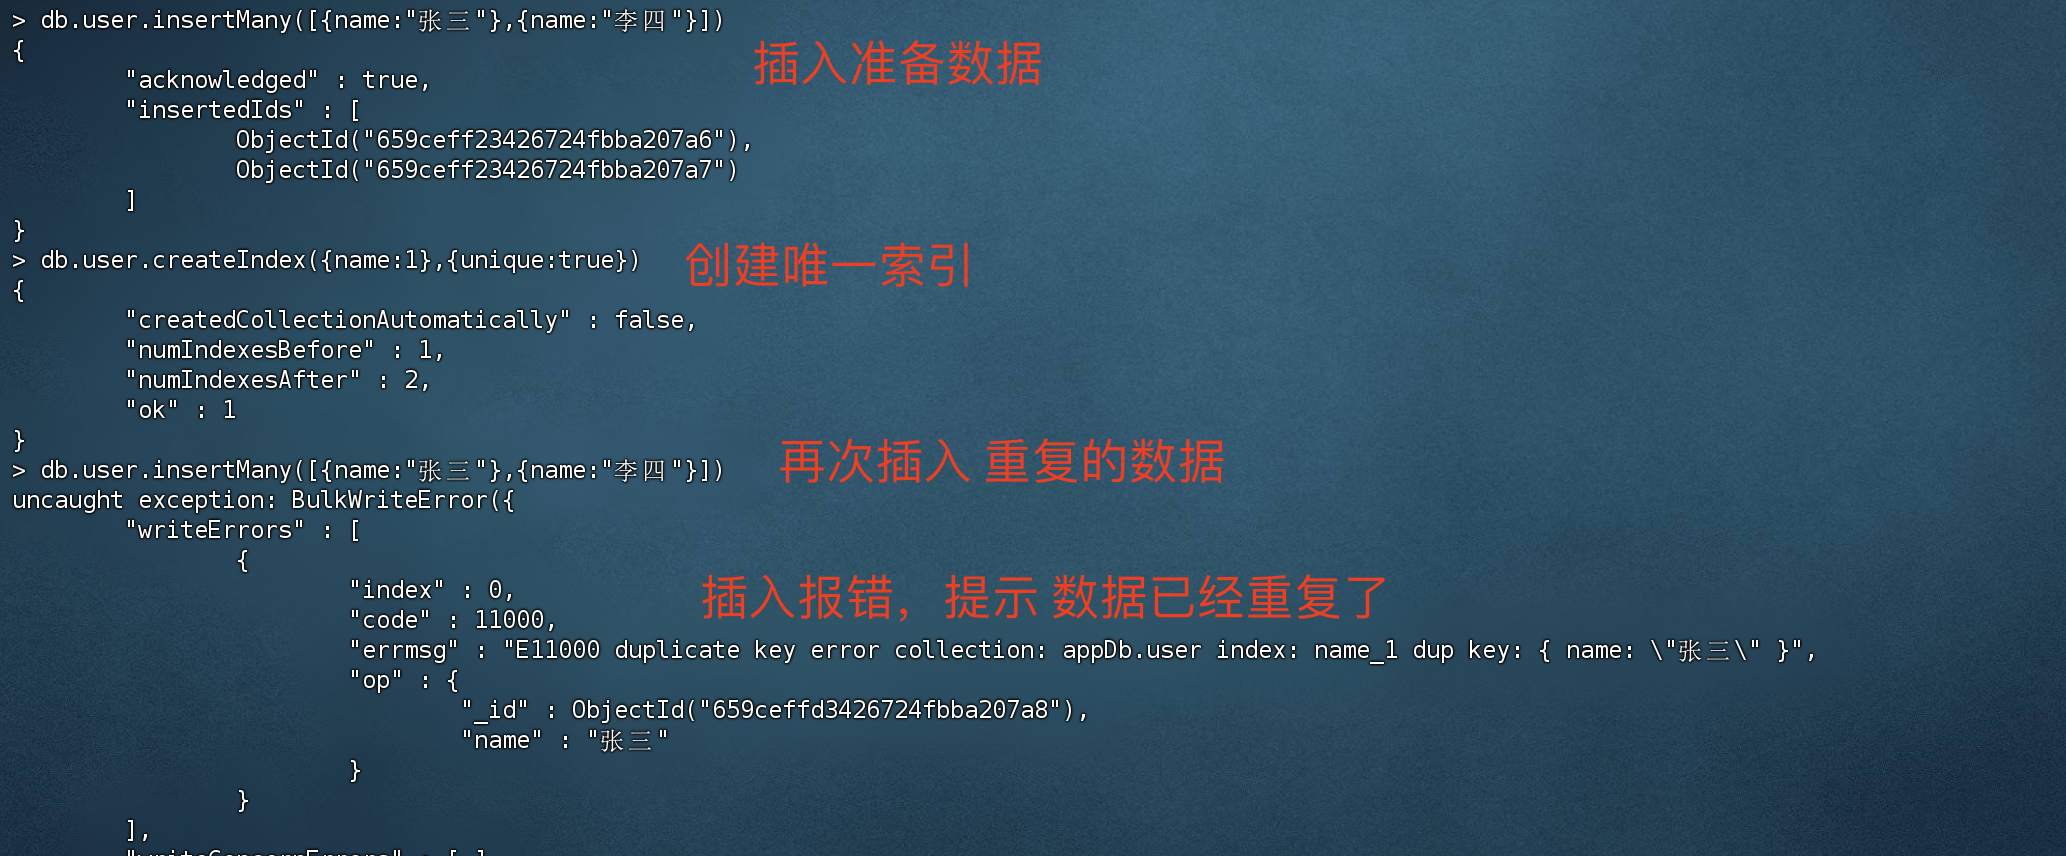
插入准备数据
1 2 3 4 5 6 7 8 > db.user.insertMany([{name:"张三"},{name:"李四"}]){ "acknowledged" : true , "insertedIds" : [ ObjectId("659ceff23426724fbba207a6"), ObjectId("659ceff23426724fbba207a7") ] }
创建唯一索引
1 2 3 4 5 6 7 8 # 创建唯一索引的属性是 unique :true > db.user.createIndex({name:1 },{unique :true }){ "createdCollectionAutomatically" : false , "numIndexesBefore" : 1 , "numIndexesAfter" : 2 , "ok" : 1 }
再次插入 重复的数据
创建复合唯一索引
1 2 3 4 5 6 7 8 9 10 11 12 13 14 15 16 17 18 # 准备数据 > db.user.insertMany([{name:"王五",age:23 ,interest:["basketball","computer"]}]){ "acknowledged" : true , "insertedIds" : [ ObjectId("659cf3223426724fbba207ab") ] } # 创建唯一索引的属性是 unique :true > db.user.createIndex({name:1 ,age:20 },{unique :true }){ "createdCollectionAutomatically" : false , "numIndexesBefore" : 2 , "numIndexesAfter" : 3 , "ok" : 1 }
部分索引(Partial Indexes) 创建索引:创建部分索引时,会根据 匹配条件进行匹配,只有满足条件的数据才会建立索引。
使用索引查询:使用部分索引查询,只有满足 创建索引时的匹配条件的情况下才会走 部分索引
好处:节省索引树空间和硬盘存储空间,具有更低的创建索引和维护索引成本。
创建部分索引 1 2 3 4 5 6 7 8 9 10 11 12 > db.user.createIndex( { name:1 }, { partialFilterExpression: { age: { $gt: 5 } } } ) # 创建结果 { "createdCollectionAutomatically" : false , "numIndexesBefore" : 1 , "numIndexesAfter" : 2 , "ok" : 1 }
partialFilterExpression选项接受指定过滤条件:
等式表达式(例如:field: value或使用$eq操作符)
$exists: true
$gt, $gte, $lt , $lte
$type
顶层的$and
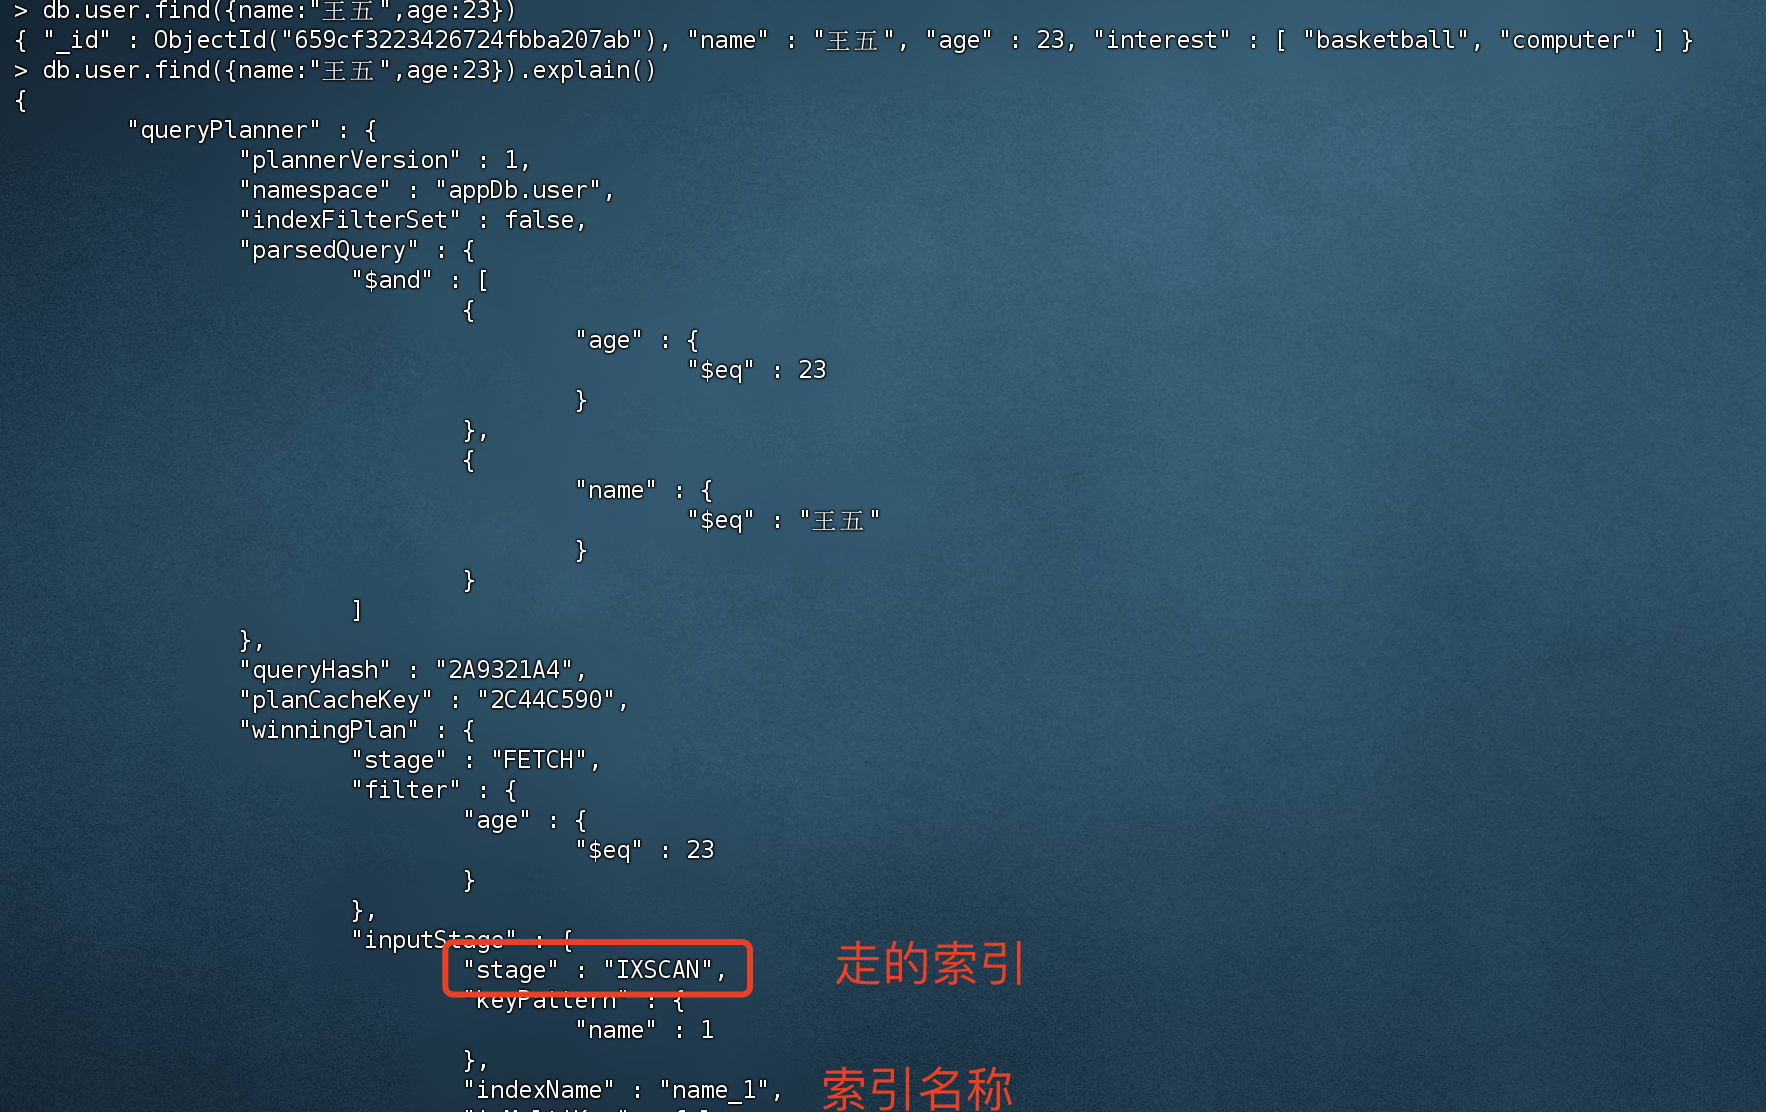
查询的时候使用部分索引
1 2 3 4 > db.user.find({name:"王五",age:23 })# 查询结果 { "_id" : ObjectId("659cf3223426724fbba207ab"), "name" : "王五", "age" : 23 , "interest" : [ "basketball", "computer" ] }
在查询的时候,如果想使用部分索引的话,必须满足 创建索引时匹配条件
不满足匹配条件无法使用部分索引
1 > db.user.find({name:"王五",age:1 })
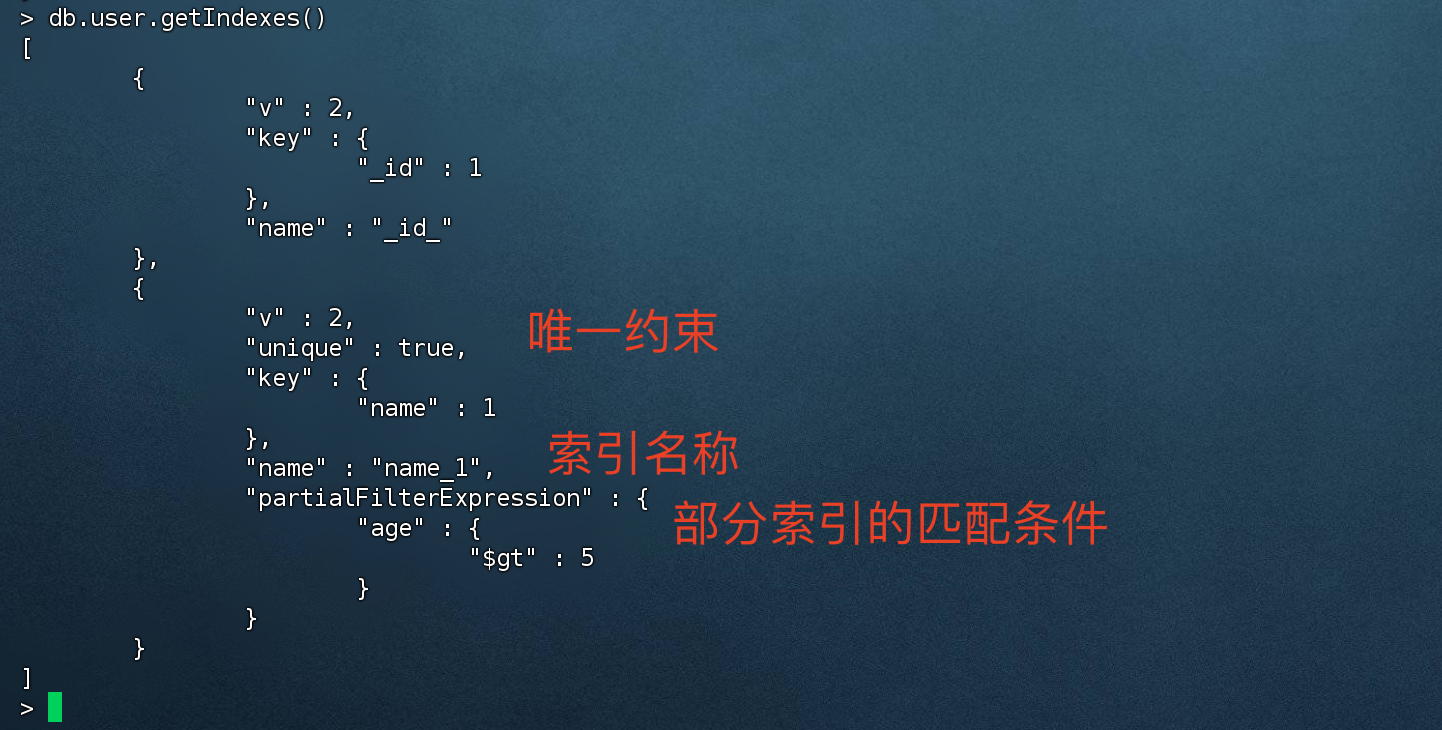
唯一索引结合部分索引 导致唯一索引失效 注意:当我们创建部分索引时,同时还指定唯一索引的话,只有匹配条件的文档才会触发唯一约束,不满足的话不会触发唯一约束。
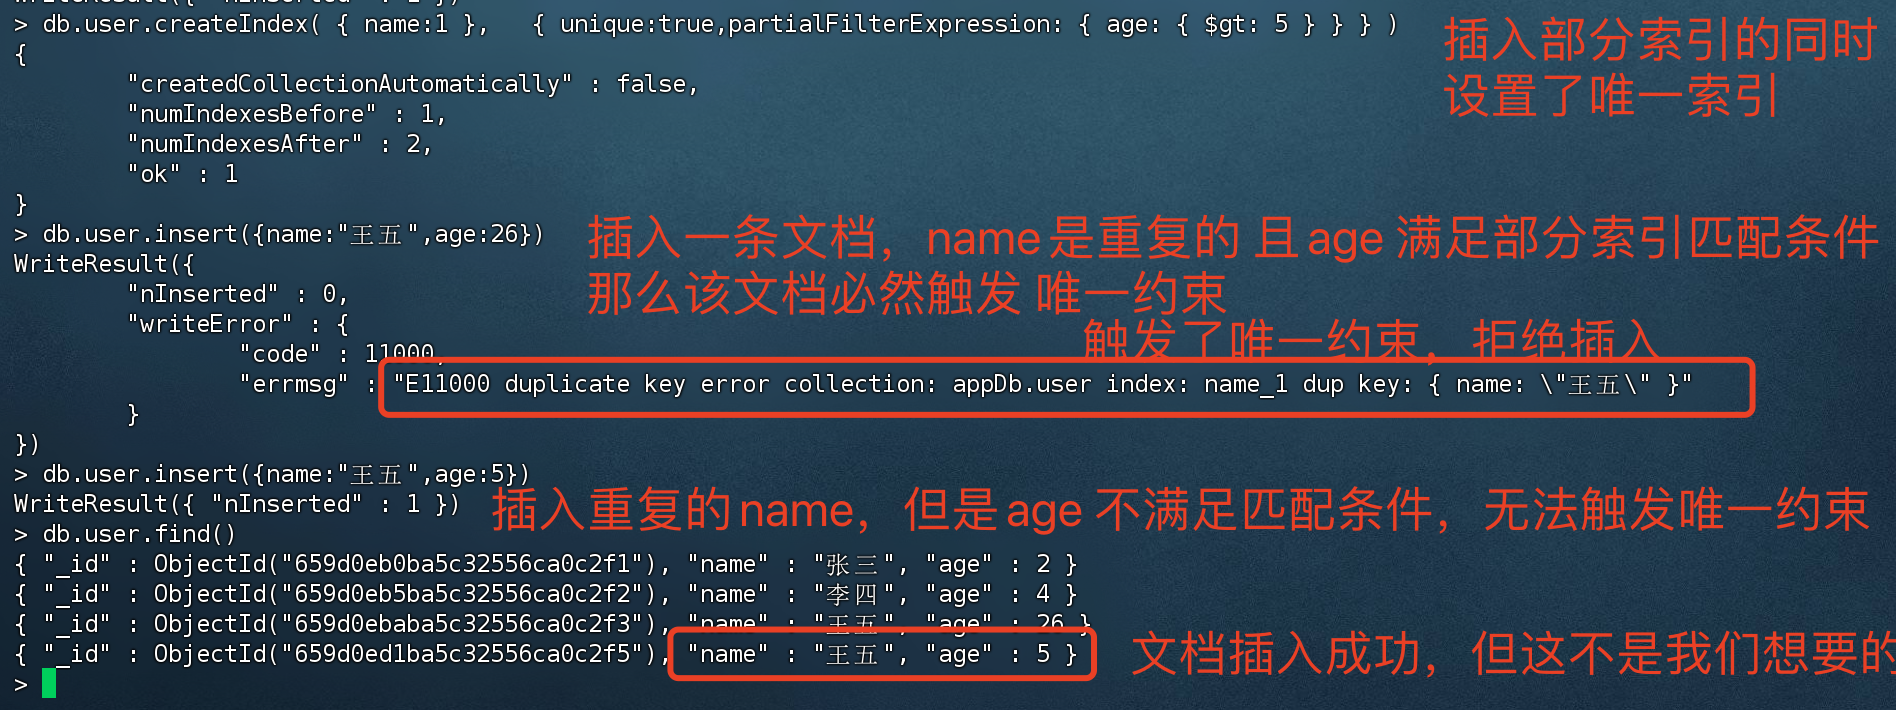
1 2 3 4 5 6 7 8 9 10 11 12 > db.user.createIndex( { name:1 }, { unique :true ,partialFilterExpression: { age: { $gt: 5 } } } ) # 创建结果 { "createdCollectionAutomatically" : false , "numIndexesBefore" : 1 , "numIndexesAfter" : 2 , "ok" : 1 }
查询当前user数据库的所有数据
1 2 3 4 5 6 > db.user.find()# 只有三条文档,张三、李四、王五 { "_id" : ObjectId("659d0eb0ba5c32556ca0c2f1"), "name" : "张三", "age" : 2 } { "_id" : ObjectId("659d0eb5ba5c32556ca0c2f2"), "name" : "李四", "age" : 4 } { "_id" : ObjectId("659d0ebaba5c32556ca0c2f3"), "name" : "王五", "age" : 26 }
插入重复名称的数据
此时我们插入重复name的数据,并且age 匹配条件 小于5,该age 匹配条件匹配不到 创建部分索引的条件,无法触发 唯一约束。
插入重复name,age 满足了 部分索引创建时的匹配条件,所以会触发 唯一约束
插入重复name,age 不满足 匹配条件,则无法触发唯一约束,意外的插入了数据,这不是我们想要的结果
稀疏索引(Sparse Indexes) 稀疏索引,只会对存在的字段创建索引
使用稀疏索引进行查询时,可能会丢失部分数据,因为只对存在的字段创建索引。
如果使用稀疏索引会导致查询和排序 结果集不完整,mongoDB默认不会使用该索引
查询现有数据
1 2 3 4 5 6 > db.user.find(){ "_id" : ObjectId("659d0eb0ba5c32556ca0c2f1"), "name" : "张三", "age" : 2 } { "_id" : ObjectId("659d0eb5ba5c32556ca0c2f2"), "name" : "李四", "age" : 4 } { "_id" : ObjectId("659d0ebaba5c32556ca0c2f3"), "name" : "王五", "age" : 26 } { "_id" : ObjectId("659d0ed1ba5c32556ca0c2f5"), "name" : "王五", "age" : 5 } { "_id" : ObjectId("659d124cba5c32556ca0c2f6"), "name" : "张三", "age" : 6 }
创建稀疏索引
1 2 3 4 5 6 7 8 # 为age创建稀疏索引 > db.user.createIndex( { age: 1 } , { sparse: true } ){ "createdCollectionAutomatically" : false , "numIndexesBefore" : 1 , "numIndexesAfter" : 2 , "ok" : 1 }
案例一:
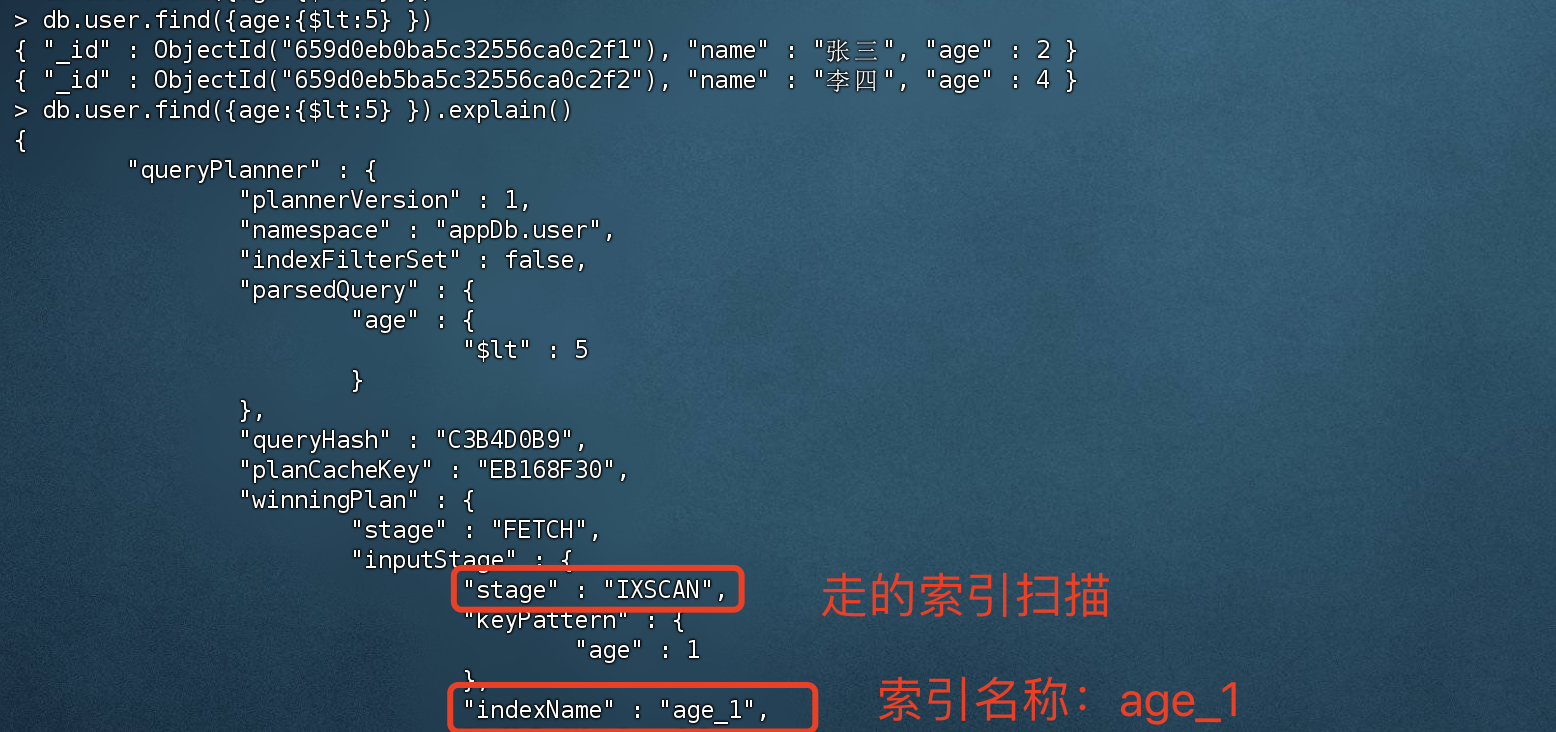
当前的集合中,所有的文档age都是存在数据的,此时去查询必然会走稀疏索引。
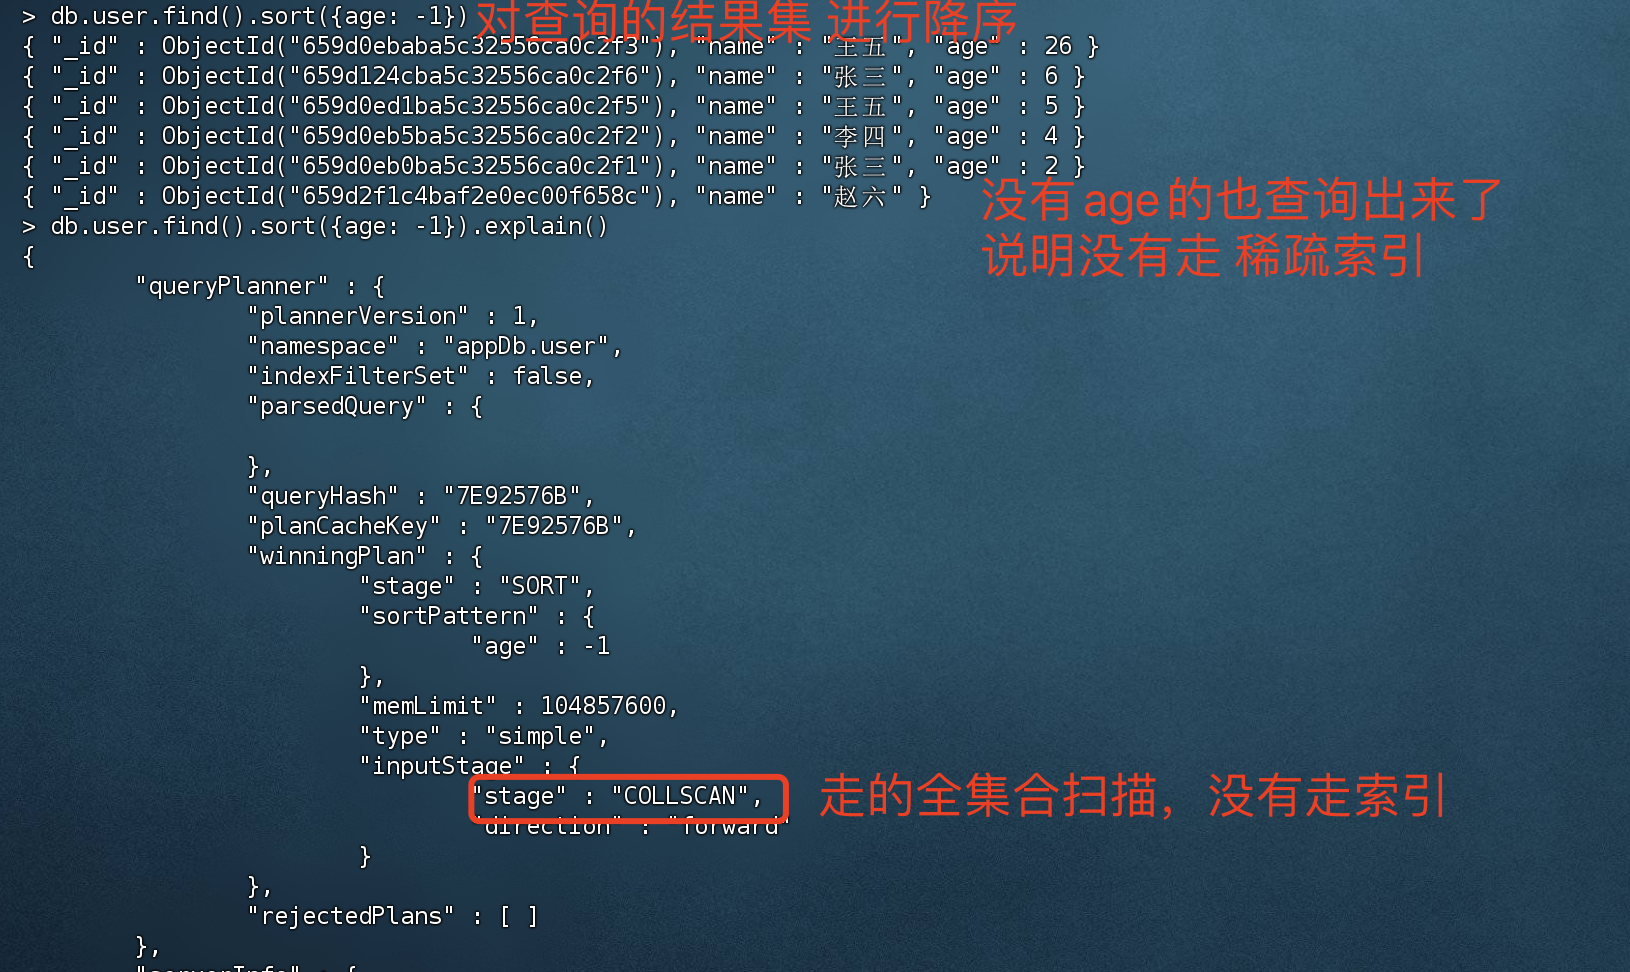
案例二:不走稀疏索引
如果在集合中新增几条文档,文档里面不包含age的话,那这几条文档不会走稀疏索引。
1 2 3 4 5 6 7 8 9 10 11 12 13 14 15 16 17 18 19 20 21 22 # 新增数据,没有age(稀疏索引字段) > db.user.insert({name:"赵六"})WriteResult({ "nInserted" : 1 }) # 查询user 所有文档,不会走稀疏索引,如果强行走稀疏索引,必然会丢失部分数据 > db.user.find() { "_id" : ObjectId("659d0eb0ba5c32556ca0c2f1"), "name" : "张三", "age" : 2 } { "_id" : ObjectId("659d0eb5ba5c32556ca0c2f2"), "name" : "李四", "age" : 4 } { "_id" : ObjectId("659d0ebaba5c32556ca0c2f3"), "name" : "王五", "age" : 26 } { "_id" : ObjectId("659d0ed1ba5c32556ca0c2f5"), "name" : "王五", "age" : 5 } { "_id" : ObjectId("659d124cba5c32556ca0c2f6"), "name" : "张三", "age" : 6 } { "_id" : ObjectId("659d2f1c4baf2e0ec00f658c"), "name" : "赵六" } # 对集合进行排序 > db.user.find().sort({age: -1 }){ "_id" : ObjectId("659d0ebaba5c32556ca0c2f3"), "name" : "王五", "age" : 26 } { "_id" : ObjectId("659d124cba5c32556ca0c2f6"), "name" : "张三", "age" : 6 } { "_id" : ObjectId("659d0ed1ba5c32556ca0c2f5"), "name" : "王五", "age" : 5 } { "_id" : ObjectId("659d0eb5ba5c32556ca0c2f2"), "name" : "李四", "age" : 4 } { "_id" : ObjectId("659d0eb0ba5c32556ca0c2f1"), "name" : "张三", "age" : 2 } { "_id" : ObjectId("659d2f1c4baf2e0ec00f658c"), "name" : "赵六" }
排序结果:
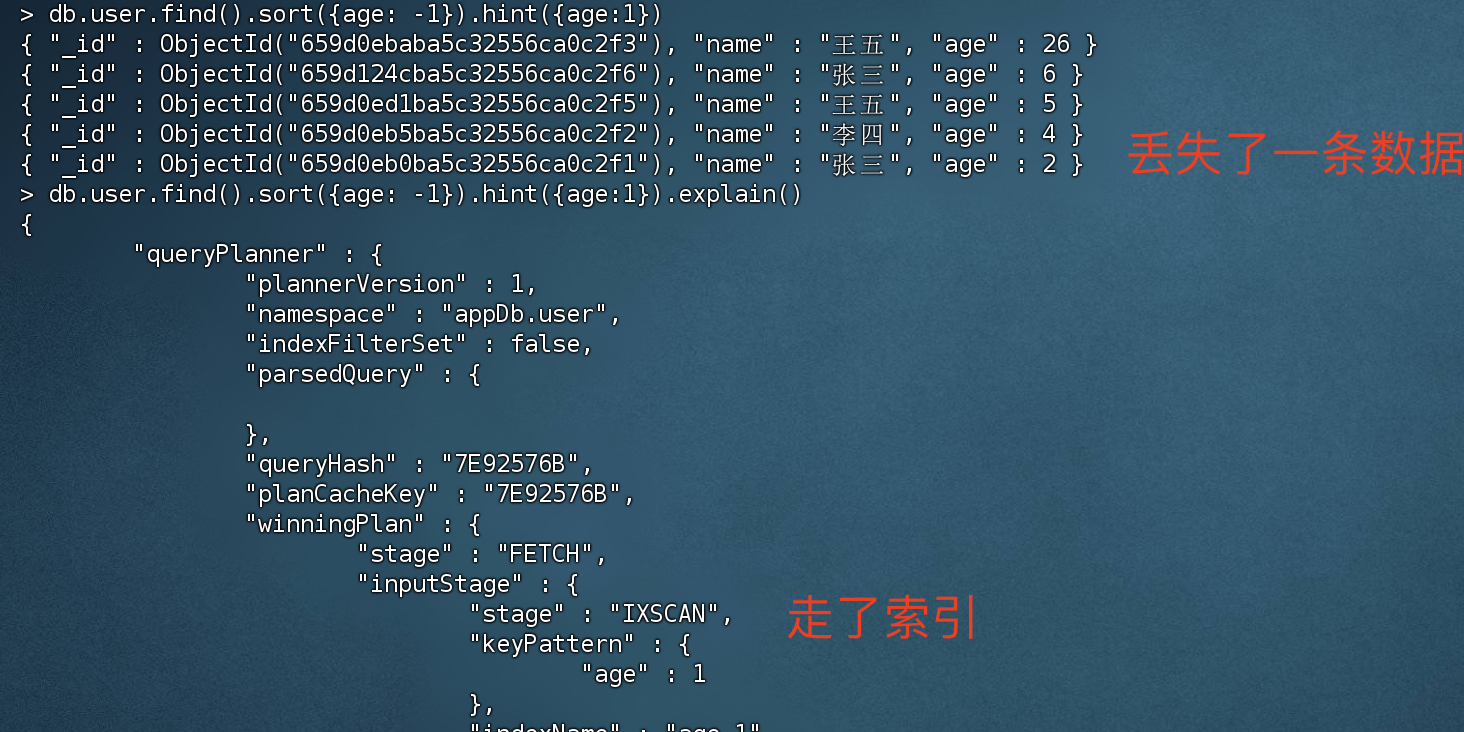
强行指定使用索引
强行指定走索引的话,必然会丢失部分数据,如下图所示,丢失了一条 “赵六” 的数据。因为 “赵六” 的文档没有 age字段。
1 2 3 4 5 6 7 > db.user.find().sort({age: -1 }).hint({age:1 }){ "_id" : ObjectId("659d0ebaba5c32556ca0c2f3"), "name" : "王五", "age" : 26 } { "_id" : ObjectId("659d124cba5c32556ca0c2f6"), "name" : "张三", "age" : 6 } { "_id" : ObjectId("659d0ed1ba5c32556ca0c2f5"), "name" : "王五", "age" : 5 } { "_id" : ObjectId("659d0eb5ba5c32556ca0c2f2"), "name" : "李四", "age" : 4 } { "_id" : ObjectId("659d0eb0ba5c32556ca0c2f1"), "name" : "张三", "age" : 2 }
TTL索引(TTL Indexes) 在生产环境中,并非所有的数据都需要永久存储,对于一些需要定时清理的数据,我们可以通过TTL索引 来实现定期删除功能。
注意:
TTL索引过期之后并不会马上删除 每60秒执行一次 TTL索引不仅提供了定时删除功能,同时还可以提高 查询效率。
准备数据
1 2 3 4 5 6 7 8 9 10 > db.log.insertOne( { "createTime": new Date (), "logMessage": "Success!" } ) # 插入结果 { "acknowledged" : true , "insertedId" : ObjectId("659e0ca387dfdae46dc69397") }
创建TTL索引
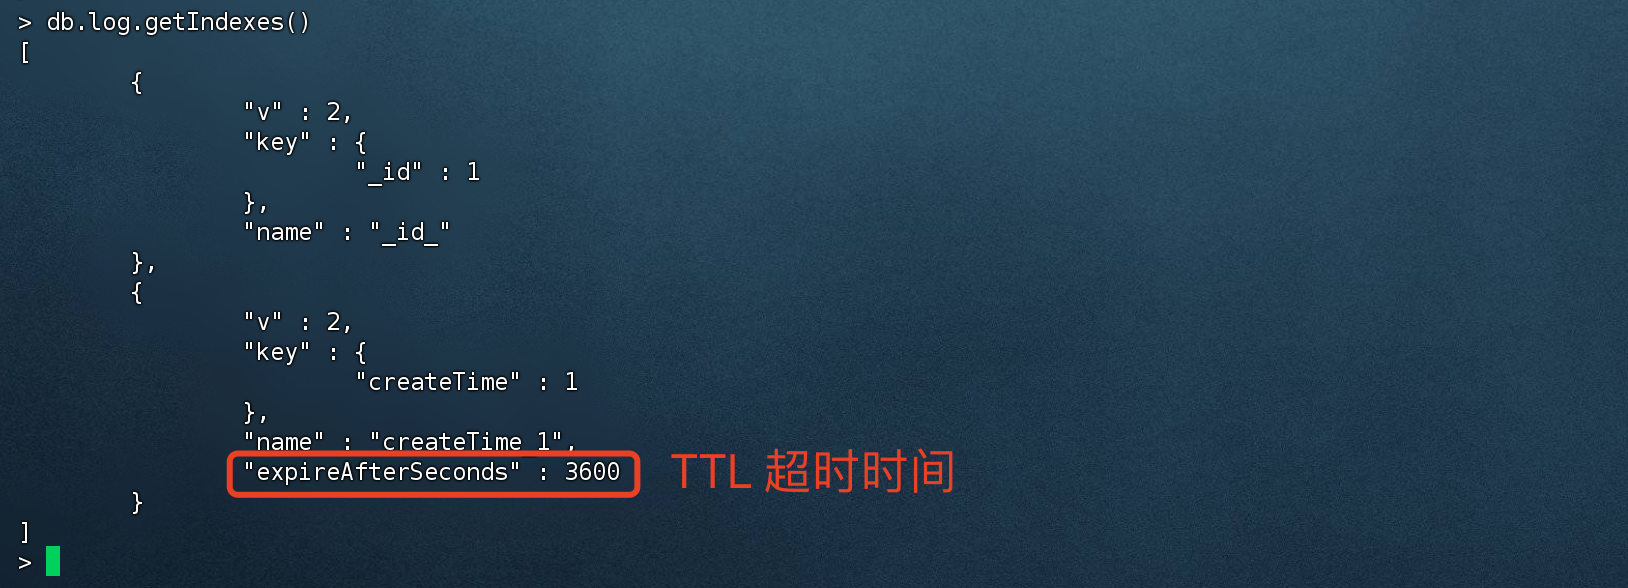
1 2 3 4 5 6 7 8 # 创建 TTL 索引,TTL 值为3600 秒 > db.log.createIndex( { "createTime": 1 }, { expireAfterSeconds: 3600 }){ "createdCollectionAutomatically" : false , "numIndexesBefore" : 1 , "numIndexesAfter" : 2 , "ok" : 1 }
修改TTL索引过期时间
1 2 3 4 5 6 > db.runCommand({collMod:"log",index:{keyPattern:{createTime:1 },expireAfterSeconds:600 }}){ "expireAfterSeconds_old" : 3600 , "expireAfterSeconds_new" : 600 , "ok" : 1 }
TTL使用注意事项
TTL索引只支持 单键索引(单个字段),并且必须是非 _id字段。
TTL索引过期后不会马上删除,会有60秒的时间差。
TTL删除时 用的是remove命令,如果数据量大的话会对CPU、磁盘产生一定的压力。
隐藏索引(Hidden Indexes) 隐藏索引并不是一个真正意义上的索引,而是索引的一个属性,类似于 停用该索引。
隐藏索引后,查询数据时就不会走该索引。该功能更多的是临时隐藏索引,停止使用该索引,以后需要启用的时候在 取消隐藏。
创建隐藏索引
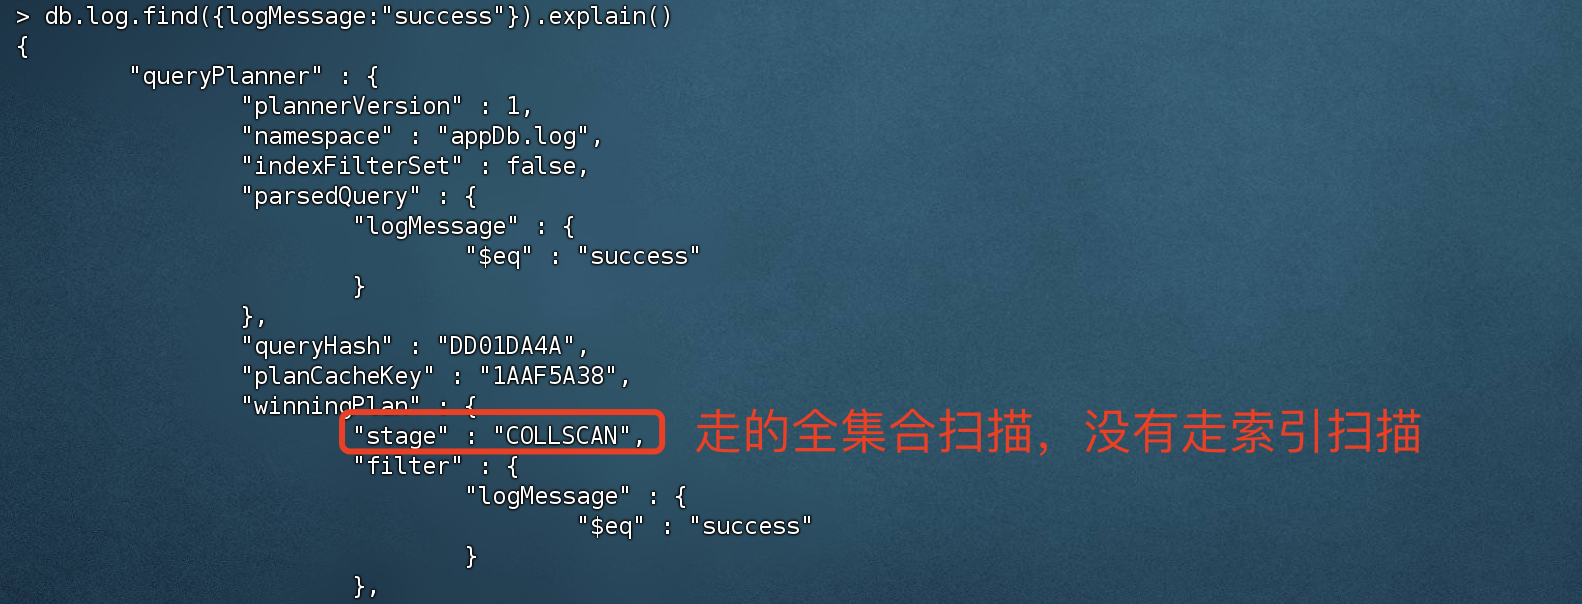
1 2 3 4 5 6 7 8 # 创建隐藏索引,属性:hidden:true > db.log.createIndex({ logMessage : 1 },{ hidden: true });{ "createdCollectionAutomatically" : false , "numIndexesBefore" : 1 , "numIndexesAfter" : 2 , "ok" : 1 }
隐藏现有索引
1 2 3 4 5 # 隐藏多个,可以用{}隔开 > db.log.hideIndex( { logMessage: 1 } )# 隐藏单个 > db.log.hideIndex( logMessage )
取消隐藏索引
1 2 3 4 5 # 取消隐藏多个,可以用{}隔开 > db.log.unhideIndex( { logMessage: 1 } )# 取消隐藏单个 > db.log.unhideIndex( logMessage )
查看执行计划,发现走索引
5)索引使用建议
为每个集合创建一个合适的索引
对于数据量比较大的集合时,就要合理的创建索引,可以有效的提高查询效率。
尽量用复合索引来完成查询,而不是用交叉索引
交叉索引:每个字段都创建单键索引,然后查询时 这些字段都用上去查询就叫交叉索引查询。
尽量通过2-5个复合索引来解决 90%的查询命令,减少单键索引的使用
使用复合索引时,要满足 最左前缀匹配原则
使用复合索引时,查询时 等值匹配放在前,范围查询放后面
先利用等值匹配筛选结果后完成排序,才通过范围查询,效率比较高
尽可能使用 覆盖索引
覆盖索引并非真正的索引,而是 你需要什么数据,你就返回什么数据,这样 尽可能的不回表在去取数据,等同于MySQL的覆盖索引
创建索引时 尽可能的后台运行
在大数据量的情况下去创建索引时会导致系统阻塞,建议使用后台方式创建索引
避免设计过长的 数组索引
数组索引的内容较多,存储的时候需要更多的空间,影响索引树的查询效率
更新频繁的字段慎用索引
如果字段更新频繁的话,索引树需要频繁的更新信息
对于超长字符串的字段慎用索引
不建议的原因同第七点一样
3. explain执行计划 MongoDB提供了explain命令, 可以让我们直观的看到 查询命令的执行计划,根据实际情况来做出相应优化。
执行计划最主要看的是几个属性:
是否走索引
winningPlan.inputStage.stage = IXSCAN 代表走索引,COLLSCAN 代表走全表扫描
语句执行时间、索引扫描次数
executionStats.executionTimeMillis 语句执行时间
executionStats.totalKeysExamined 索引扫描次数
executionStats.totalDocsExamined 文档扫描次数
注意:聚合管道想要查看执行计划explain,需要在 聚合函数之前先调用explain。其他的命令则是在最末尾加上explain()。
如:db.books.explain().aggregate([ xxx ])
常规语法:
1 db.collection.find().explain(< verbose> )
verbose 为可选参数,默认为queryPlanner。
模式名字 描述
queryPlanner
执行计划的详细信息,包括查询计划、集合信息、查询条件、最佳执行计划、查询方式和服务信息等
exectionStats
最佳执行计划的执行情况和被拒绝的计划等信息
allPlansExecution
选择并执行最佳执行计划,并返回最佳执行计划和其他执行计划的执行情况
queryPlanner 1 2 3 4 5 6 7 8 9 10 11 12 13 14 15 16 17 18 19 20 21 22 23 24 25 26 27 28 29 30 31 32 33 34 35 36 37 38 39 40 41 42 43 44 45 46 47 48 49 50 51 52 53 54 55 56 57 58 # explain不写参数的话,默认就是queryPlanner > db.books.find({title:"book-2"}).explain()# 执行计划返回结果 { "queryPlanner" : { # 执行计划版本号 "plannerVersion" : 1 , # 查询的集合名称 "namespace" : "appDb.books", # 是否使用索引,这里保留个疑问,因为下面明明使用了索引,但是这里却是为false ,初步怀疑该字段的真实性和有效性 "indexFilterSet" : false , "parsedQuery" : { # 查询条件 "title" : { "$eq" : "book-2" } }, "queryHash" : "6E0D6672", "planCacheKey" : "B1CDA929", # 最佳执行计划 "winningPlan" : { # 查询方式 "stage" : "FETCH", "inputStage" : { # 使用的 索引扫描 "stage" : "IXSCAN", "keyPattern" : { "title" : 1 }, "indexName" : "title_1", "isMultiKey" : false , "multiKeyPaths" : { "title" : [ ] }, "isUnique" : false , "isSparse" : false , "isPartial" : false , "indexVersion" : 2 , "direction" : "forward", "indexBounds" : { "title" : [ "[\"book-2 \", \"book-2 \"]" ] } } }, "rejectedPlans" : [ ] }, "serverInfo" : { "host" : "cvm52851", "port" : 27017 , "version" : "4.4.26", "gitVersion" : "acdc463fe60bdc85aeced25297041b4051a0fc33" }, "ok" : 1 }
字段名称 描述
plannerVersion
执行计划的版本
namespace
查询的集合
indexFilterSet
是否使用索引
parsedQuery
查询条件
winningPlan
最佳执行计划
stage
查询方式
filter
过滤条件
direction
查询顺序
rejectedPlans
拒绝的执行计划
serverInfo
mongodb服务器信息
executionStats executionStats 模式的返回信息中包含了 queryPlanner 模式的所有字段,并且还包含了更为详尽的最佳执行计划执行情况。
1 2 3 4 5 6 7 8 9 10 11 12 13 14 15 16 17 18 19 20 21 22 23 24 25 26 27 28 29 30 31 32 33 34 35 36 37 38 39 40 41 42 43 44 45 46 47 48 49 50 51 52 53 54 55 56 57 58 59 60 61 62 63 64 65 66 67 68 69 70 71 72 73 74 75 76 77 78 79 80 81 82 83 84 85 86 87 88 89 90 91 92 93 94 95 96 97 98 99 100 101 > db.books.find({title:"book-2"}).explain("executionStats"){ "queryPlanner" : { "plannerVersion" : 1 , "namespace" : "appDb.books", "indexFilterSet" : false , "parsedQuery" : { "title" : { "$eq" : "book-2" } }, "winningPlan" : { "stage" : "FETCH", "inputStage" : { "stage" : "IXSCAN", "keyPattern" : { "title" : 1 }, "indexName" : "title_1", "isMultiKey" : false , "multiKeyPaths" : { "title" : [ ] }, "isUnique" : false , "isSparse" : false , "isPartial" : false , "indexVersion" : 2 , "direction" : "forward", "indexBounds" : { "title" : [ "[\"book-2 \", \"book-2 \"]" ] } } }, "rejectedPlans" : [ ] }, "executionStats" : { "executionSuccess" : true , "nReturned" : 1 , "executionTimeMillis" : 2 , "totalKeysExamined" : 1 , "totalDocsExamined" : 1 , "executionStages" : { "stage" : "FETCH", "nReturned" : 1 , "executionTimeMillisEstimate" : 0 , "works" : 2 , "advanced" : 1 , "needTime" : 0 , "needYield" : 0 , "saveState" : 0 , "restoreState" : 0 , "isEOF" : 1 , "docsExamined" : 1 , "alreadyHasObj" : 0 , "inputStage" : { "stage" : "IXSCAN", "nReturned" : 1 , "executionTimeMillisEstimate" : 0 , "works" : 2 , "advanced" : 1 , "needTime" : 0 , "needYield" : 0 , "saveState" : 0 , "restoreState" : 0 , "isEOF" : 1 , "keyPattern" : { "title" : 1 }, "indexName" : "title_1", "isMultiKey" : false , "multiKeyPaths" : { "title" : [ ] }, "isUnique" : false , "isSparse" : false , "isPartial" : false , "indexVersion" : 2 , "direction" : "forward", "indexBounds" : { "title" : [ "[\"book-2 \", \"book-2 \"]" ] }, "keysExamined" : 1 , "seeks" : 1 , "dupsTested" : 0 , "dupsDropped" : 0 } } }, "serverInfo" : { "host" : "cvm52851", "port" : 27017 , "version" : "4.4.26", "gitVersion" : "acdc463fe60bdc85aeced25297041b4051a0fc33" }, "ok" : 1 }
字段名称 描述
winningPlan.inputStage
用来描述子stage,并且为其父stage提供文档和索引关键字
winningPlan.inputStage.stage
子查询方式
winningPlan.inputStage.keyPattern
所扫描的index内容
winningPlan.inputStage.indexName
索引名
winningPlan.inputStage.isMultiKey
是否是Multikey。如果索引建立在array上,将是true
executionStats.executionSuccess
是否执行成功
executionStats.nReturned
返回的个数
executionStats.executionTimeMillis
这条语句执行时间
executionStats.executionStages.executionTimeMillisEstimate
检索文档获取数据的时间
executionStats.executionStages.inputStage.executionTimeMillisEstimate
扫描获取数据的时间
executionStats.totalKeysExamined
索引扫描次数
executionStats.totalDocsExamined
文档扫描次数
executionStats.executionStages.isEOF
是否到达 steam 结尾,1 或者 true 代表已到达结尾
executionStats.executionStages.works
工作单元数,一个查询会分解成小的工作单元
executionStats.executionStages.advanced
优先返回的结果数
executionStats.executionStages.docsExamined
文档检查数
allPlansExecution allPlansExecution返回的信息包含 executionStats 模式的内容,且包含allPlansExecution,这是最详细的执行计划。
1 2 3 4 5 6 7 8 9 10 11 12 13 14 15 16 17 18 19 > db.books.find({title:"book-2"}).explain("allPlansExecution")# 返回结果,这里我故意只显示allPlansExecution部分,其他的我没写进来,因为信息实在太多了 "allPlansExecution" : [ { "nReturned" : < int > , "executionTimeMillisEstimate" : < int > , "totalKeysExamined" : < int > , "totalDocsExamined" :< int > , "executionStages" : { "stage" : < STAGEA> , "nReturned" : < int > , "executionTimeMillisEstimate" : < int > , ... } } }, ... ]
stage状态
状态 描述
COLLSCAN
全表扫描
IXSCAN
索引扫描
FETCH
根据索引检索指定文档
SHARD_MERGE
将各个分片返回数据进行合并
SORT
在内存中进行了排序
LIMIT
使用limit限制返回数
SKIP
使用skip进行跳过
IDHACK
对_id进行查询
SHARDING_FILTER
通过mongos对分片数据进行查询
COUNTSCAN
count不使用Index进行count时的stage返回
COUNT_SCAN
count使用了Index进行count时的stage返回
SUBPLA
未使用到索引的$or查询的stage返回
TEXT
使用全文索引进行查询时候的stage返回
PROJECTION
限定返回字段时候stage的返回
执行计划的stage状态尽量不要出现以下几种情况
COLLSCAN 全表扫描
如果在大数据量的集合下,尽量使用索引扫描,不要走 全集合扫描。
SORT(使用了sort 排序 但是没有走index索引)
不合理的SKIP尽量少用
SUBPLA(没有用到index索引的$or 条件)
COUNTSCAN(不使用index索引进行count)