RabbitMQ基础概念
RabbitMQ是基于AMQP协议开发的产品,由生产者Producer和消费者Consumer组成,生产者发送消息给MQ,消费者监听MQ队列,收到消息后进行消费。
1)名词解释 virtual host 虚拟主机 一个RabbitMQ集群(单机也可以成为一个小集群,默认就会创建)中可以创建多个虚拟主机,每个虚拟主机的数据都是逻辑隔离的,并且可以根据虚拟主机配置权限。
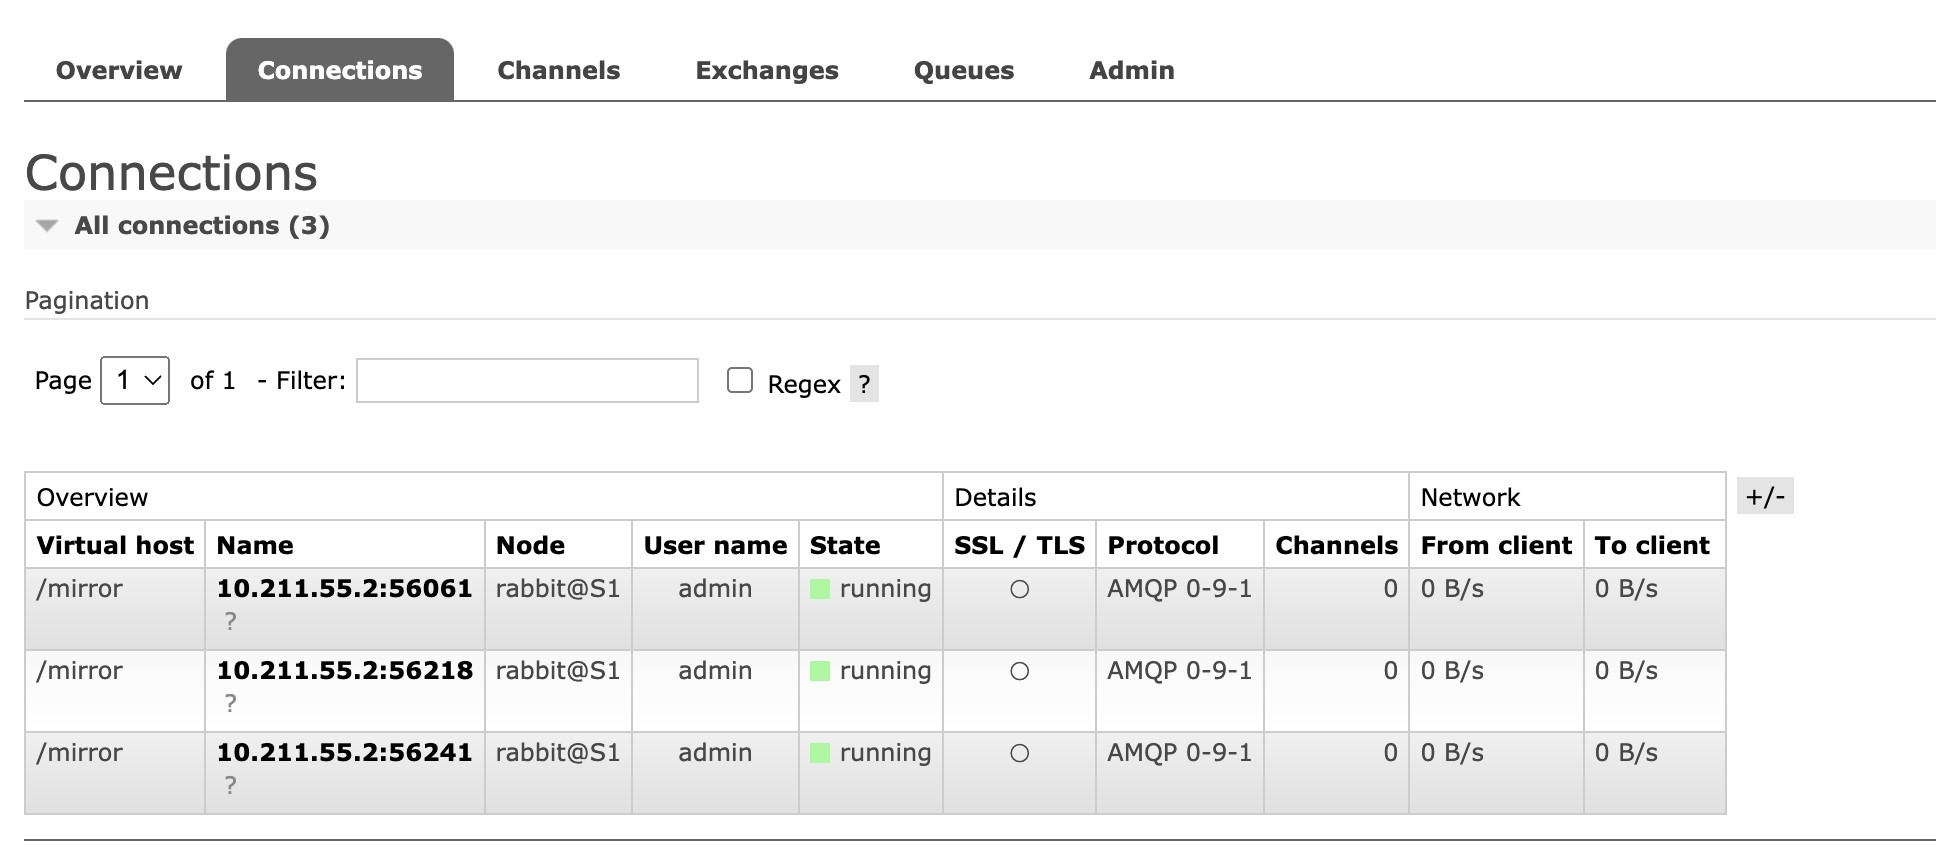
Connection 连接 客户端与RabbitMQ进行交互时,会创建一个TCP Connection连接。
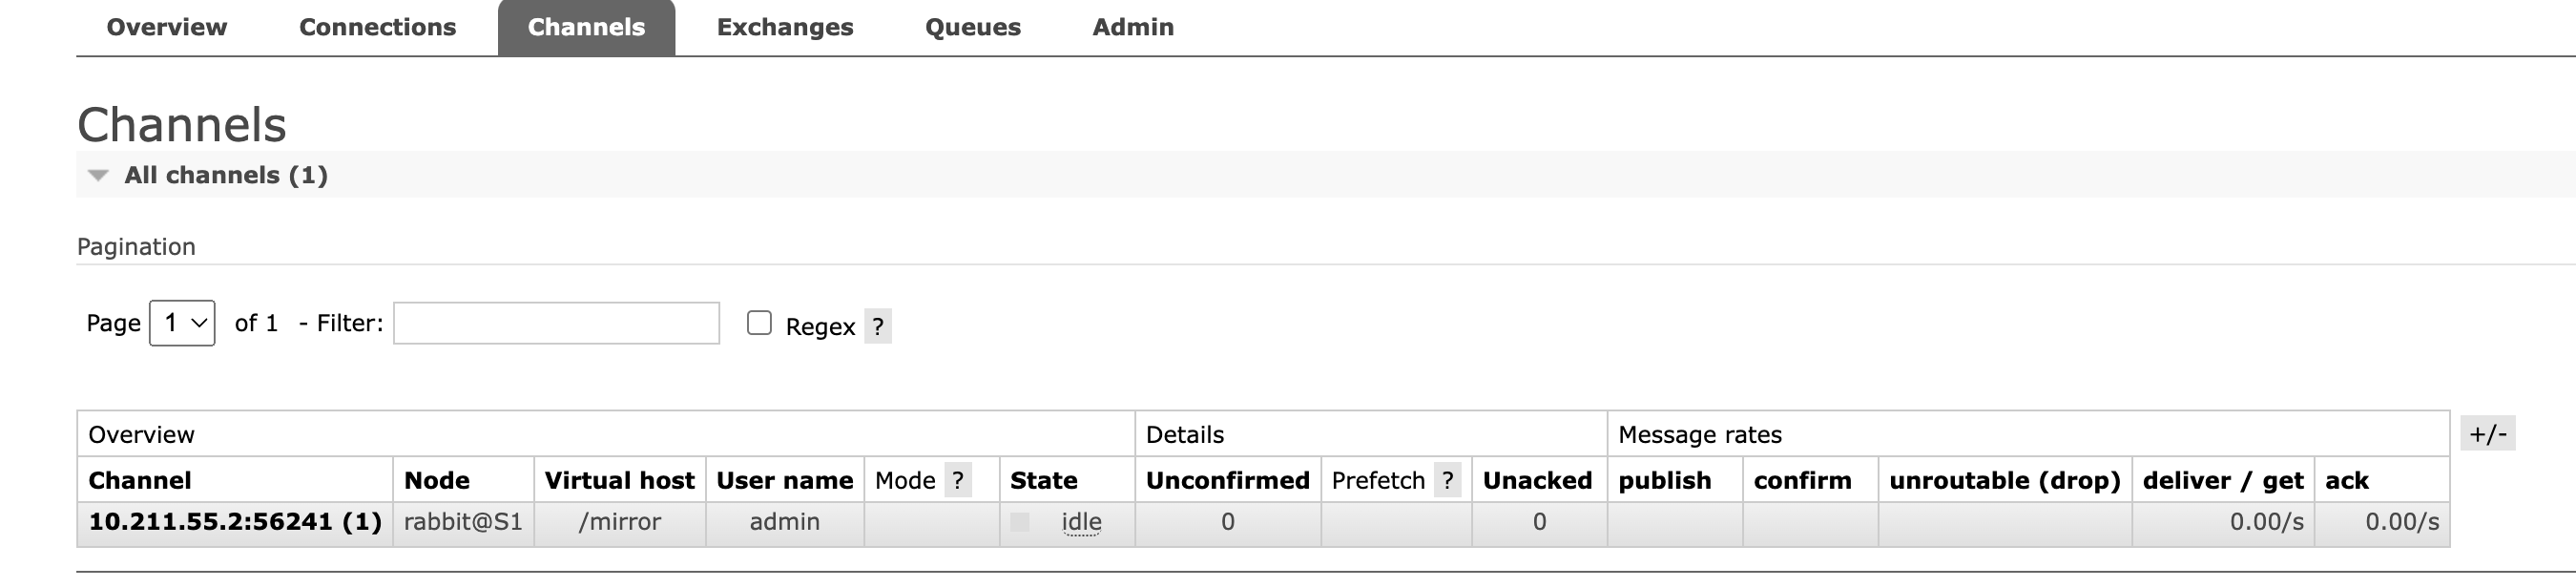
Channel 信道 一旦客户端与RabbitMQ建立了连接,就会分配一个AMQP信道 Channel,每个Channel都有一个唯一ID,而后续的数据交互都将由该Channel进行传输。
RabbitMQ为了减少性能开销,也会在一个Connection中建立多个Channel,当客户端进行多线程访问时,这些Channel就会复用同一个Connection。
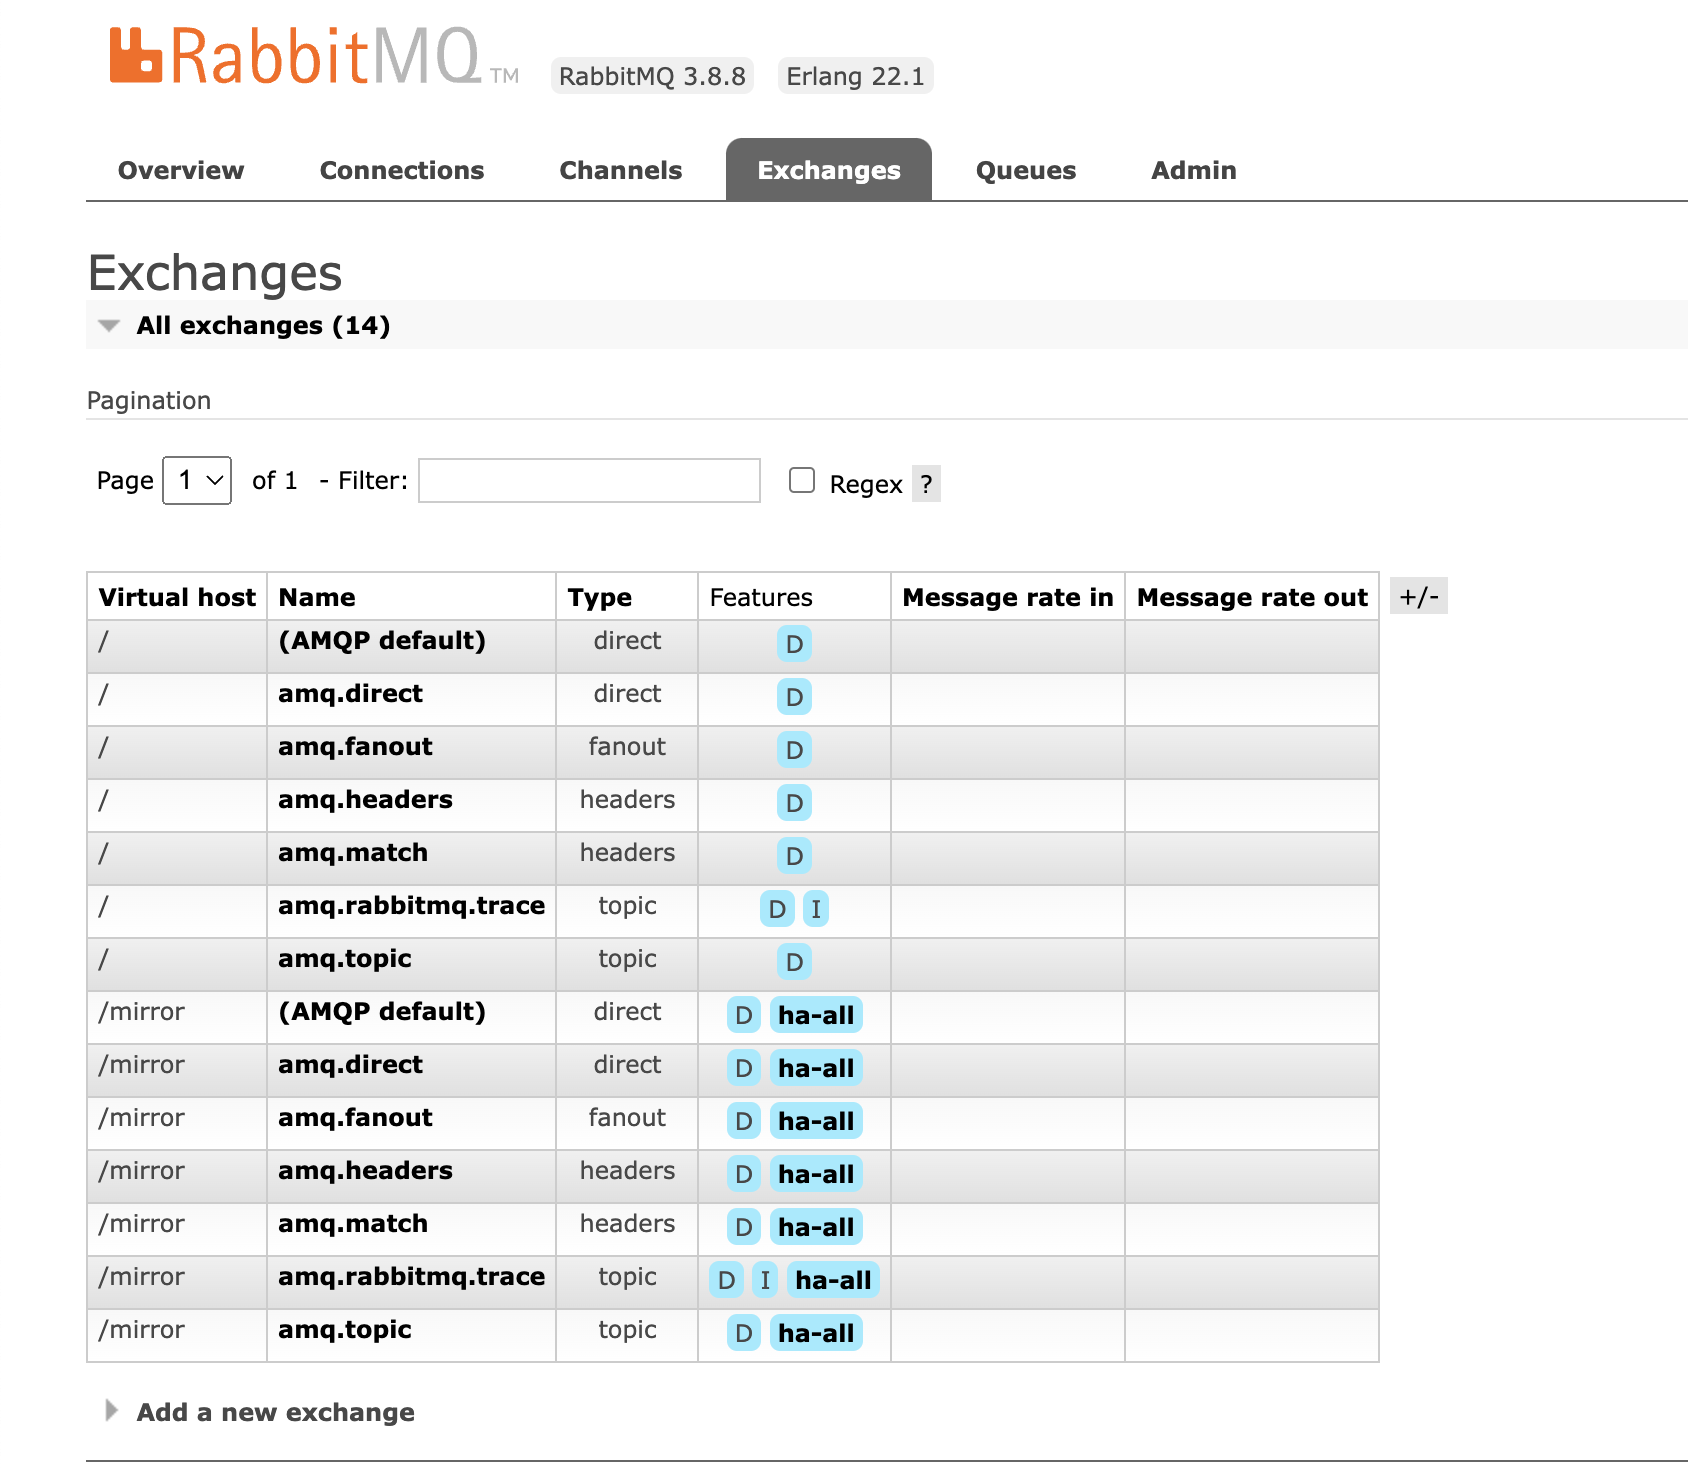
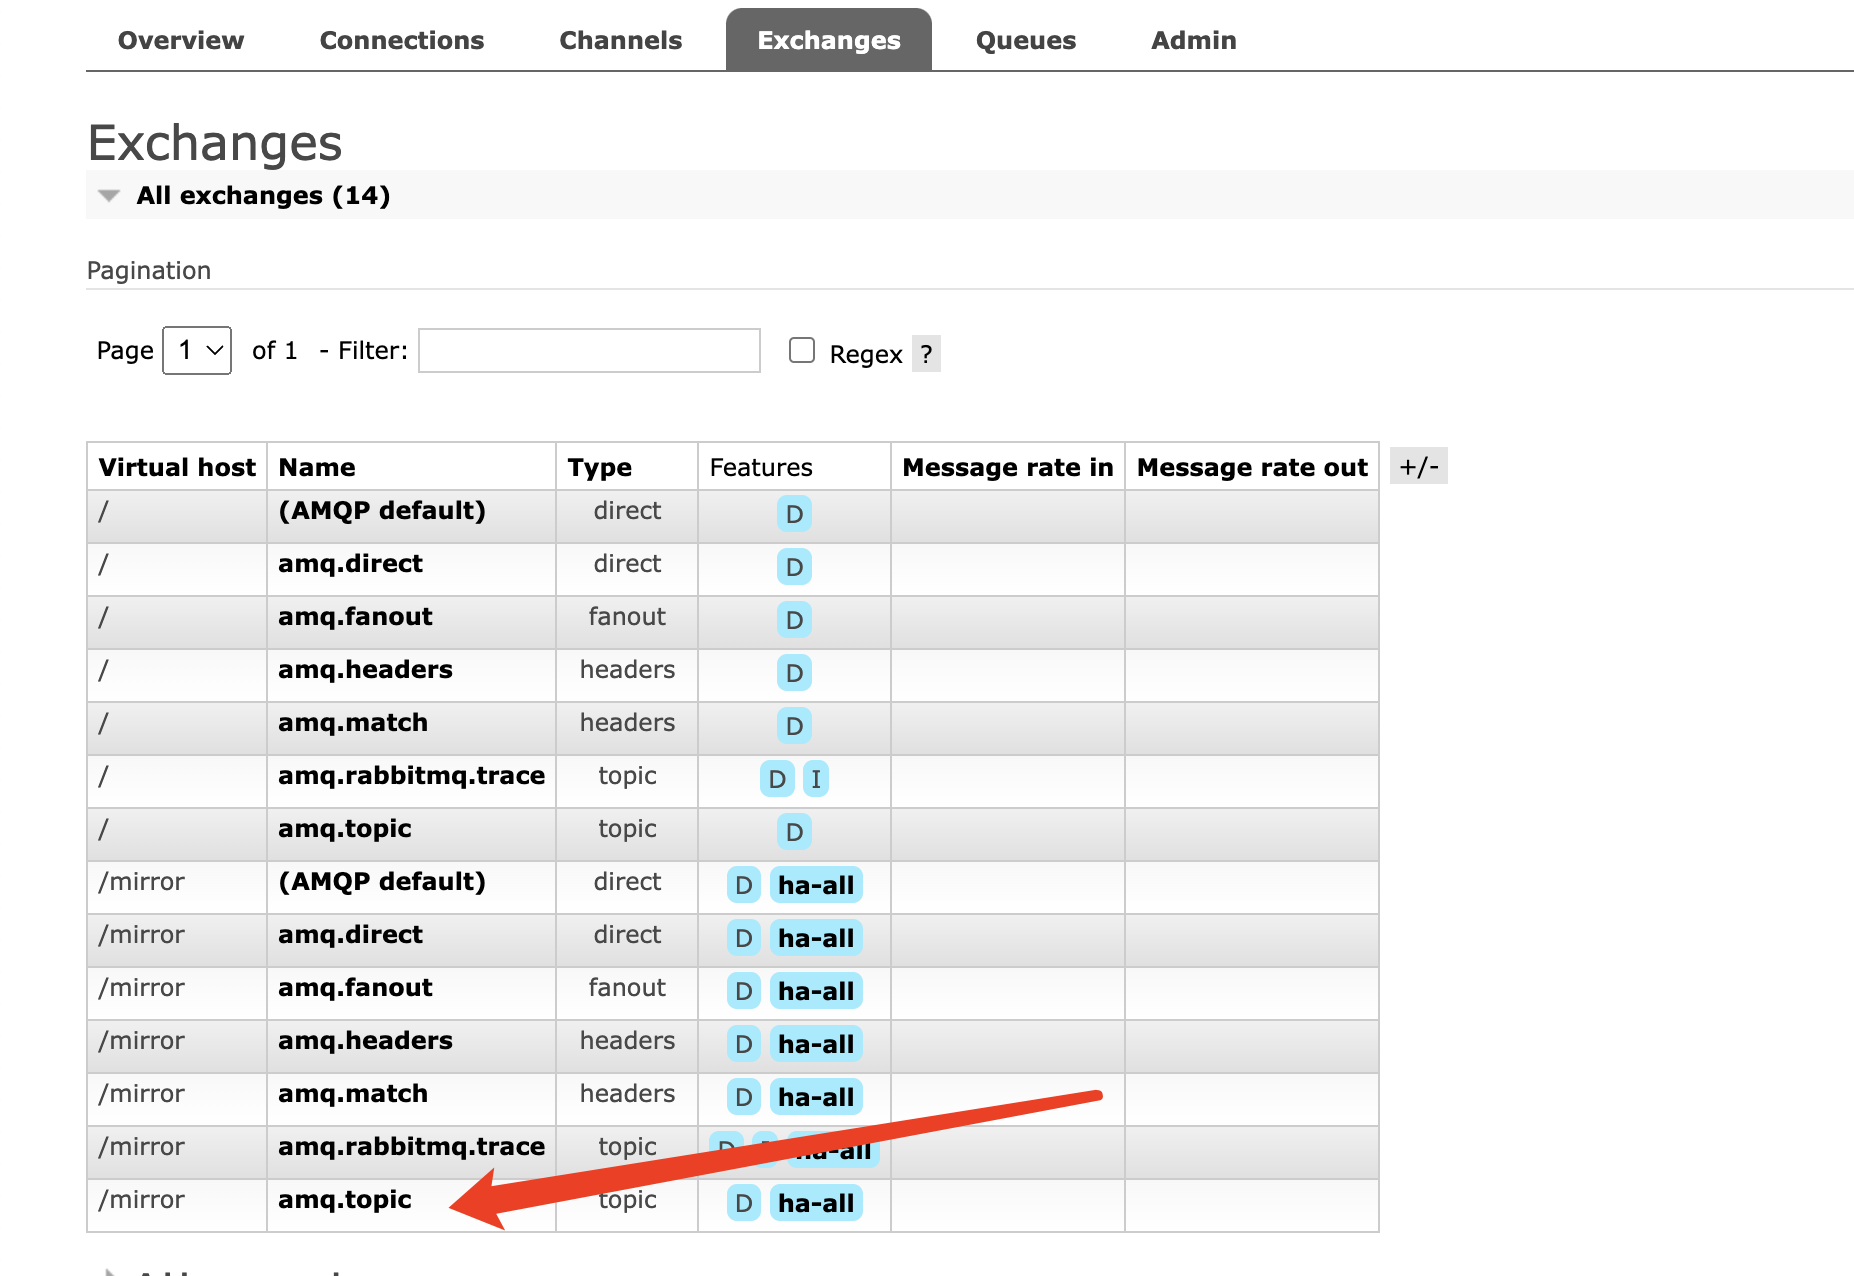
Exchange 交换机 当生产者把消息发送到RabbitMQ中后,会先进入交换机(没有指定交换机的话,就会进入根交换机),然后交换机负责将数据转发到不同队列中。
RabbitMQ中有多种不同类型的交换机来支持不同的路由策略,在每个虚拟主机中,RabbitMQ都会默认创建几个不同类型的交换机来。
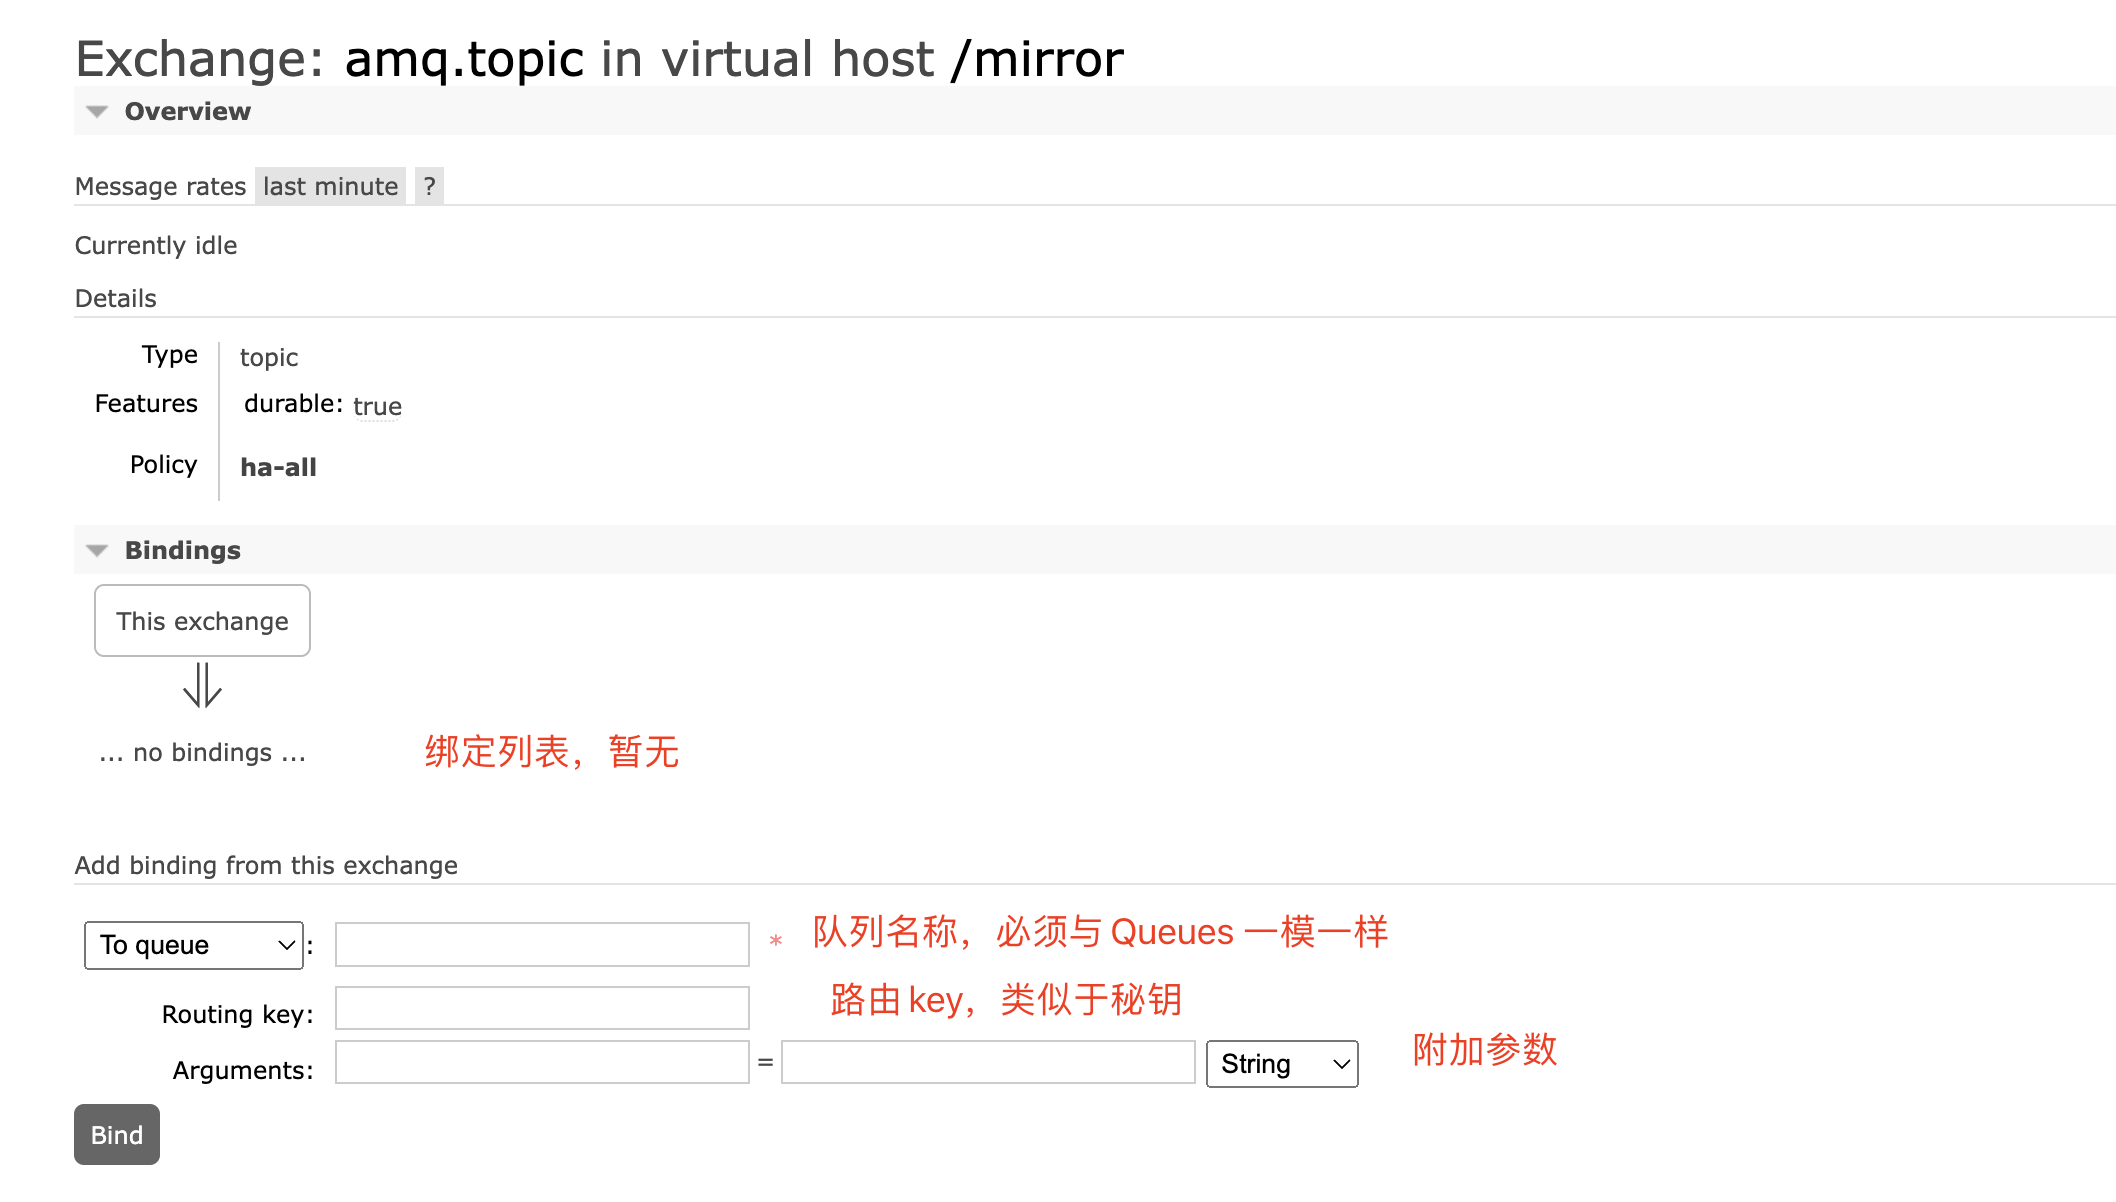
交换机
交换机绑定队列
Queue 队列 队列都是先进先出FIFO原则,消息通过Exchange交换机分配到各个不同的Queue队列上,才能被消费者消费。
Classic 经典队列 RabbitMQ经典队列,也是最常用的消息队列。
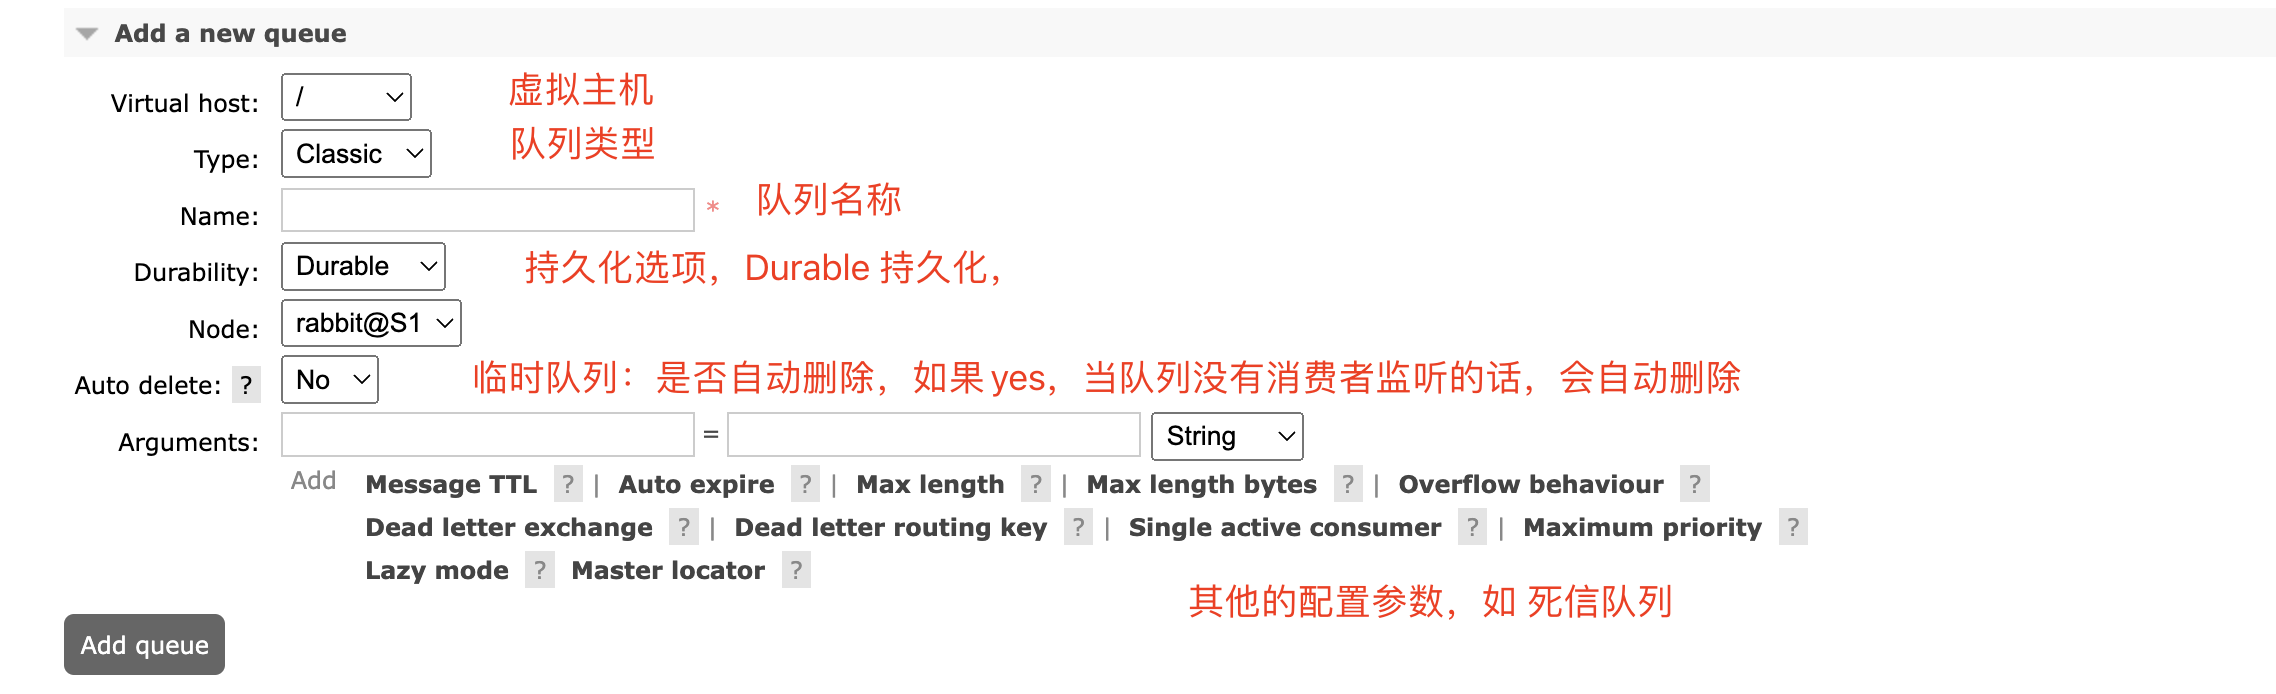
队列参数
Virtual host 虚拟主机
Type 队列类型:有Classic、Quorum、Stream
Durability 是否持久化,Durable 持久化到硬盘(可靠性高但性能低)、Transient 不持久化(可靠性低但性能高)
Node 指定创建在集群哪个节点
Auto delete 临时队列,队列将在第一个消费者连接后,等所有的消费者都断开连接后删除该队列
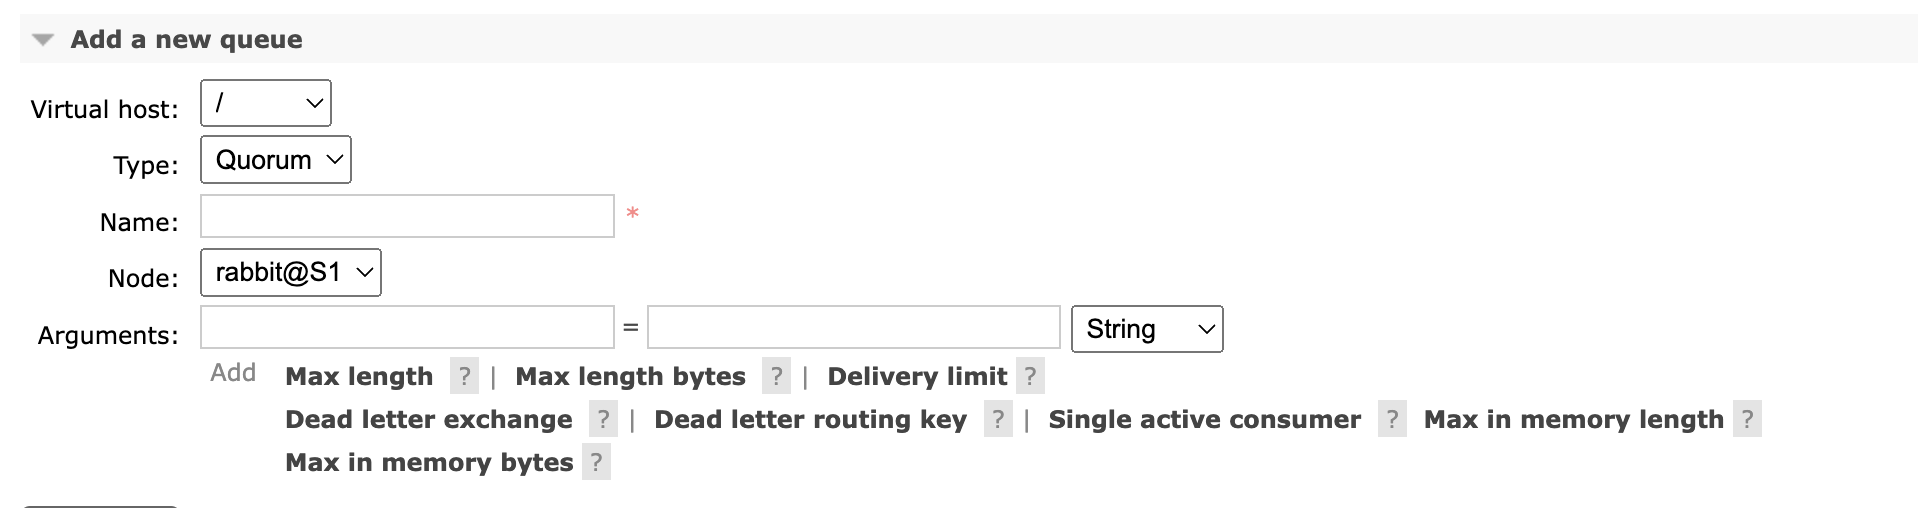
Quorum 仲裁队列 RabbitMQ在3.8.0版本后新增的队列,仲裁队列在分布式环境下对消息的可靠性保障更高。
Quorum是基于Raft一致性协议实现的一种新型的分布式消息队列,他实现了持久化,多备份的FIFO队列,主要就是针对RabbitMQ的镜像模式设计的。
多数确认机制
当生产者发送消息给MQ中的quorum队列后,需要有集群中半数以上的节点同意确认
类似于 redis选举时的半数确认机制和Zookeeper半数确认,这种方式可以保证消息在集群内部不会丢失,但是会牺牲一定的性能
队列参数
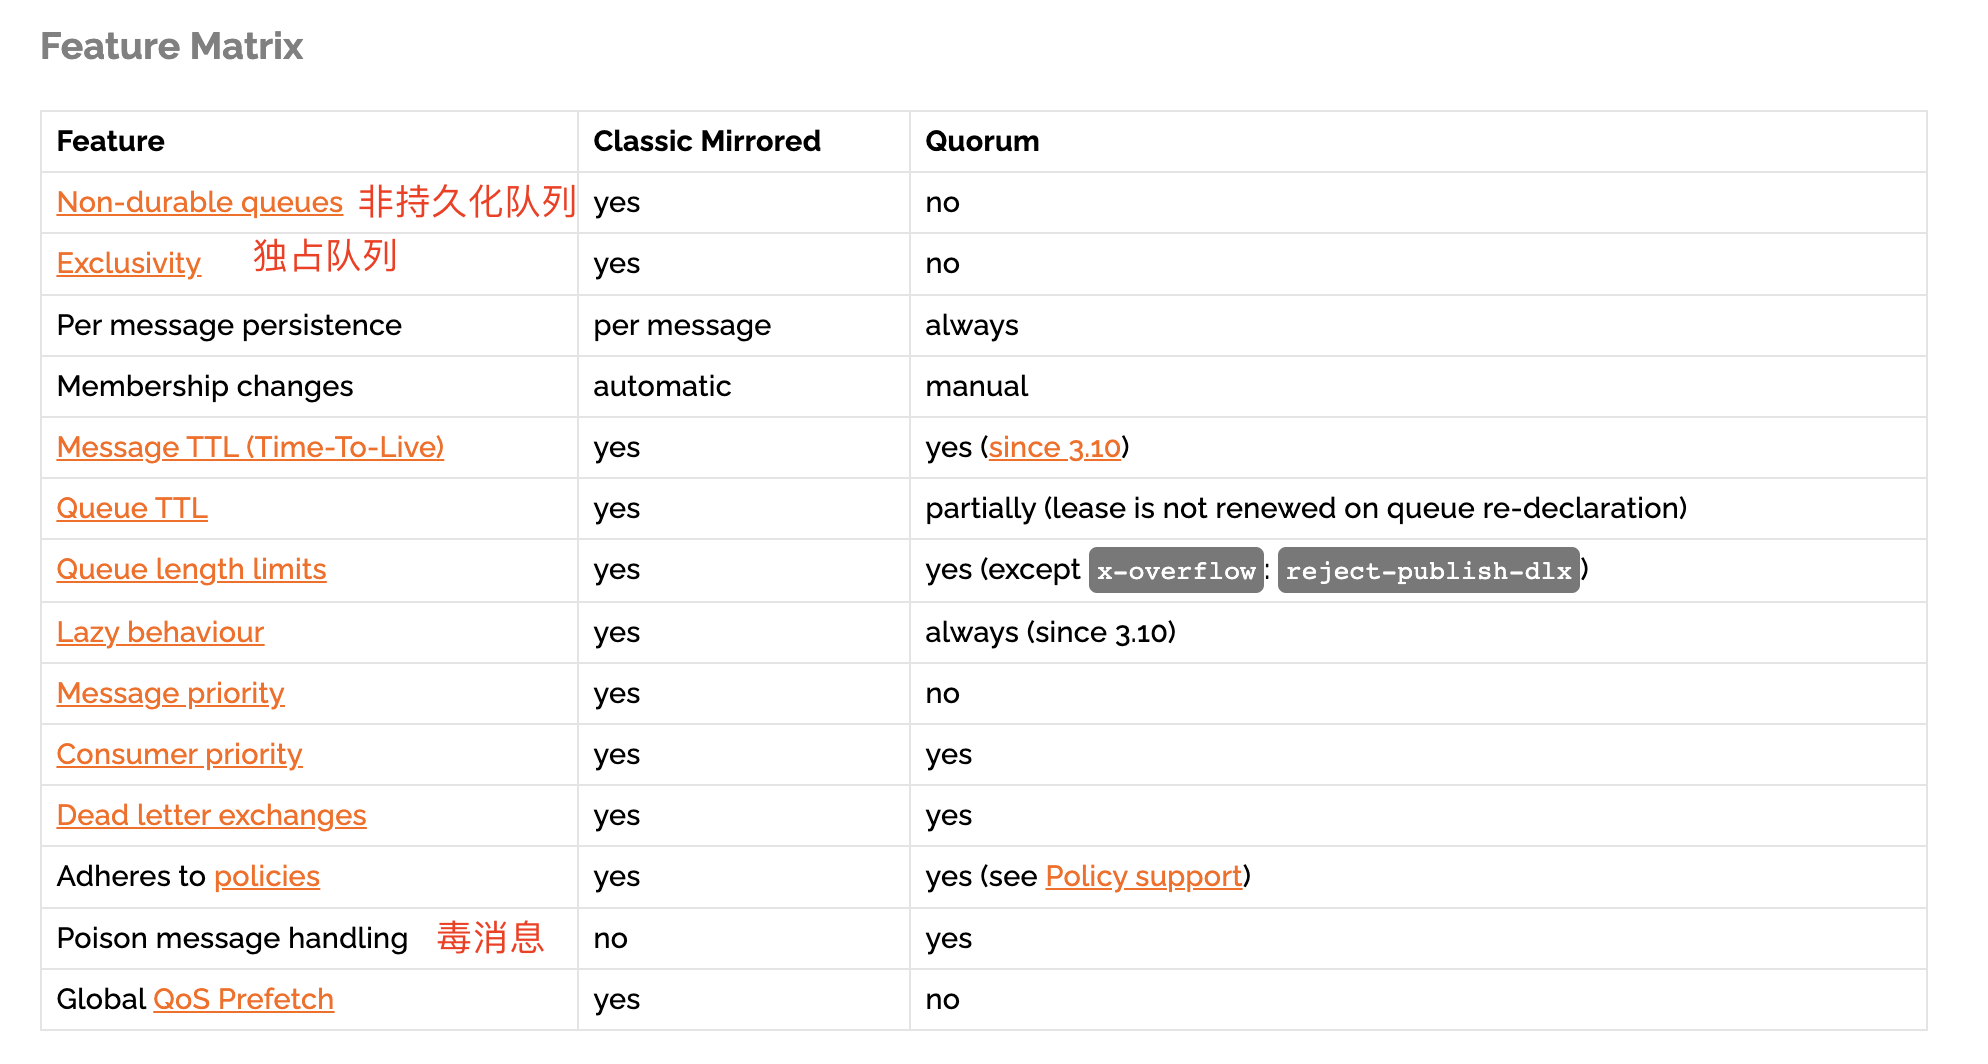
Quorum与Classic的区别
非持久化队列:Classic队列可以支持非持久化队列,但是Quorum 不支持非持久化,一定要持久化到硬盘中。
独占队列,只能由 启动时候创建的连接使用,其他连接无法使用,Quorum不支持独占队列
毒消息:一直不能正常被消费者消费的消息(因为消费者不能正常消费(消费逻辑出现异常)导致不断的重入队列)
Quorum队列会持续跟踪毒消息,并在消息头部字段:x-delivery-count 记录失败次数,当次数超过了MQ阈值 MQ就会删除这些毒消息。
Quorum队列不适用场景
不适用于 临时队列,独占队列,或经常需要修改删除的队列
不适用于 对消息延迟要求比较低的场景,因为一致性算法(多数确认机制)在一定程度会上影响消息处理的效率
不适用于 对数据安全不高的场景,Quorum每次都需要生产者或消费者手动确认
不适用用 队列消息积压严重的场景,如果Quorum队列消息积压太多,会一直保存在内存中,直到内存溢出
Quorum队列更适合于队列长期存在,且安全性要求较高,可靠性较高的场景,如 电商下单,支付系统等。
Stream 队列 Stream队列是RabbitMQ自3.9.0版本开始引入的一种新的数据队列类型,也是目前官方最为推荐
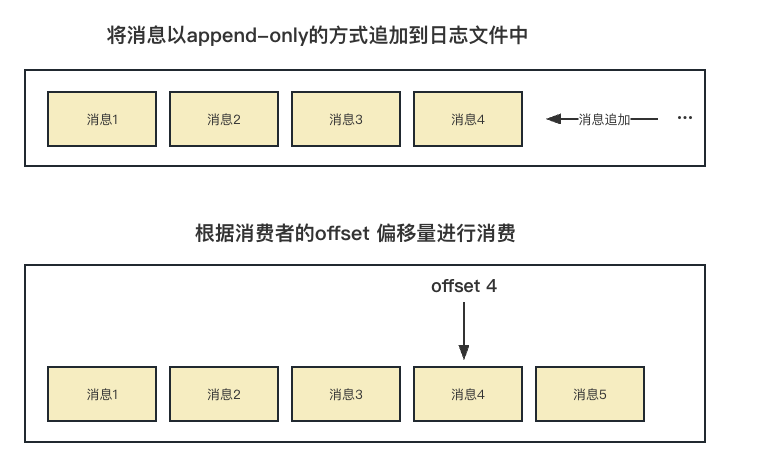
核心概念:将消息以append-only的方式持久化到日志文件中,然后根据消费者指定的offset 偏移量进行消费。
Stream队列特点
1、large fan-outs 大规模分发
当我们需要向多个消费者发送相同的消息时 ,按照之前的队列类型,每个消费者都要绑定一个专门的队列,因为如果多个消费者同时监听一个队列,那么就会存在消费者抢消息的情况
如果消费者非常多的情况下就会创建非常多的队列,就会导致性能急剧下降,而stream队列允许任何数量的消费者共同读取同一个队列的消息
2、Replay/Time-travelling 消息回溯
RabbitMQ已有的这些队列类型,在消费者处理完消息后,消息都会从队列中删除,因此,无法重新读取已经消费过的消息。
而Stream队列允许用户在日志的任何一个位置重新读取数据
3、Throughput Performance 高吞吐性能
Strem队列的设计以性能为主要目标,对消息传递吞吐量的提升非常明显。
4、Large logs 大日志
最小的内存开销去高效的存储大量的数据
RabbitMQ消息场景 名词解释
producer:生产者
consumer:消费者
exchange:交换机
queue:队列
hello world体验
最简单的模式,producer直接发送消息到Queue队列中,由consumer直接消费。
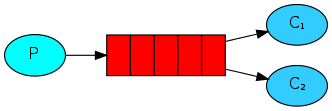
Work queues 工作序列
多个消费者同时监听一个队列任务,当producer发送消息到队列后,服务器会根据策略发送给其中一个消费者进行消费。
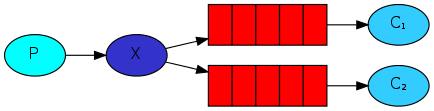
Publish/Subscribe 订阅 发布 机制 交换机(exchange)类型:fanout 广播模式
producer发送消息时,不需要指定Queue队列,而是直接发送给交换机,而交换机收到后会广播给自己所有绑定的队列。
注意:如果交换机没有绑定任何队列,则会自动创建一个以amq.gen-开头的队列,当该队列没有消费者消费时,会自动删除。
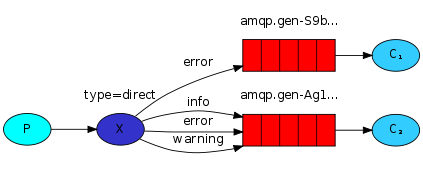
Routing 路由模式 交换机(exchange)类型:direct 直连模式
producer发送消息给exchange时,可以给消息指定RoutingKey,exchange会根据RoutingKey和自身队列绑定关系进行匹配,匹配到相应的队列后转发给该队列。
如:routingKey = order,代表是 订单类型的消息,routingKey = pay,代表是 支付类型的消息,以此类推。
如果producer发送的消息指定的RoutingKey,在exchange中匹配不到,该消息就会丢失。
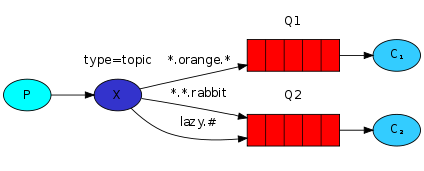
Topics 通配符
这个模式也就在上一个模式的基础上,对routingKey进行了模糊匹配,单词之间用 逗号 , 隔开,* 代表一个具体的单词。# 代表0个或多个单词。
匹配规则案例:
1 2 3 4 5 6 7 *.orange.* --> a.orange.b *.apple.* --> a.apple.b *.*.rabbit --> a.b.rabbit #.rabbit --> abc.rabbit --> a.rabbit
Publisher Confirms 发送者消息确认 上面的模式无法保证 producer 消息是否发送成功,而这种模式则可以保证是否发送成功,保障了消息的高可靠性。
发送者确认模式默认是不开启的,所以如果需要开启发送者确认模式,需要手动在channel中进行声明。
channel.confirmSelect();
发送者消息确认机制有三种使用方式:发送单条消息、批量发送消息、异步确认消息。
实验源码:https://files.javaxing.com/Java%08Demo/RabbitMQ-Demo.zip
发送单条消息
producer发送消息给RabbitMQ后,就会开始等待RabbitMQ响应,RabbitMQ会告知producer该消息已经收到,producer才会发送下一条消息。
注意:该方法在等待期间,会阻塞所使用的Channel,阻塞期间不能发送任何消息,该方式会降低集群的发送速度。
1
2
3
4
5
6
7
8
9
10
11
12
13
14
15
16
17
18
19
20
21
22
23
24
25
26
27
28
29
30
31
32
static Connection createConnection () throws Exception { ConnectionFactory factory = new ConnectionFactory (); factory.setHost("10.211.55.12" ); factory.setPort("5672" ); factory.setUsername("admin" ); factory.setPassword("123456" ); factory.setVirtualHost("/mirror" ); return connection = factory.newConnection(); } static void publishMessagesIndividually () throws Exception { try (Connection connection = createConnection()) { Channel ch = connection.createChannel(); String queue = UUID.randomUUID().toString(); ch.queueDeclare(queue, false , false , true , null ); ch.confirmSelect(); long start = System.nanoTime(); for (int i = 0 ; i < MESSAGE_COUNT; i++) { String body = String.valueOf(i); ch.basicPublish("" , queue, null , body.getBytes()); ch.waitForConfirmsOrDie(5_000 ); } long end = System.nanoTime(); System.out.format("Published %,d messages individually in %,d ms%n" , MESSAGE_COUNT, Duration.ofNanos(end - start).toMillis()); } }
测试结果
我们通过单条确认的方式发送了5W条消息,居然用了31秒,单条确认方式会急剧降低性能,影响效率。
批量发送消息
上面单条确认方式会急剧降低性能,为此我们可以发送一批消息后,在一起确认
1
2
3
4
5
6
7
8
9
10
11
12
13
14
15
16
17
18
19
20
21
22
23
24
25
26
27
28
29
30
31
32
33
34
35
36
37
38
39
40
41
42
43
44
45
46
static Connection createConnection () throws Exception { ConnectionFactory factory = new ConnectionFactory (); factory.setHost("10.211.55.12" ); factory.setPort("5672" ); factory.setUsername("admin" ); factory.setPassword("123456" ); factory.setVirtualHost("/mirror" ); return connection = factory.newConnection(); } static void publishMessagesInBatch () throws Exception { try (Connection connection = createConnection()) { Channel ch = connection.createChannel(); String queue = UUID.randomUUID().toString(); ch.queueDeclare(queue, false , false , true , null ); ch.confirmSelect(); int batchSize = 100 ; int outstandingMessageCount = 0 ; long start = System.nanoTime(); for (int i = 0 ; i < MESSAGE_COUNT; i++) { String body = String.valueOf(i); ch.basicPublish("" , queue, null , body.getBytes()); outstandingMessageCount++; if (outstandingMessageCount == batchSize) { ch.waitForConfirmsOrDie(5_000 ); outstandingMessageCount = 0 ; } } if (outstandingMessageCount > 0 ) { ch.waitForConfirmsOrDie(5_000 ); } long end = System.nanoTime(); System.out.format("Published %,d messages in batch in %,d ms%n" , MESSAGE_COUNT, Duration.ofNanos(end - start).toMillis()); } }
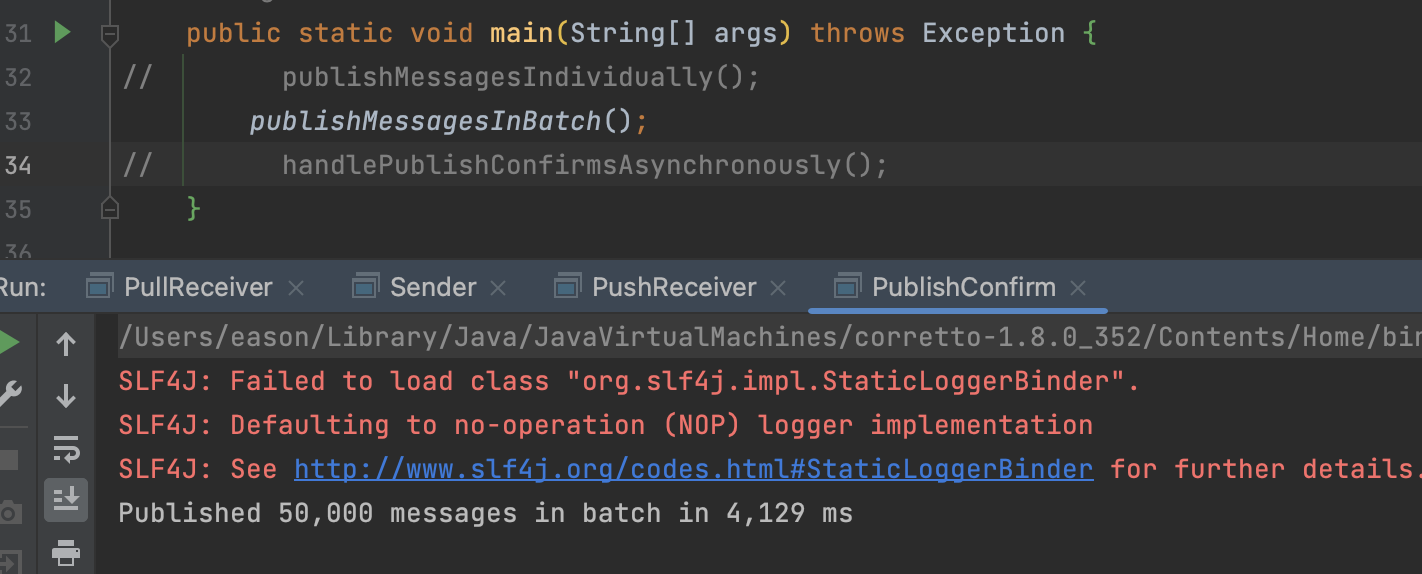
测试结果
通过批量发送消息,一次性确认的方式,一次性发送5W条消息,耗时4秒。
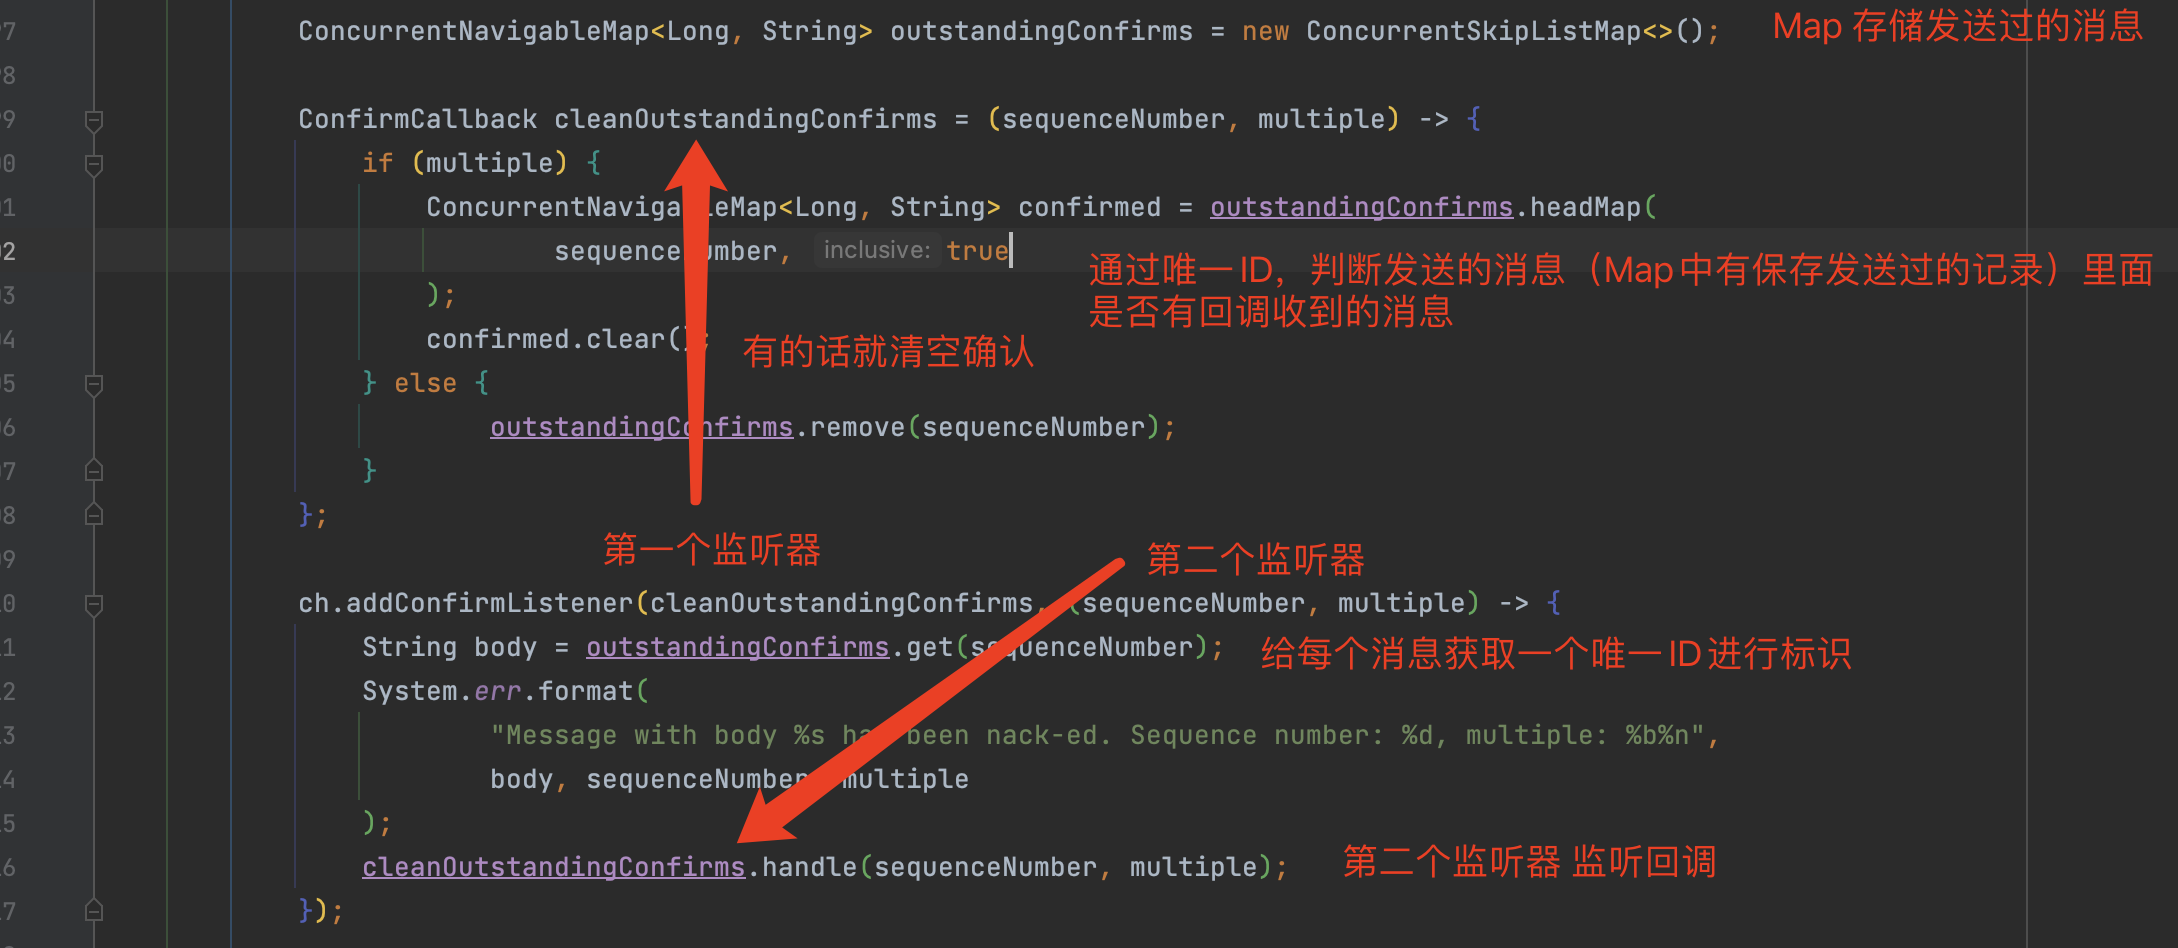
异步发送消息 1 2 3 4 5 6 7 8 9 10 11 12 13 14 15 16 17 18 19 20 21 22 23 24 25 26 27 28 29 30 31 32 33 34 35 36 37 38 39 40 41 42 43 44 45 46 47 48 49 50 51 52 53 54 55 56 57 58 59 60 61 62 63 64 65 66 67 68 69 70 71 static Connection createConnection () throws Exception { ConnectionFactory factory = new ConnectionFactory (); factory.setHost("10.211.55.12" ); factory.setPort("5672" ); factory.setUsername("admin" ); factory.setPassword("123456" ); factory.setVirtualHost("/mirror" ); return connection = factory.newConnection(); } static void handlePublishConfirmsAsynchronously () throws Exception { try (Connection connection = createConnection()) { Channel ch = connection.createChannel(); String queue = UUID.randomUUID().toString(); ch.queueDeclare(queue, false , false , true , null ); ch.confirmSelect(); ConcurrentNavigableMap<Long, String> outstandingConfirms = new ConcurrentSkipListMap <>(); ConfirmCallback cleanOutstandingConfirms = (sequenceNumber, multiple) -> { if (multiple) { ConcurrentNavigableMap<Long, String> confirmed = outstandingConfirms.headMap( sequenceNumber, true ); confirmed.clear(); } else { outstandingConfirms.remove(sequenceNumber); } }; ch.addConfirmListener(cleanOutstandingConfirms, (sequenceNumber, multiple) -> { String body = outstandingConfirms.get(sequenceNumber); System.err.format( "Message with body %s has been nack-ed. Sequence number: %d, multiple: %b%n" , body, sequenceNumber, multiple ); cleanOutstandingConfirms.handle(sequenceNumber, multiple); }); long start = System.nanoTime(); for (int i = 0 ; i < MESSAGE_COUNT; i++) { String body = String.valueOf(i); outstandingConfirms.put(ch.getNextPublishSeqNo(), body); ch.basicPublish("" , queue, null , body.getBytes()); } if (!waitUntil(Duration.ofSeconds(60 ), () -> outstandingConfirms.isEmpty())) { throw new IllegalStateException ("All messages could not be confirmed in 60 seconds" ); } long end = System.nanoTime(); System.out.format("Published %,d messages and handled confirms asynchronously in %,d ms%n" , MESSAGE_COUNT, Duration.ofNanos(end - start).toMillis()); } } static boolean waitUntil (Duration timeout, BooleanSupplier condition) throws InterruptedException { int waited = 0 ; while (!condition.getAsBoolean() && waited < timeout.toMillis()) { Thread.sleep(100L ); waited = +100 ; } return condition.getAsBoolean(); }
注意:
channel.addConfirmListener(ConfirmCallback var1, ConfirmCallback var2);
这里注册了2个监听器,发送者在发送完消息后,就会执行第一个监听器callback1,然后等服务端发过来的反馈后,再执行第二个监听器callback2。
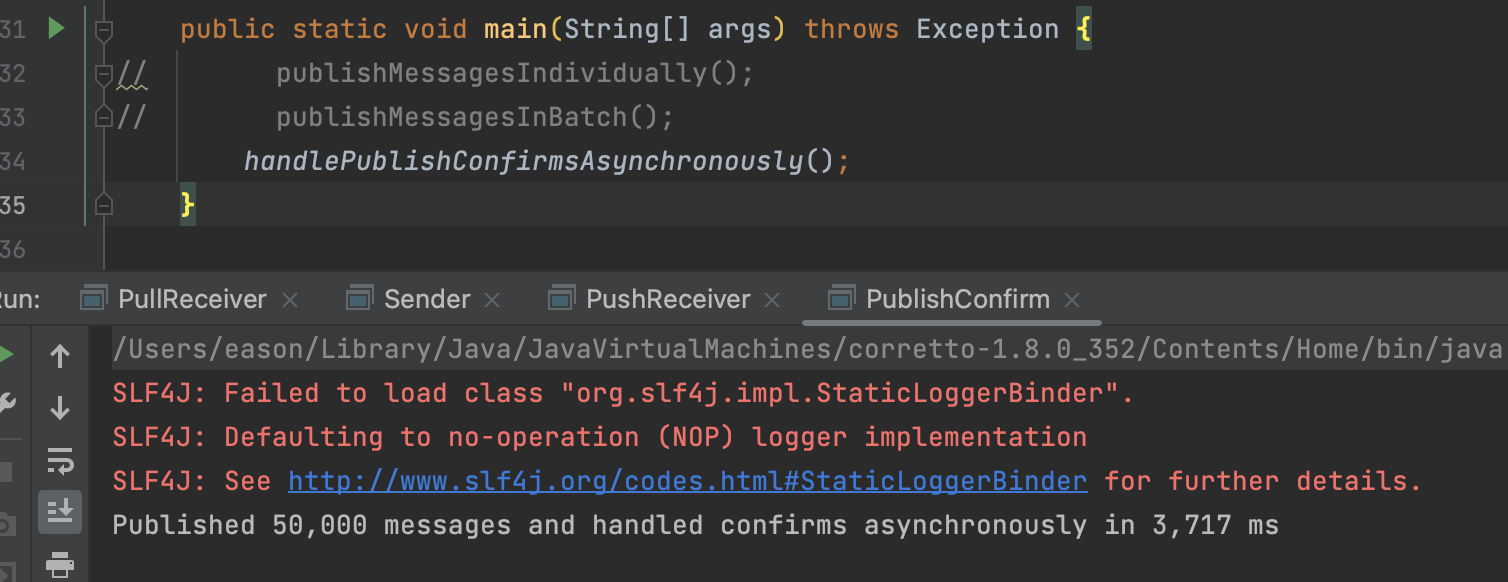
测试结果
通过异步发送的形式,发送5W条记录,耗时3秒。
Java原生API集成 1)Java实验 实验源码:https://files.javaxing.com/Java%08Demo/RabbitMQ-Demo.zip
1.引入Maven依赖 1 2 3 4 5 6 7 <dependencies > <dependency > <groupId > com.rabbitmq</groupId > <artifactId > amqp-client</artifactId > <version > 5.9.0</version > </dependency > </dependencies >
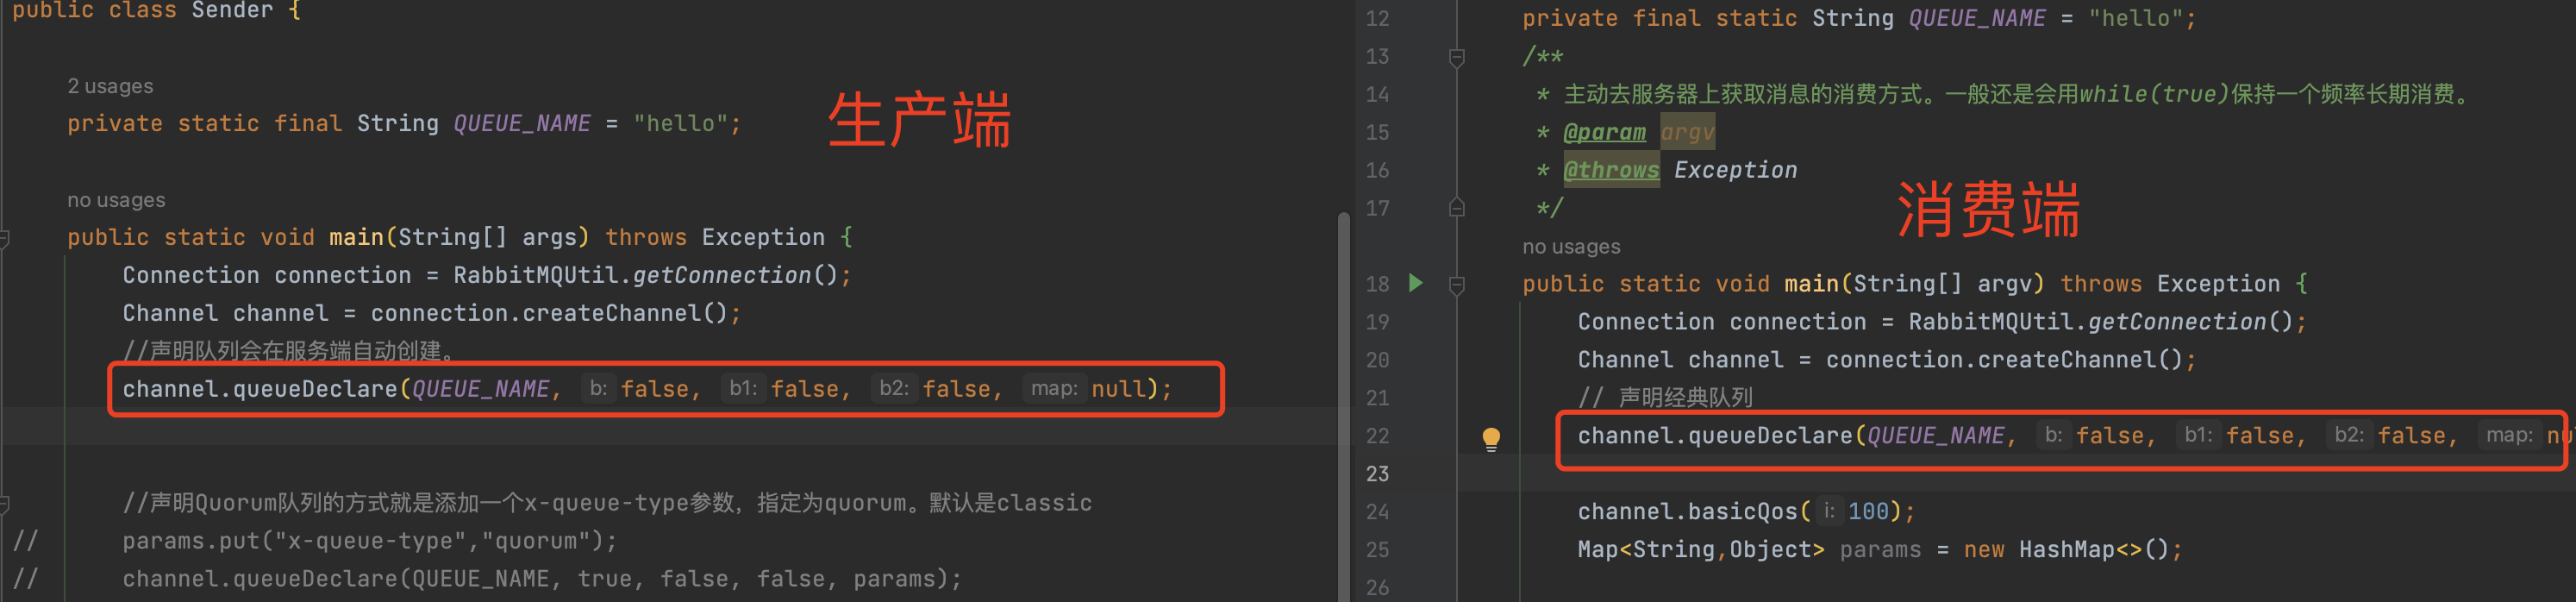
2.创建连接、Channel并声明队列 1 2 3 4 5 6 7 8 9 public static void main (String[] args) throws Exception { Connection connection = RabbitMQUtil.getConnection(); Channel channel = connection.createChannel(); channel.queueDeclare(QUEUE_NAME, false , false , false , null ); } }
步骤1:创建连接和Channel 1 2 3 4 5 6 7 8 9 10 ConnectionFactory factory = new ConnectionFactory ();factory.setHost("10.211.55.12" ); factory.setPort("5672" ); factory.setUsername("admin" ); factory.setPassword("123456" ); factory.setVirtualHost("/mirror" ); Connection connection = factory.newConnection();Channel channel = connection.createChannel();
步骤2:声明Queue队列 1 2 channel.queueDeclare(QUEUE_NAME, false , false , false , null );
声明队列时,如果服务端不存在该队列会自动创建,但是如果服务端有了这个队列,那么声明的队列属性必须和服务端的队列属性一致才行,否则会报错。
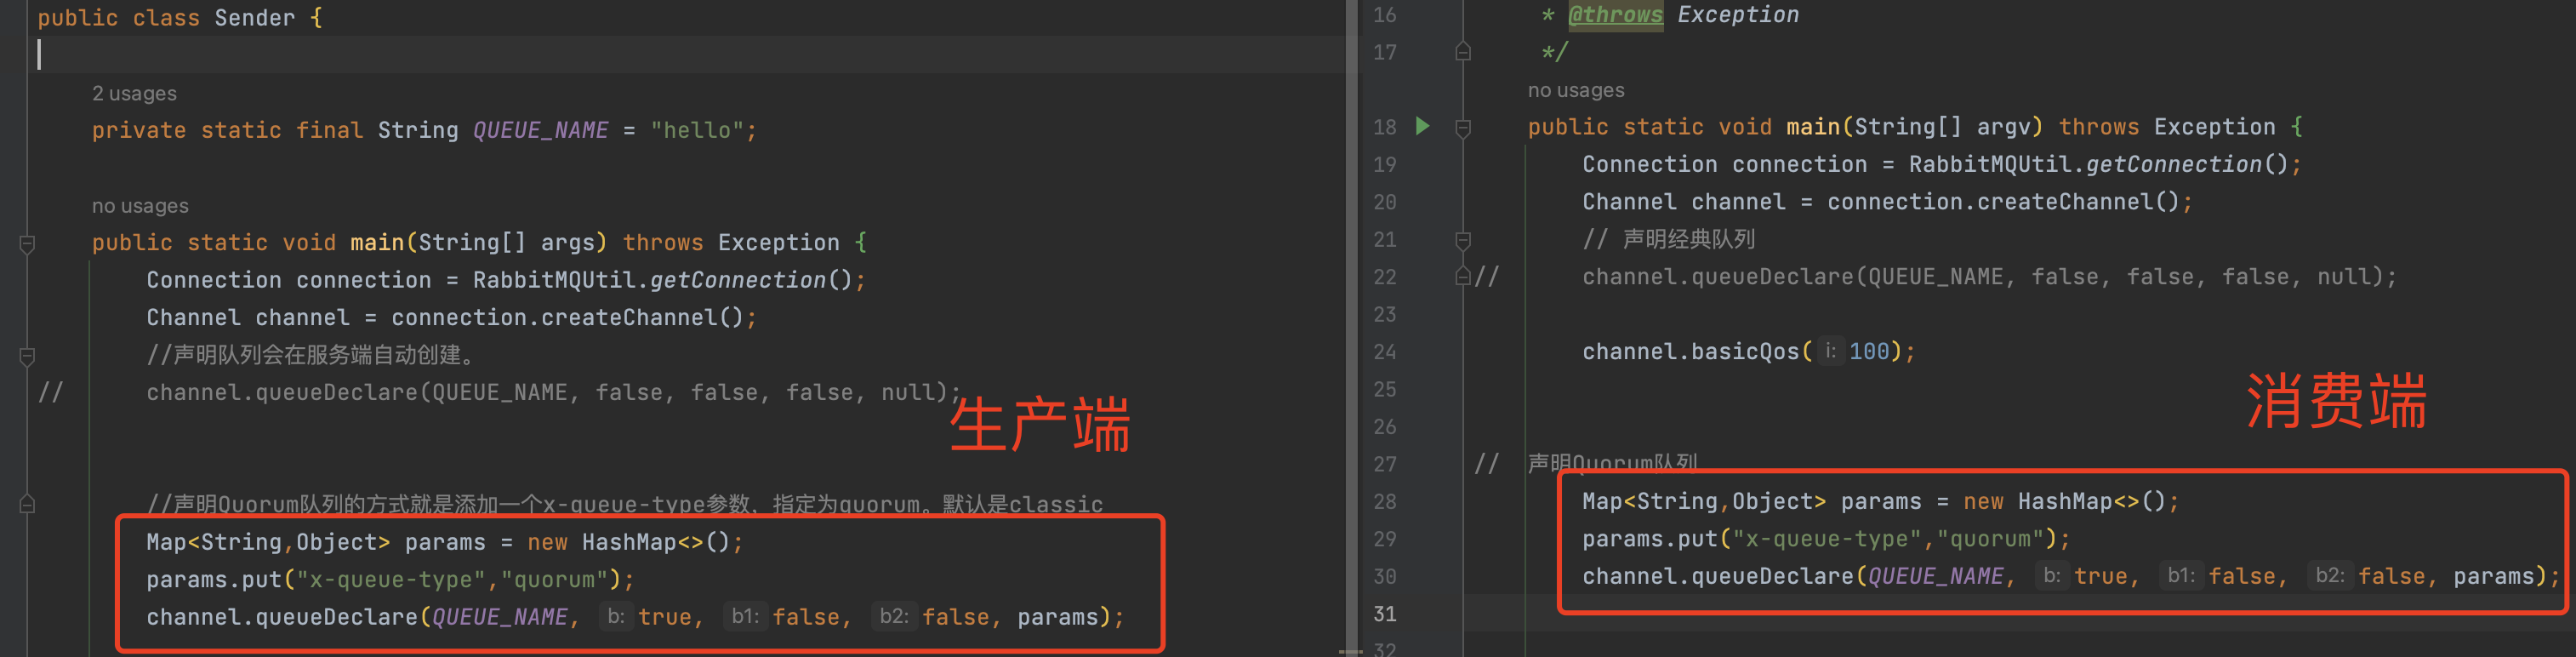
默认声明的是经典队列(classic),如果要声明其他队列类型,就需要在后面的arguments参数传入队列属性 x-queue-type 。
声明Quorum队列 1 2 3 4 Map<String,Object> params = new HashMap <>(); params.put("x-queue-type" ,"quorum" ); channel.queueDeclare(QUEUE_NAME, true , false , false , params);
注意细节:
1、durable参就必须是true,因为Quorum必须持久化,否则会报错。
2、exclusive参数必须设置为false,因为Quorum不支持独占队列。
声明Stream队列 1 2 3 4 5 params.put("x-queue-type" ,"stream" ); params.put("x-max-length-bytes" , 20_000_000_000L ); params.put("x-stream-max-segment-size-bytes" , 100_000_000 ); channel.queueDeclare(QUEUE_NAME, true , false , false , params);
注意细节:
1、durable参数必须是true,exclusive必须是false,原因同Quorum队列
2、x-max-length-bytes:表示日志文件的最大字节数。x-stream-max-segment-size-bytes 每一个日志文件的最大大小。这两个是可选参数(可以不配置),通常为了防止stream日志无限制累计,都会配合stream队列一起声明。
3.发送消息到队列 1 2 3 4 5 6 7 8 9 10 11 12 13 14 String message = "Hello World!333" ;AMQP.BasicProperties.Builder builder = new AMQP .BasicProperties.Builder(); builder.deliveryMode(MessageProperties.PERSISTENT_TEXT_PLAIN.getDeliveryMode()); builder.priority(MessageProperties.PERSISTENT_TEXT_PLAIN.getPriority()); builder.messageId("" +channel.getNextPublishSeqNo()); Map<String, Object> headers = new HashMap <>(); headers.put("order" , "123" ); builder.headers(headers); channel.basicPublish("" , QUEUE_NAME, builder.build(), message.getBytes("UTF-8" )); System.out.println(" [x] Sent '" + message + "'" );
代码解析:
channel.basicPublish("", QUEUE_NAME, builder.build(), message.getBytes("UTF-8"));
exchange:交换机,交换机会根据策略转发到不同的队列,如果不写默认为空,就发送到根 交换机
routingKey:路由key
props:路由头其他信息,如header头
body:消息主体
4.Consumer消费消息 消费者消费消息有2种模式:1、主动获取队列消息 2、监听消息队列
注意:不论是哪种模式,如果消费成功后一定要返回ack给MQ
监听消息队列模式 服务端与RabbitMQ创建长连接后,告知MQ需要监听的队列,RabbitMQ有消息后会立马推送给服务端。
监听Classic和Quorum队列
1 2 3 4 5 6 7 8 9 10 11 12 13 14 15 16 17 18 19 20 21 22 23 24 25 26 27 28 29 30 31 32 33 34 35 36 37 38 39 40 41 42 public class PushReceiver { private static final String QUEUE_NAME = "hello" ; public static void main (String[] args) throws Exception { Connection connection = RabbitMQUtil.getConnection(); Channel channel = connection.createChannel(); channel.queueDeclare(QUEUE_NAME, false , false , false , null ); Consumer myconsumer = new DefaultConsumer (channel) { @Override public void handleDelivery (String consumerTag, Envelope envelope, BasicProperties properties, byte [] body) throws IOException { System.out.println("========================" ); String routingKey = envelope.getRoutingKey(); System.out.println("routingKey >" +routingKey); String contentType = properties.getContentType(); System.out.println("contentType >" +contentType); long deliveryTag = envelope.getDeliveryTag(); System.out.println("deliveryTag >" +deliveryTag); System.out.println("content:" +new String (body,"UTF-8" )); System.out.println("messageId:" +properties.getMessageId()); properties.getHeaders().forEach((key,value)-> System.out.println("key: " +key +"; value: " +value)); channel.basicAck(deliveryTag, false ); } }; channel.basicConsume(QUEUE_NAME, false , myconsumer); } }
监听Stream队列
消费Stream队列时,需要注意三个位置:
channel必须设置basicQos属性。
正确声明Stream队列。
消费时需要指定offset。
1 2 3 4 5 6 7 8 9 10 11 12 13 14 15 16 17 18 19 20 21 22 23 24 25 26 27 28 29 30 31 32 33 34 35 36 37 38 39 40 41 42 Connection connection = RabbitMQUtil.getConnection(); Channel channel = connection.createChannel(); channel.basicQos(100 ); Map<String,Object> params = new HashMap <>(); params.put("x-queue-type" ,"stream" ); params.put("x-max-length-bytes" , 20_000_000_000L ); params.put("x-stream-max-segment-size-bytes" , 100_000_000 ); channel.queueDeclare(QUEUE_NAME, true , false , false , params); Consumer myconsumer = new DefaultConsumer (channel) { @Override public void handleDelivery (String consumerTag, Envelope envelope, AMQP.BasicProperties properties, byte [] body) throws IOException { System.out.println("========================" ); String routingKey = envelope.getRoutingKey(); System.out.println("routingKey >" + routingKey); String contentType = properties.getContentType(); System.out.println("contentType >" + contentType); long deliveryTag = envelope.getDeliveryTag(); System.out.println("deliveryTag >" + deliveryTag); System.out.println("content:" + new String (body, "UTF-8" )); channel.basicAck(deliveryTag, false ); } }; Map<String,Object> consumeParam = new HashMap <>(); consumeParam.put("x-stream-offset" ,"next" ); channel.basicConsume(QUEUE_NAME, false ,consumeParam, myconsumer); channel.close();
发送命令
1 2 3 channel.basicConsume(QUEUE_NAME, false , myconsumer);
注意:如果在回调函数内没有手动发送ack(basicAck),那么在获取消息时 一定要autoAck 为true
回调函数内的手动确认
1 2 channel.basicAck(deliveryTag, false );
第二个参数:批量确认,为false 代表一条消息发送一次ACK确认,如果为true,则多条消息后一起确认
主动获取队列消息 1 2 3 4 5 6 7 8 9 10 11 12 13 14 15 16 17 18 19 20 21 22 23 24 25 26 27 28 29 30 31 32 33 34 35 36 37 38 39 40 41 public static void main (String[] argv) throws Exception { Connection connection = RabbitMQUtil.getConnection(); Channel channel = connection.createChannel(); channel.queueDeclare(QUEUE_NAME, false , false , false , null ); channel.basicQos(100 ); Map<String,Object> params = new HashMap <>(); System.out.println(" [*] Waiting for messages. To exit press CTRL+C" ); GetResponse response = channel.basicGet(QUEUE_NAME, false ); if (null != response){ System.out.println(new String (response.getBody(),"UTF-8" )); } Thread.sleep(10000 ); GetResponse response2 = channel.basicGet(QUEUE_NAME, false ); if (null != response2){ System.out.println(new String (response2.getBody(),"UTF-8" )); } channel.close(); connection.close(); }
获取消息命令
1 2 3 GetResponse response = channel.basicGet(QUEUE_NAME, false );
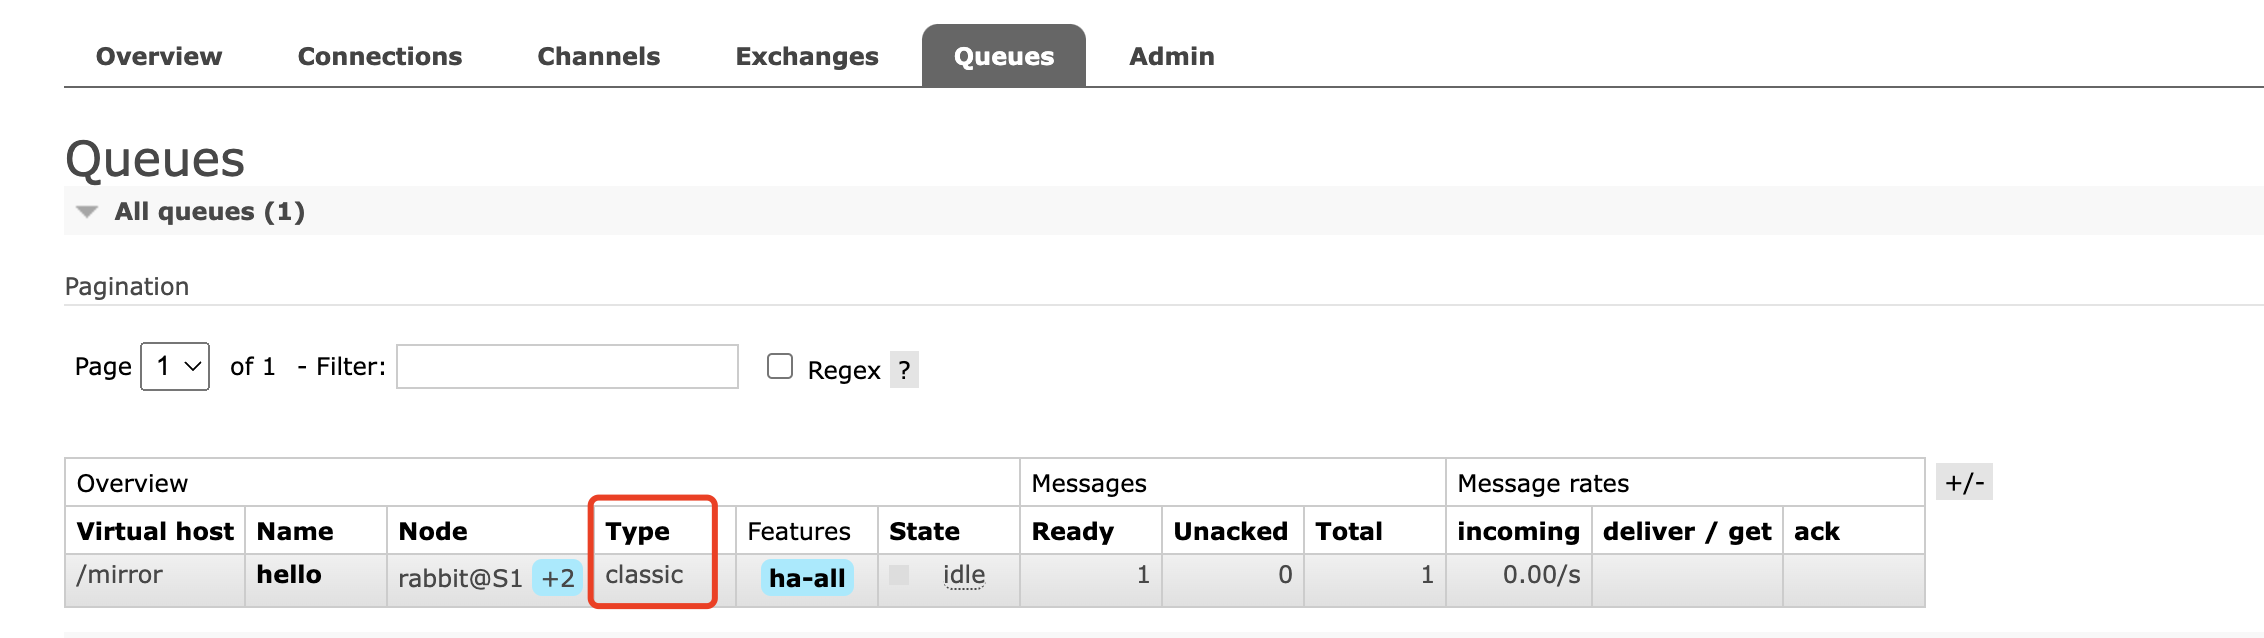
关于队列不同导致出错的问题
经典队列:
quorum队列:
Stream队列:
注意:主动获取队列消息时,必须声明获取的队列信息,声明的队列参数必须与生产者创建的队列参数一模一样
错误案例
当前hello队列中有一条消息,我们尝试取出来,但是我们获取消息时,故意和生产者的声明队列信息不一致。
生产者声明的队列是不持久化的,而消费者声明的队列进行了持久化,2个队列的参数是不一致的,就会出现以下的错误:
5.Close连接 1 2 channel.close(); connection.close();
在执行完所有逻辑后,不论是发送消息还是获取消息,一定要关闭连接,释放资源。
Springboot集成RabbitMQ 源码:https://files.javaxing.com/Java%08Demo/RabbitMQTestDemo.zip
1)引入xml依赖 1 2 3 4 <dependency > <groupId > org.springframework.boot</groupId > <artifactId > spring-boot-starter-amqp</artifactId > </dependency >
2)配置RabbitMQ参数 rabbitMQ基本参数都需要在Springboot的application.properties文件中进行配置。
1 2 3 4 5 6 7 8 9 10 11 12 13 14 server.port =8080 spring.rabbitmq.host =10.211.55.12 spring.rabbitmq.port =5672 spring.rabbitmq.username =admin spring.rabbitmq.password =123456 spring.rabbitmq.virtual-host =/mirror spring.rabbitmq.listener.simple.prefetch =1 spring.rabbitmq.listener.simple.concurrency =5 spring.rabbitmq.listener.simple.max-concurrency =10 spring.rabbitmq.listener.simple.acknowledge-mode =none
3)声明队列、交换机、绑定关系
我们需要通过配置文件来声明队列和交换机以及队列和交换机之间的绑定关系
如果RabbitMQ有已经存在的队列或交换机,springboot在启动时就不会再次创建队列和交换机
如果我们提前创建好了队列和交换机,这里的声明队列的配置文件其实就可以不用写
1 2 3 4 5 6 7 8 9 10 11 12 13 14 15 16 17 18 19 20 21 22 23 24 25 26 27 28 29 30 31 32 33 34 35 36 37 38 39 40 41 42 43 44 45 46 47 48 49 50 51 52 53 54 55 56 57 package com.javaxing.springbootrabbitmq.config;import com.javaxing.springbootrabbitmq.util.MyConstants;import org.springframework.amqp.core.Binding;import org.springframework.amqp.core.BindingBuilder;import org.springframework.amqp.core.FanoutExchange;import org.springframework.amqp.core.Queue;import org.springframework.context.annotation.Bean;import org.springframework.context.annotation.Configuration;@Configuration public class FanoutConfig { @Bean public Queue fanoutQ1 () { return new Queue (MyConstants.QUEUE_FANOUT_Q1); } @Bean public Queue fanoutQ2 () { return new Queue (MyConstants.QUEUE_FANOUT_Q2); } @Bean public Queue fanoutQ3 () { return new Queue (MyConstants.QUEUE_FANOUT_Q3); } @Bean public Queue fanoutQ4 () { return new Queue (MyConstants.QUEUE_FANOUT_Q4); } @Bean public FanoutExchange setFanoutExchange () { return new FanoutExchange (MyConstants.EXCHANGE_FANOUT); } @Bean public Binding bindQ1 () { return BindingBuilder.bind(fanoutQ1()).to(setFanoutExchange()); } @Bean public Binding bindQ2 () { return BindingBuilder.bind(fanoutQ2()).to(setFanoutExchange()); } @Bean public Binding bindQ3 () { return BindingBuilder.bind(fanoutQ3()).to(setFanoutExchange()); } @Bean public Binding bindQ4 () { return BindingBuilder.bind(fanoutQ4()).to(setFanoutExchange()); } }
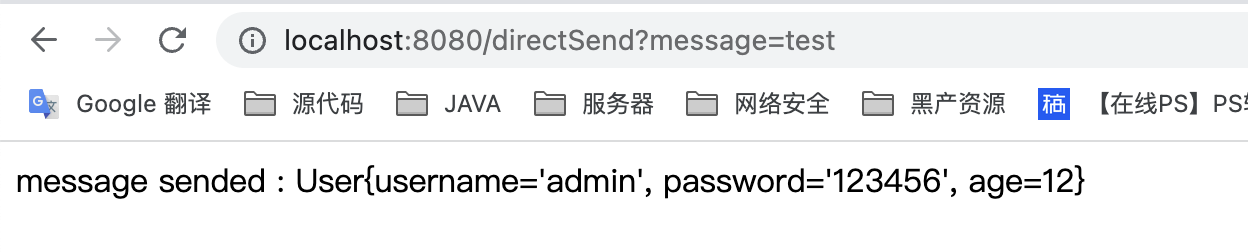
4)生产者发送消息,消费者消费消息 1.直接发送队列 生产者发送消息
1 2 3 4 5 6 7 8 9 10 11 12 13 14 15 16 17 18 19 20 21 22 23 24 25 26 27 28 @GetMapping(value="/directSend") public Object directSend () throws AmqpException, UnsupportedEncodingException { User user = new User (); user.setUsername("admin" ); user.setPassword("123456" ); user.setAge(12 ); rabbitTemplate.setMessageConverter(new Jackson2JsonMessageConverter ()); rabbitTemplate.convertAndSend("" ,"directqueue" ,user); return "message sended : " +user; }
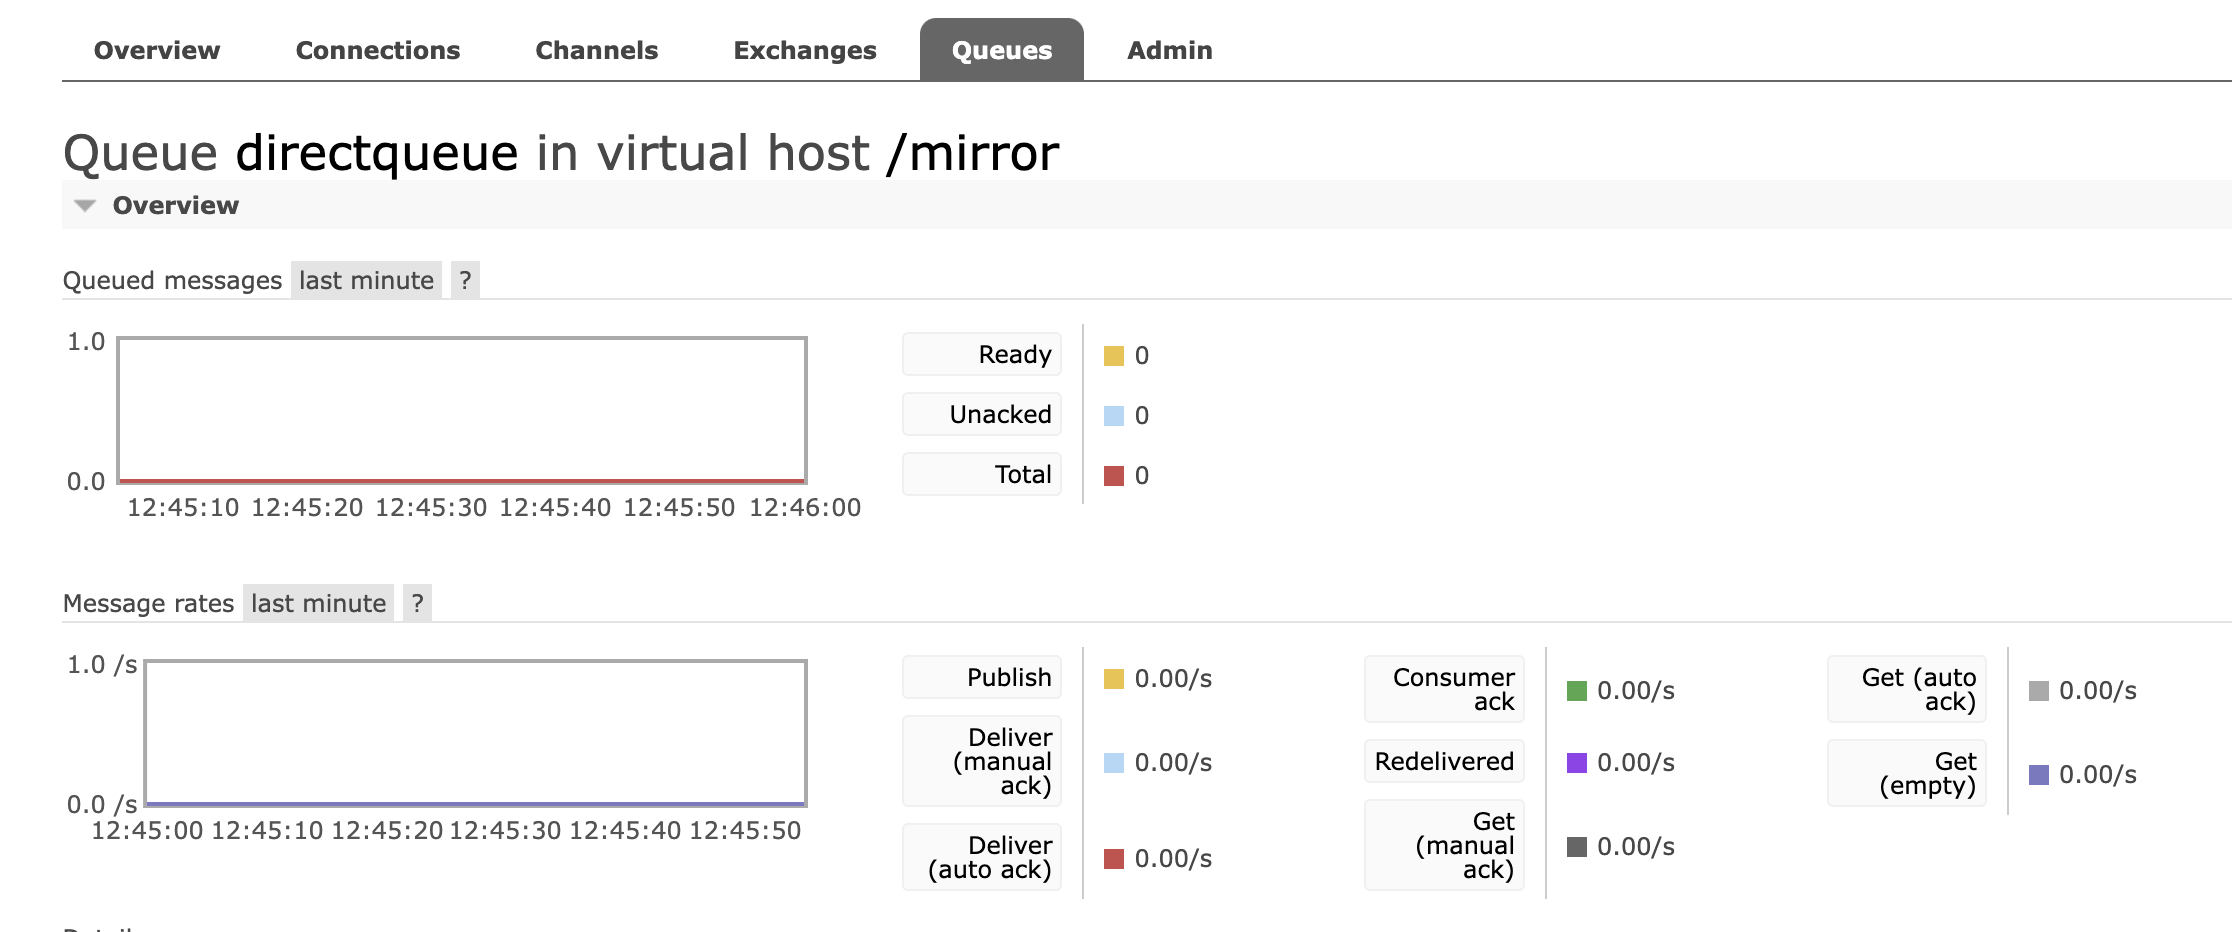
发送结果
消费者监听队列
1 2 3 4 5 6 7 8 9 10 11 12 @Component public class DirectReceiver { @RabbitListener(queues= MyConstants.QUEUE_DIRECT) public void directReceive22 (Message message, Channel channel, String messageMap) { System.out.println("message:" +message); System.out.println("channel:" +channel); System.out.println("consumer1 received message : " +messageMap); } }
监听结果
2.广播的形式发送到Exchange 发送消息
1 2 3 4 5 6 7 8 9 10 11 12 13 14 15 16 17 18 19 20 21 @GetMapping(value="/fanoutSend") public void fanoutSend () throws AmqpException, UnsupportedEncodingException { User user = new User (); user.setUsername("admin" ); user.setPassword("123456" ); user.setAge(12 ); rabbitTemplate.setMessageConverter(new Jackson2JsonMessageConverter ()); rabbitTemplate.convertAndSend(MyConstants.EXCHANGE_FANOUT,"" ,user); }
发送结果
消费者监听队列
1 2 3 4 5 6 7 8 9 10 11 12 13 14 15 16 @RabbitListener(queues=MyConstants.QUEUE_FANOUT_Q1) public void fanoutReceiveq1 (String message) { System.out.println("fanoutReceive q1 received message : " +message); } @RabbitListener(queues=MyConstants.QUEUE_FANOUT_Q2) public void fanoutReceiveq2 (String message) { System.out.println("fanoutReceive q2 received message : " +message); } @RabbitListener(queues=MyConstants.QUEUE_FANOUT_Q3) public void fanoutReceiveq3 (String message) { System.out.println("fanoutReceive q3 received message : " +message); } @RabbitListener(queues=MyConstants.QUEUE_FANOUT_Q4) public void fanoutReceiveq4 (String message) { System.out.println("fanoutReceive q4 received message : " +message); }
监听结果
3.topic 通配符的方式发送到Exchange 案例一:
生产者发送消息
1 2 3 4 5 6 7 8 9 10 11 12 13 14 15 16 17 18 19 20 21 22 23 24 25 @GetMapping(value="/topicSend") public Object topicSend () throws AmqpException, UnsupportedEncodingException { String routingKey="hebei.IT" ; User user = new User (); user.setUsername("admin" ); user.setPassword("123456" ); user.setAge(12 ); rabbitTemplate.setMessageConverter(new Jackson2JsonMessageConverter ()); rabbitTemplate.convertAndSend("topicExchange" ,routingKey,user); return "message sended : routingKey >" +routingKey+";message > " +user; }
routingKey这里我们可以根据 声明topic队列的策略,进行匹配。如:hebei.IT –> topicQ4的条件 hebei.*,a.eco –> topicQ3的条件
发送结果
队列配置文件
1 2 3 4 5 6 7 8 9 10 11 12 13 14 15 16 17 18 19 20 21 22 23 24 25 26 27 28 29 30 31 32 33 34 35 36 37 38 39 40 41 42 43 44 45 46 47 48 @Configuration public class TopicConfig { @Bean public Queue topicQ1 () { return new Queue ("hunan.eco" ); } @Bean public Queue topicQ2 () { return new Queue ("hunan.IT" ); } @Bean public Queue topicQ3 () { return new Queue ("hebei.eco" ); } @Bean public Queue topicQ4 () { return new Queue ("hebei.IT" ); } @Bean public TopicExchange setTopicExchange () { return new TopicExchange (MyConstants.EXCHANGE_TOPIC); } @Bean public Binding bindTopicHebei1 () { return BindingBuilder.bind(topicQ1()).to(setTopicExchange()).with("hunan.*" ); } @Bean public Binding bindTopicHebei2 () { return BindingBuilder.bind(topicQ2()).to(setTopicExchange()).with("*.IT" ); } @Bean public Binding bindTopicHebei3 () { return BindingBuilder.bind(topicQ3()).to(setTopicExchange()).with("*.eco" ); } @Bean public Binding bindTopicHebei4 () { return BindingBuilder.bind(topicQ4()).to(setTopicExchange()).with("hebei.*" ); } }
消费者监听队列
1 2 3 4 5 6 7 8 9 10 11 12 13 14 15 16 @RabbitListener(queues="hunan.eco") public void topicReceiveq1 (String message) { System.out.println("topic1 hunan.* received message : " +message); } @RabbitListener(queues="hunan.IT") public void topicReceiveq2 (String message) { System.out.println("topic2 *.IT received message : " +message); } @RabbitListener(queues="hebei.eco") public void topicReceiveq3 (String message) { System.out.println("topic3 *.eco received message : " +message); } @RabbitListener(queues="hebei.IT") public void topicReceiveq4 (String message) { System.out.println("topic4 hebei.* received message : " +message); }
监听结果
我们发送了一条消息给交换机,topic = hubei.it ,刚好能匹配上2个队列,队列规则如下:
1 2 hubei.it --> *.IT hubei.it --> hebei.*
案例二:
案例二中 topic key = a.eco,刚好可以满足topicQ3的条件 *.eco
4.发送消息到Quorum队列 生产者发送消息
1 2 3 4 5 6 7 8 9 10 11 12 13 14 15 16 17 18 19 20 @GetMapping(value="/directQuorum") public Object directQuorum () throws AmqpException, UnsupportedEncodingException { User user = new User (); user.setUsername("admin" ); user.setPassword("123456" ); user.setAge(12 ); rabbitTemplate.setMessageConverter(new Jackson2JsonMessageConverter ()); rabbitTemplate.convertAndSend("quorumQueue" ,user); return "message sended : " +user; }
发送结果
消费者监听队列
1 2 3 4 @RabbitListener(queues = MyConstants.QUEUE_QUORUM) public void quorumReceiver (String message) { System.out.println("quorumReceiver received message : " + message); }
监听结果
SpringCloudStream集成RabbitMQ SpringCloudStream是SpringBoot官方推出的一个微服务MQ框架,可以同时集成RabbitMQ、RocketMQ、Kafka等消息队列。
1)名词解释
Binders
定义一个外部服务器,外部服务器可以是rabbitMQ、kafka,类似于数据源。,可以配置多个
Binding
Message
2)简易集成不指定交换机和队列 1.引入xml依赖 1 2 3 4 5 6 7 8 9 10 11 <dependency > <groupId > org.springframework.cloud</groupId > <artifactId > spring-cloud-stream-binder-rabbit</artifactId > <version > 3.1.5</version > </dependency > <dependency > <groupId > com.alibaba</groupId > <artifactId > fastjson</artifactId > <version > 1.2.49</version > </dependency >
注意,这里的依赖版本用的3.1.5,这很重要,不要去追求太新的版本,因为实测 新版本有很多BUG,请三思而行。
2.在启动类上配置注解 1 2 3 4 5 6 7 8 9 10 11 12 13 14 15 package com.javaxing.springcloudstreamdemo1;import org.springframework.boot.SpringApplication;import org.springframework.boot.autoconfigure.SpringBootApplication;import org.springframework.cloud.stream.annotation.EnableBinding;import org.springframework.cloud.stream.messaging.Sink;import org.springframework.cloud.stream.messaging.Source;@SpringBootApplication @EnableBinding({Source.class, Sink.class}) public class SpringCloudStreamDemo1Application { public static void main (String[] args) { SpringApplication.run(SpringCloudStreamDemo1Application.class, args); } }
3.创建一个user 实体类 1 2 3 4 5 6 7 8 9 10 11 12 13 14 15 16 17 18 19 20 21 22 23 24 25 package com.javaxing.springcloudstreamdemo1;public class User { private String username; private String password; @Override public String toString () { return "User{" + "username='" + username + '\'' + ", password='" + password + '\'' + '}' ; } public String getUsername () { return username; } public String getPassword () { return password; } public void setPassword (String password) { this .password = password; } public void setUsername (String username) { this .username = username; } }
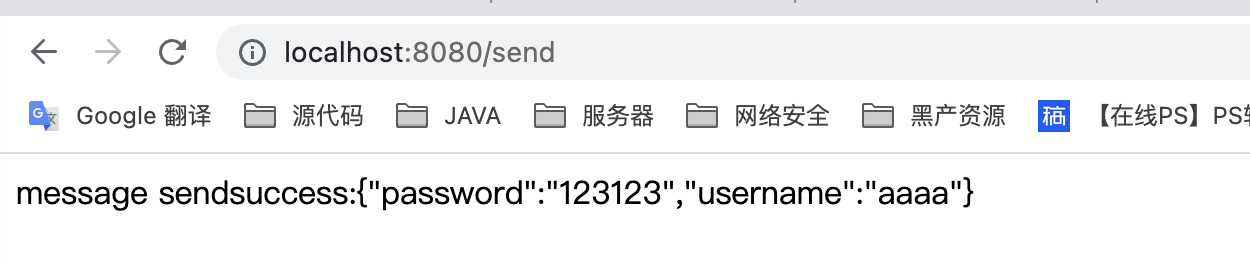
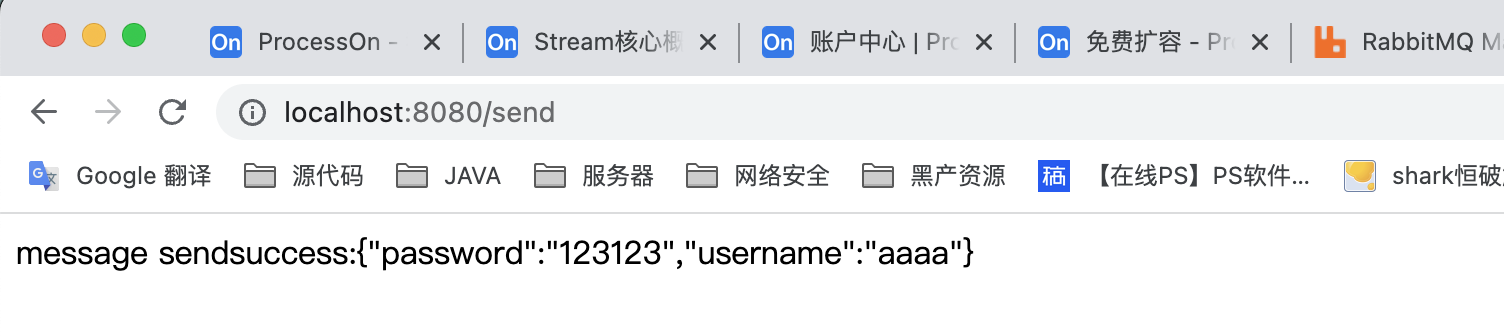
4.配置生产者 1 2 3 4 5 6 7 8 9 10 11 12 13 14 15 16 17 18 19 20 21 22 23 24 25 26 27 28 29 package com.javaxing.springcloudstreamdemo1.controller;import com.alibaba.fastjson.JSON;import com.javaxing.springcloudstreamdemo1.User;import org.springframework.beans.factory.annotation.Autowired;import org.springframework.cloud.stream.messaging.Source;import org.springframework.integration.support.MessageBuilder;import org.springframework.web.bind.annotation.GetMapping;import org.springframework.web.bind.annotation.RestController;@RestController public class SendMessageController { @Autowired private Source source; @GetMapping("/send") public Object send () { User user = new User (); user.setUsername("aaaa" ); user.setPassword("123123" ); MessageBuilder<String> messageBuilder = MessageBuilder.withPayload(JSON.toJSONString(user)); source.output().send(messageBuilder.build()); return "message sendsuccess:" +JSON.toJSONString(user); } }
5.配置消费者 1 2 3 4 5 6 7 8 9 10 11 12 13 14 15 16 17 18 19 20 21 22 23 24 package com.javaxing.springcloudstreamdemo1.listening;import com.alibaba.fastjson.JSON;import com.javaxing.springcloudstreamdemo1.User;import org.slf4j.Logger;import org.slf4j.LoggerFactory;import org.springframework.cloud.stream.annotation.EnableBinding;import org.springframework.cloud.stream.annotation.StreamListener;import org.springframework.cloud.stream.messaging.Sink;import org.springframework.stereotype.Component;@Component @EnableBinding(Sink.class) public class MessageListening { private Logger logger = LoggerFactory.getLogger(MessageListening.class); @StreamListener(Sink.INPUT) public void process (String message) { logger.info("收到消息:{}" ,message); User user = JSON.parseObject(message, User.class); System.out.println(user); } }
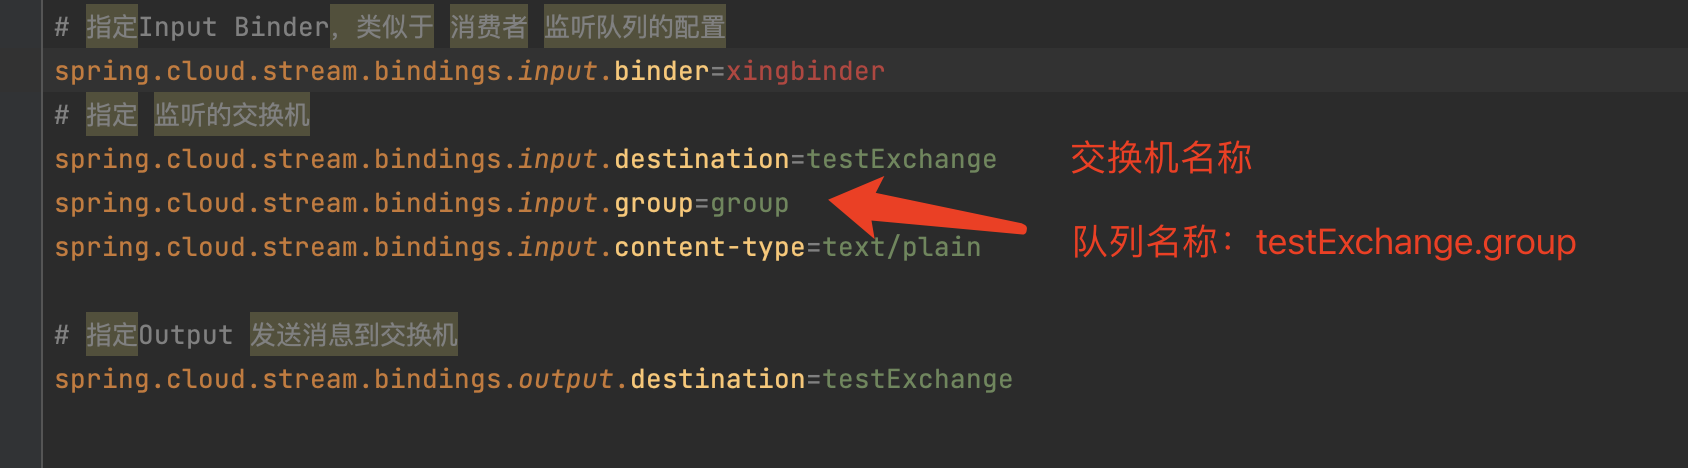
6.配置application.properties 1 2 3 4 5 6 7 8 9 10 11 12 13 14 15 16 spring.cloud.stream.binders.xingbinder.type =rabbit spring.cloud.stream.binders.xingbinder.environment.spring.rabbitmq.host =10.211.55.12,10.211.55.17,10.211.55.18 spring.cloud.stream.binders.xingbinder.environment.spring.rabbitmq.port =5672 spring.cloud.stream.binders.xingbinder.environment.spring.rabbitmq.username =admin spring.cloud.stream.binders.xingbinder.environment.spring.rabbitmq.password =123456 spring.cloud.stream.bindings.input.binder =xingbinder spring.cloud.stream.bindings.input.destination =testExchange spring.cloud.stream.bindings.input.group =group spring.cloud.stream.bindings.input.content-type =text/plain spring.cloud.stream.bindings.output.destination =testExchange
7.测试 生产者发送消息
消费者接收到消息
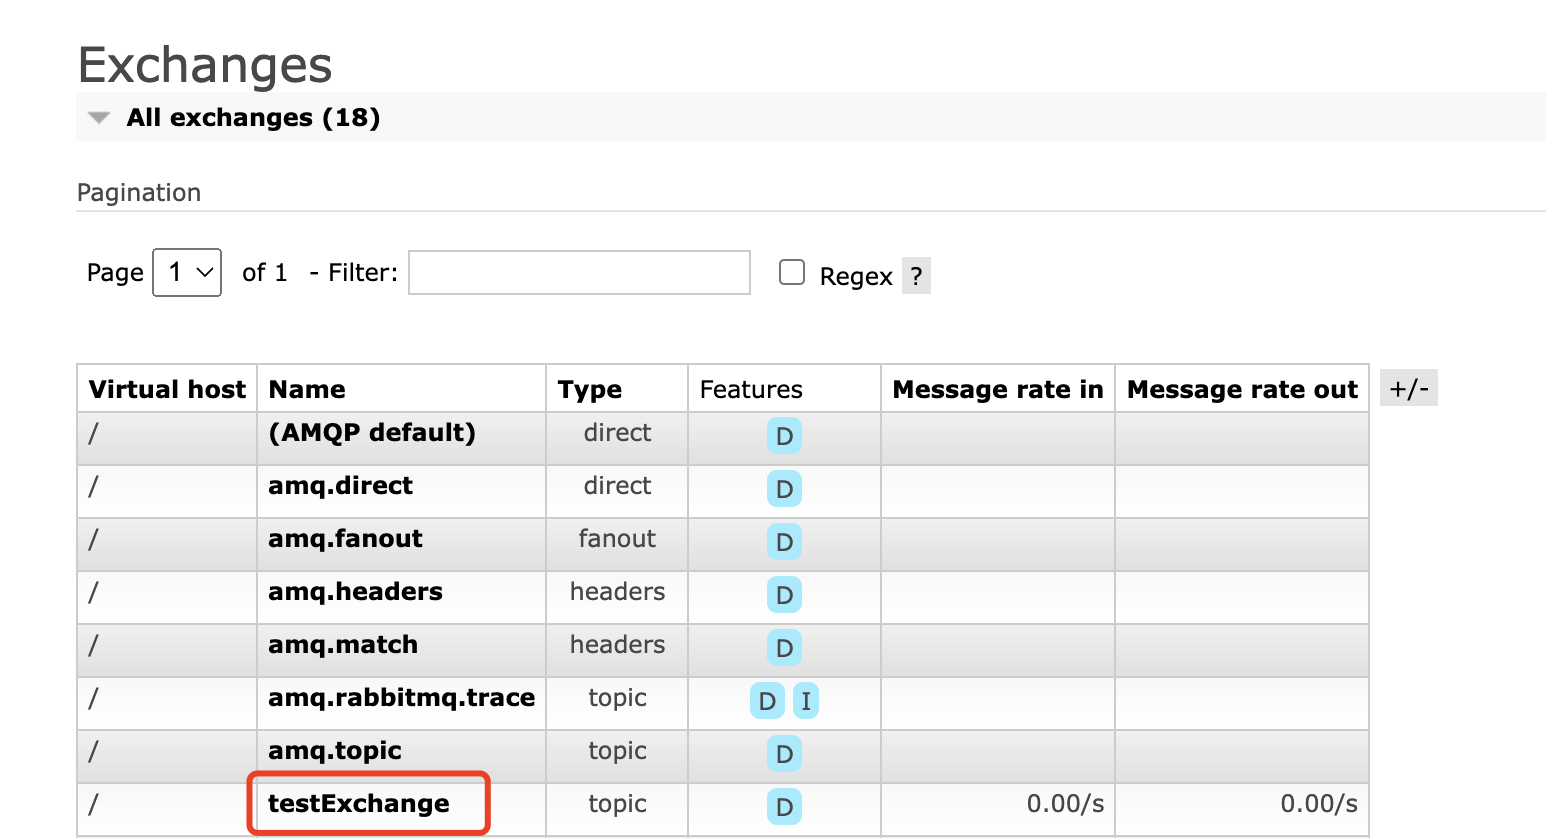
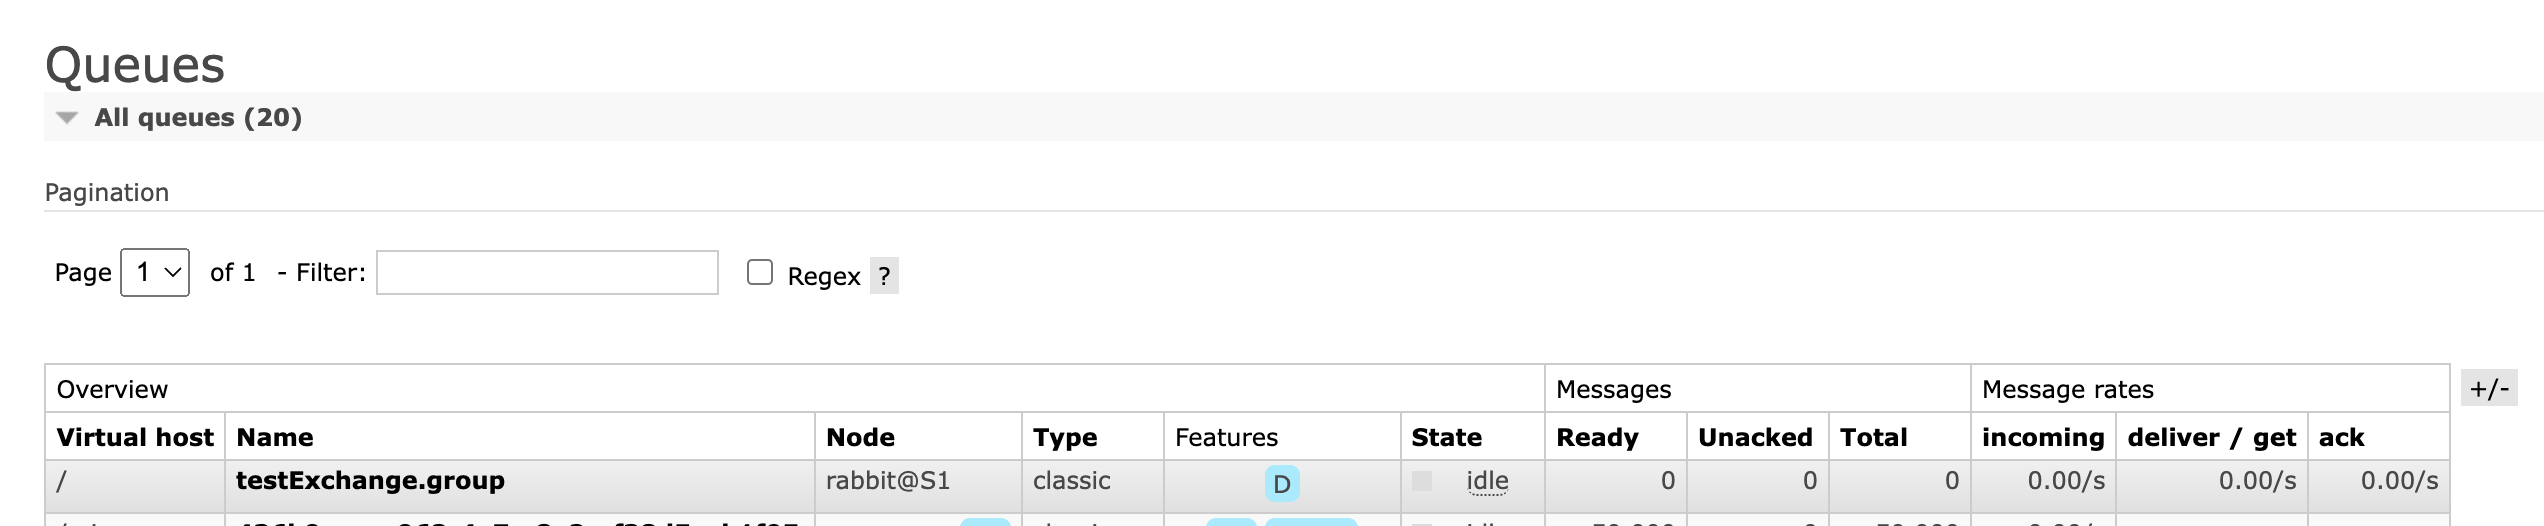
值得注意的是,如果我们在application.properties 配置的交换机不存在的话,他会自动创建交换机,且队列会以交换机名称+队列
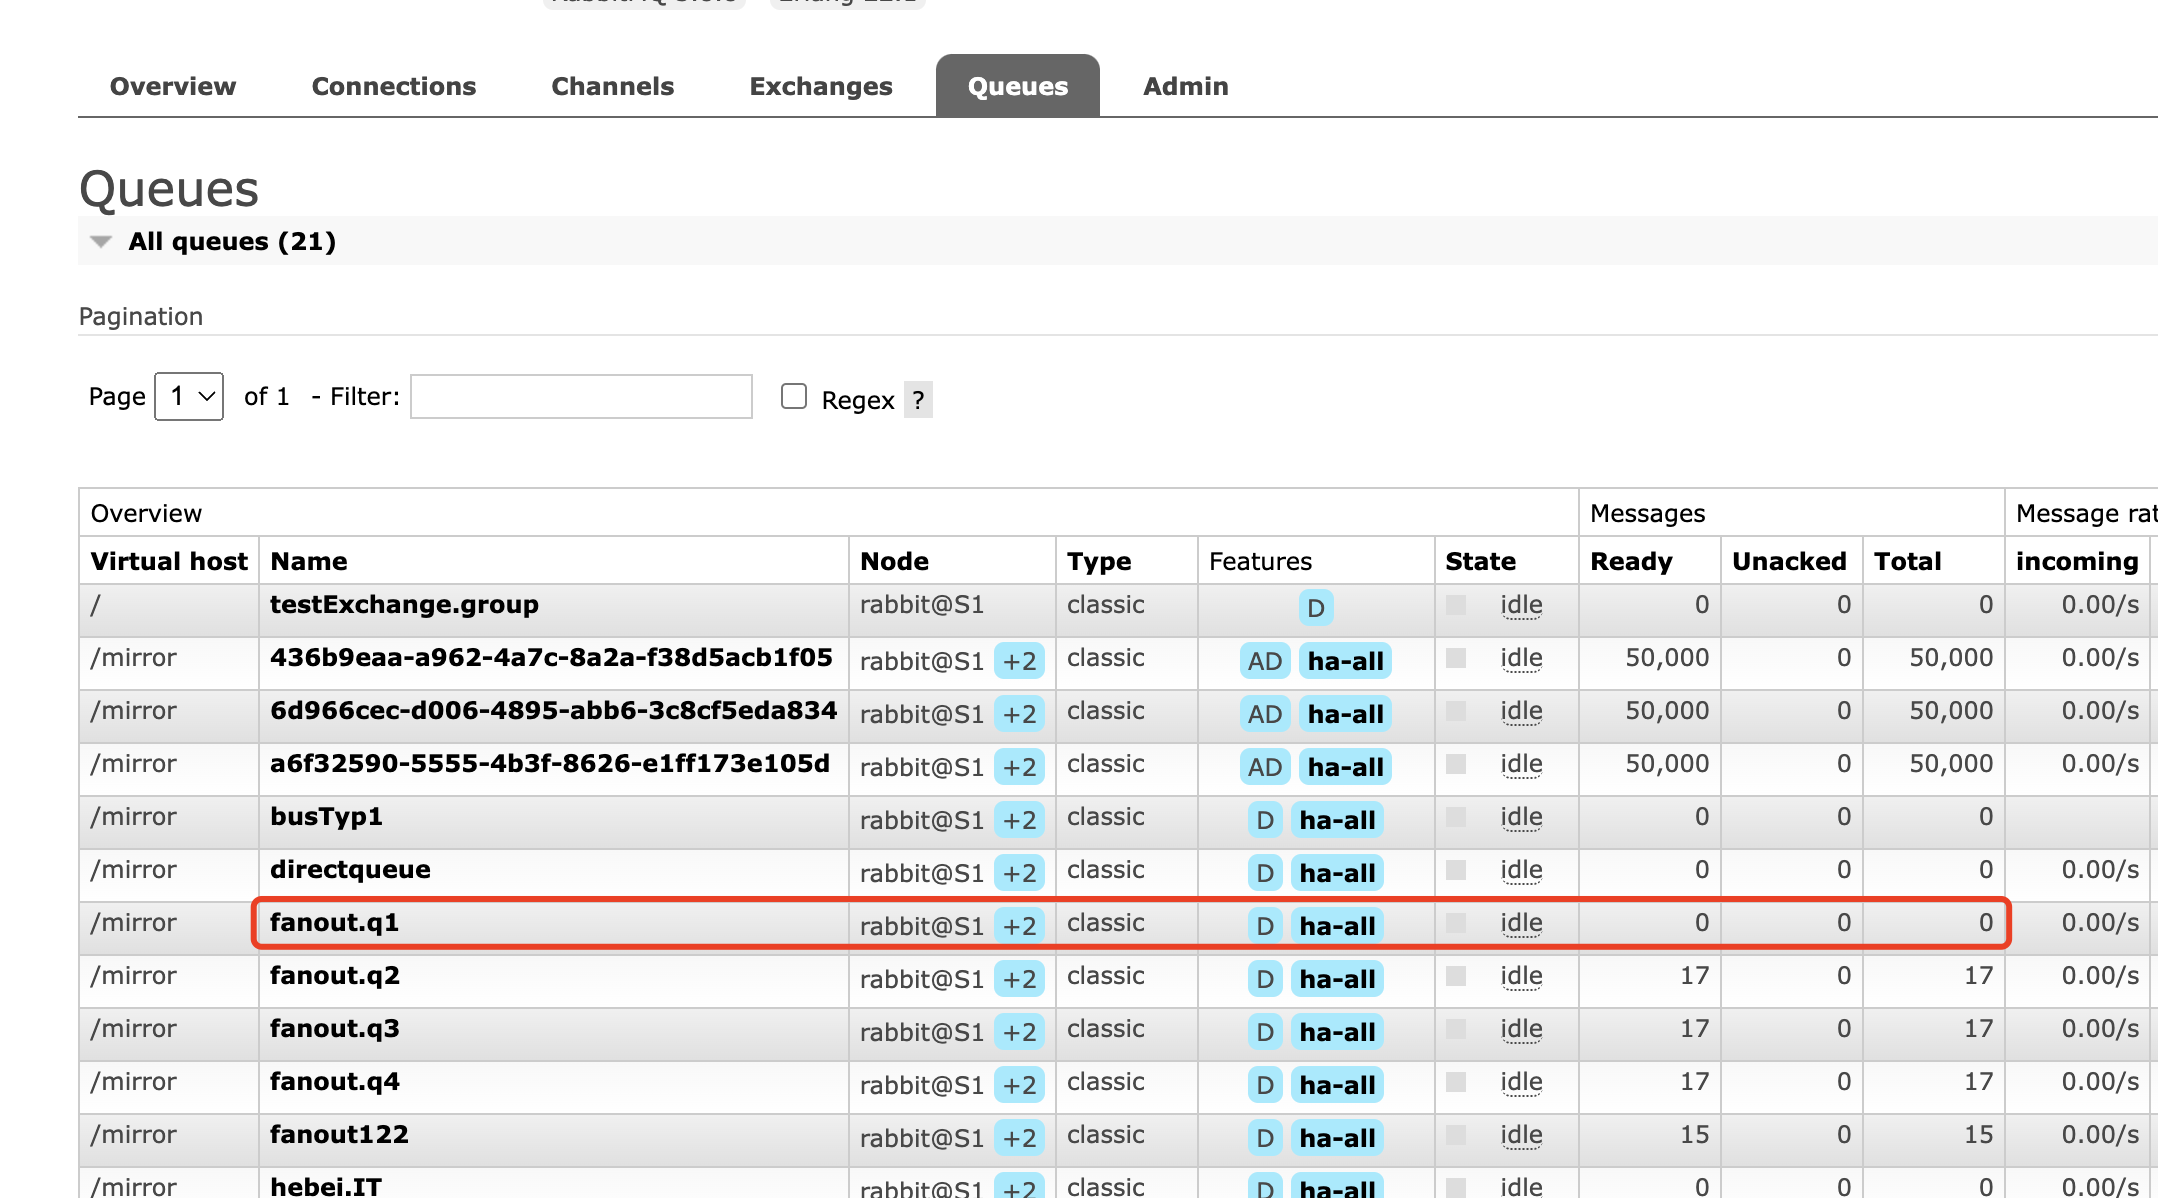
Web管理界面
3)使用现有交换机和队列 我们也可以直接指定已有的交换机和队列,只需要修改配置文件部分参数即可。
1.修改配置信息 1 2 3 4 5 6 7 8 9 10 11 12 13 14 15 16 17 18 19 20 21 22 23 24 25 26 27 28 29 30 31 32 33 34 spring.cloud.stream.binders.xingbinder.type =rabbit spring.cloud.stream.binders.xingbinder.environment.spring.rabbitmq.host =10.211.55.12,10.211.55.17,10.211.55.18 spring.cloud.stream.binders.xingbinder.environment.spring.rabbitmq.port =5672 spring.cloud.stream.binders.xingbinder.environment.spring.rabbitmq.virtual-host =/mirror spring.cloud.stream.binders.xingbinder.environment.spring.rabbitmq.username =admin spring.cloud.stream.binders.xingbinder.environment.spring.rabbitmq.password =123456 spring.cloud.stream.bindings.input.binder =xingbinder spring.cloud.stream.bindings.output.destination =fanoutExchange spring.cloud.stream.rabbit.bindings.output.producer.exchange-type =fanout spring.cloud.stream.rabbit.bindings.output.producer.bind-queue =false spring.cloud.stream.bindings.input.destination =fanoutExchange spring.cloud.stream.rabbit.bindings.input.producer.exchange-type =fanout spring.cloud.stream.bindings.input.group =fanout.q1 spring.cloud.stream.rabbit.bindings.input.consumer.bind-queue =false spring.cloud.stream.rabbit.bindings.input.consumer.queue-name-group-only =true spring.cloud.stream.bindings.input.content-type =text/plain
注意:
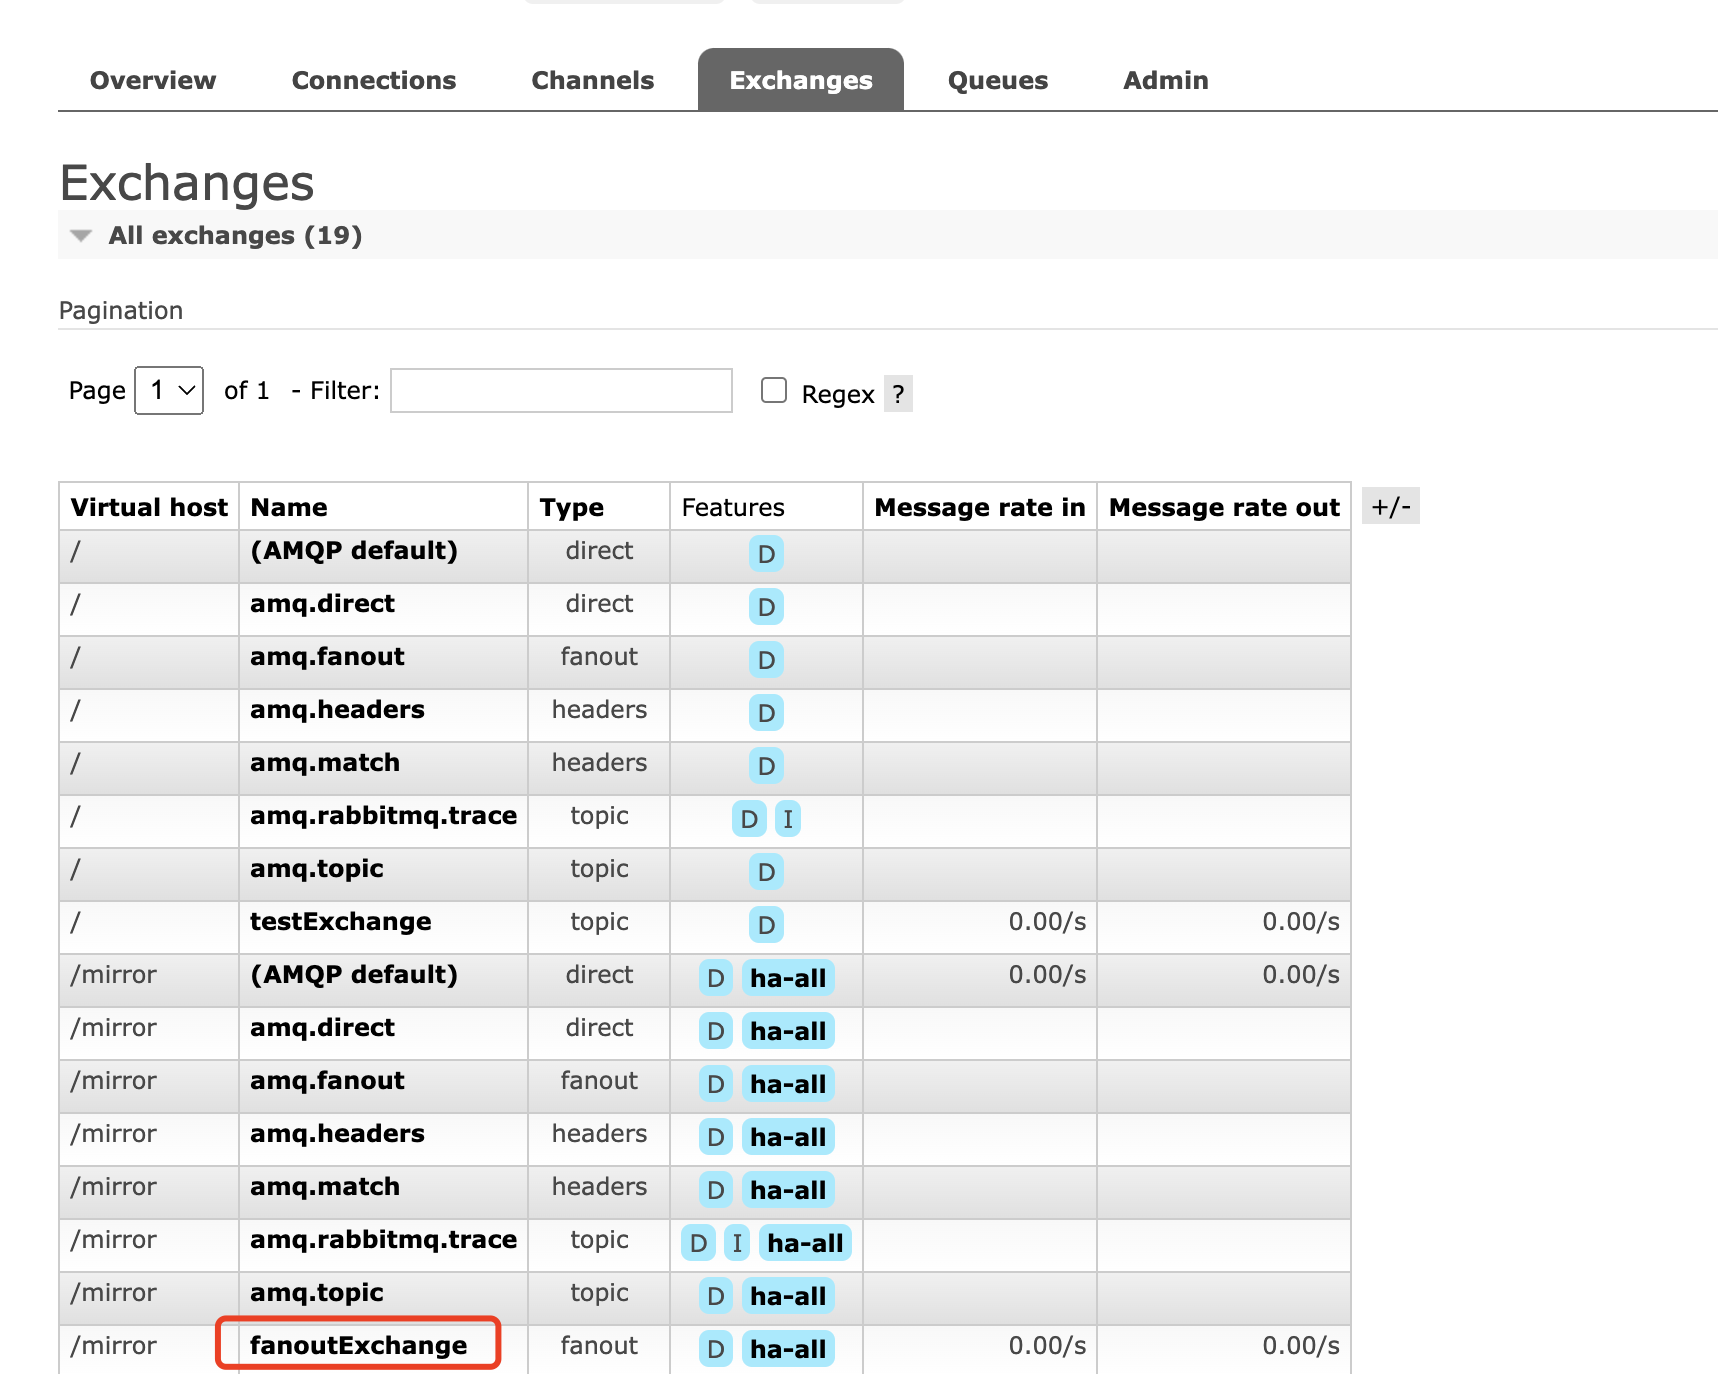
1、这里声明的交换机和类型,必须和MQ已有的交换机和类型匹配上,否则会报错
2、几个参数必须声明,bind-queue=false 不自动创建队列,queue-name-group-only=true 声明队列名称只有group的值
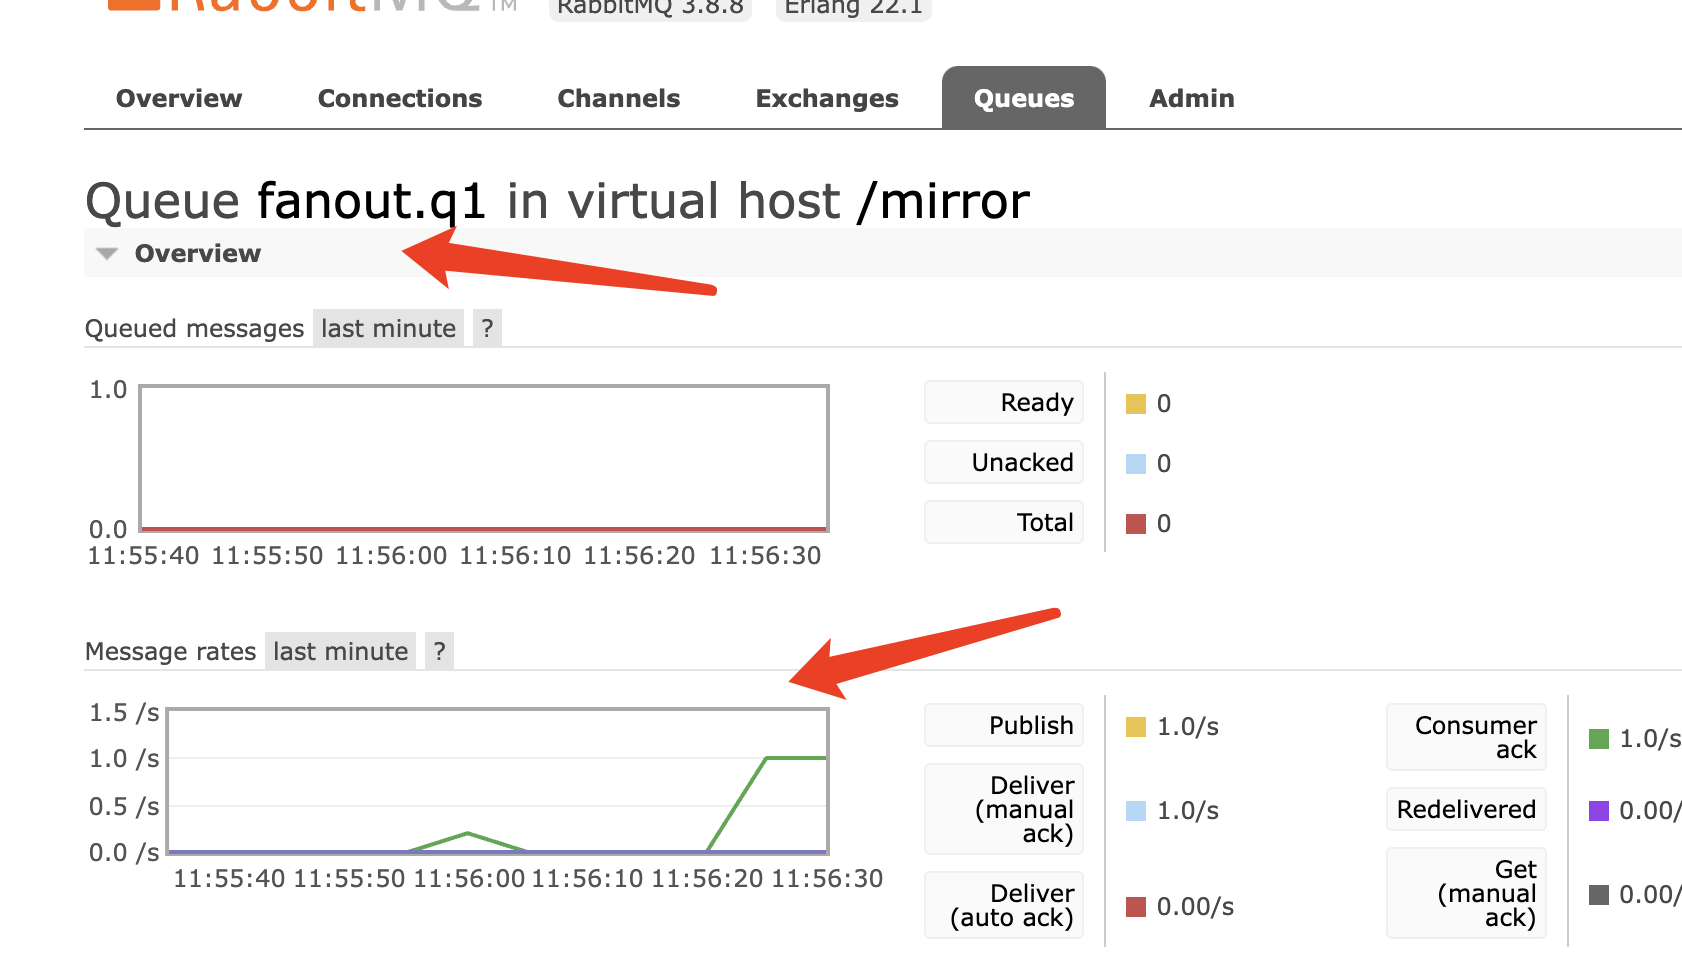
2.Web管理界面查看交换机和队列
3.生产者发送消息
4.消费者消费消息 消费者代码
1 2 3 4 5 6 7 8 9 10 11 12 13 14 15 16 17 18 19 20 21 22 23 package com.javaxing.springcloudstreamdemo1.listening;import com.alibaba.fastjson.JSON;import com.javaxing.springcloudstreamdemo1.User;import org.slf4j.Logger;import org.slf4j.LoggerFactory;import org.springframework.cloud.stream.annotation.EnableBinding;import org.springframework.cloud.stream.annotation.StreamListener;import org.springframework.cloud.stream.messaging.Sink;import org.springframework.stereotype.Component;@Component @EnableBinding(Sink.class) public class MessageListening { private Logger logger = LoggerFactory.getLogger(MessageListening.class); @StreamListener(Sink.INPUT) public void process (Object message) { logger.info("收到消息:{}" ,message); } }
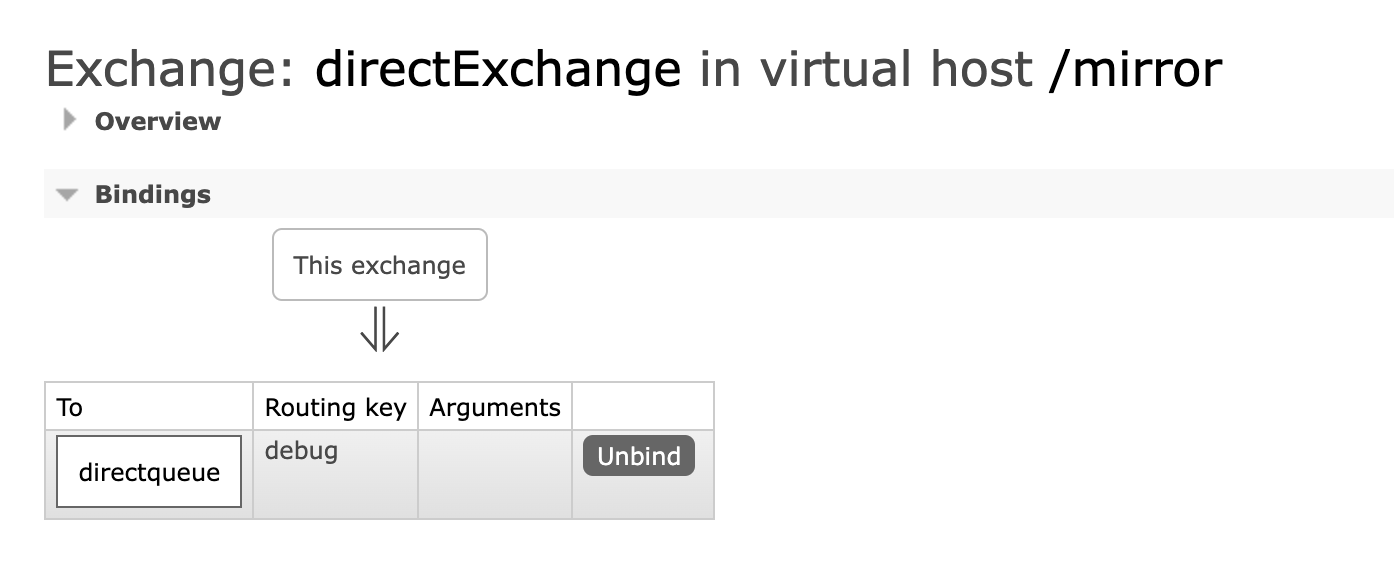
4)使用RoutingKey 1.修改配置信息 1 2 3 4 5 6 7 8 9 10 11 12 13 14 15 16 17 18 19 20 21 22 23 24 25 26 27 28 29 30 31 32 33 34 35 36 37 spring.cloud.stream.binders.xingbinder.type =rabbit spring.cloud.stream.binders.xingbinder.environment.spring.rabbitmq.host =10.211.55.12,10.211.55.17,10.211.55.18 spring.cloud.stream.binders.xingbinder.environment.spring.rabbitmq.port =5672 spring.cloud.stream.binders.xingbinder.environment.spring.rabbitmq.virtual-host =/mirror spring.cloud.stream.binders.xingbinder.environment.spring.rabbitmq.username =admin spring.cloud.stream.binders.xingbinder.environment.spring.rabbitmq.password =123456 spring.cloud.stream.bindings.input.binder =xingbinder spring.cloud.stream.bindings.output.destination =directExchange spring.cloud.stream.rabbit.bindings.output.producer.exchange-type =direct spring.cloud.stream.rabbit.bindings.output.producer.bind-queue =false spring.cloud.stream.rabbit.bindings.output.producer.routing-key-expression =headers.routingkey spring.cloud.stream.bindings.input.destination =directExchange spring.cloud.stream.rabbit.bindings.input.producer.exchange-type =direct spring.cloud.stream.bindings.input.group =directqueue spring.cloud.stream.rabbit.bindings.input.consumer.bind-queue =false spring.cloud.stream.rabbit.bindings.input.consumer.queue-name-group-only =true spring.cloud.stream.bindings.input.content-type =text/plain spring.cloud.stream.rabbit.bindings.input.consumer.binding-routing-key =debug
1、routingKey放入header头中使用
2、input 消费者也要绑定对应的routingKey,如debug,那他只会关注 debug的消息
由于SpringCloudStream框架刚出来没多久,还是存在很多坑,比如 在4.0.0之下就不兼容 routingKey,我们得使用另外一种折中的办法,把routingKey放入header头来使用。
2.Web管理界面查看交换机和队列
3.生产者发送消息 1 2 3 4 5 6 7 8 9 10 11 12 13 14 15 16 17 18 19 20 21 22 23 24 25 26 27 28 29 30 package com.javaxing.springcloudstreamdemo1.controller;import com.alibaba.fastjson.JSON;import com.javaxing.springcloudstreamdemo1.User;import org.springframework.beans.factory.annotation.Autowired;import org.springframework.cloud.stream.messaging.Source;import org.springframework.integration.support.MessageBuilder;import org.springframework.web.bind.annotation.GetMapping;import org.springframework.web.bind.annotation.RestController;@RestController public class SendMessageController { @Autowired private Source source; @GetMapping("/send") public Object send () { User user = new User (); user.setUsername("aaaa" ); user.setPassword("123123" ); MessageBuilder<String> messageBuilder = MessageBuilder.withPayload(JSON.toJSONString(user)).setHeader("routingkey" ,"debug" ); source.output().send(messageBuilder.build()); return "message sendsuccess:" +JSON.toJSONString(user); } }
4.消费者消费消息 1 2 3 4 5 6 7 8 9 10 11 12 13 14 15 16 17 18 19 20 21 22 package com.javaxing.springcloudstreamdemo1.listening;import com.alibaba.fastjson.JSON;import com.javaxing.springcloudstreamdemo1.User;import org.slf4j.Logger;import org.slf4j.LoggerFactory;import org.springframework.cloud.stream.annotation.EnableBinding;import org.springframework.cloud.stream.annotation.StreamListener;import org.springframework.cloud.stream.messaging.Sink;import org.springframework.stereotype.Component;@Component @EnableBinding(Sink.class) public class MessageListening { private Logger logger = LoggerFactory.getLogger(MessageListening.class); @StreamListener(Sink.INPUT) public void process (Object message) { logger.info("收到消息:{}" ,message); } }
这里我们发送的消息routingKey = debug,所以消费者成功收到消息,但是如果我们发送的routingKey 不是debug,是info的话,自然消费者就无法收到。
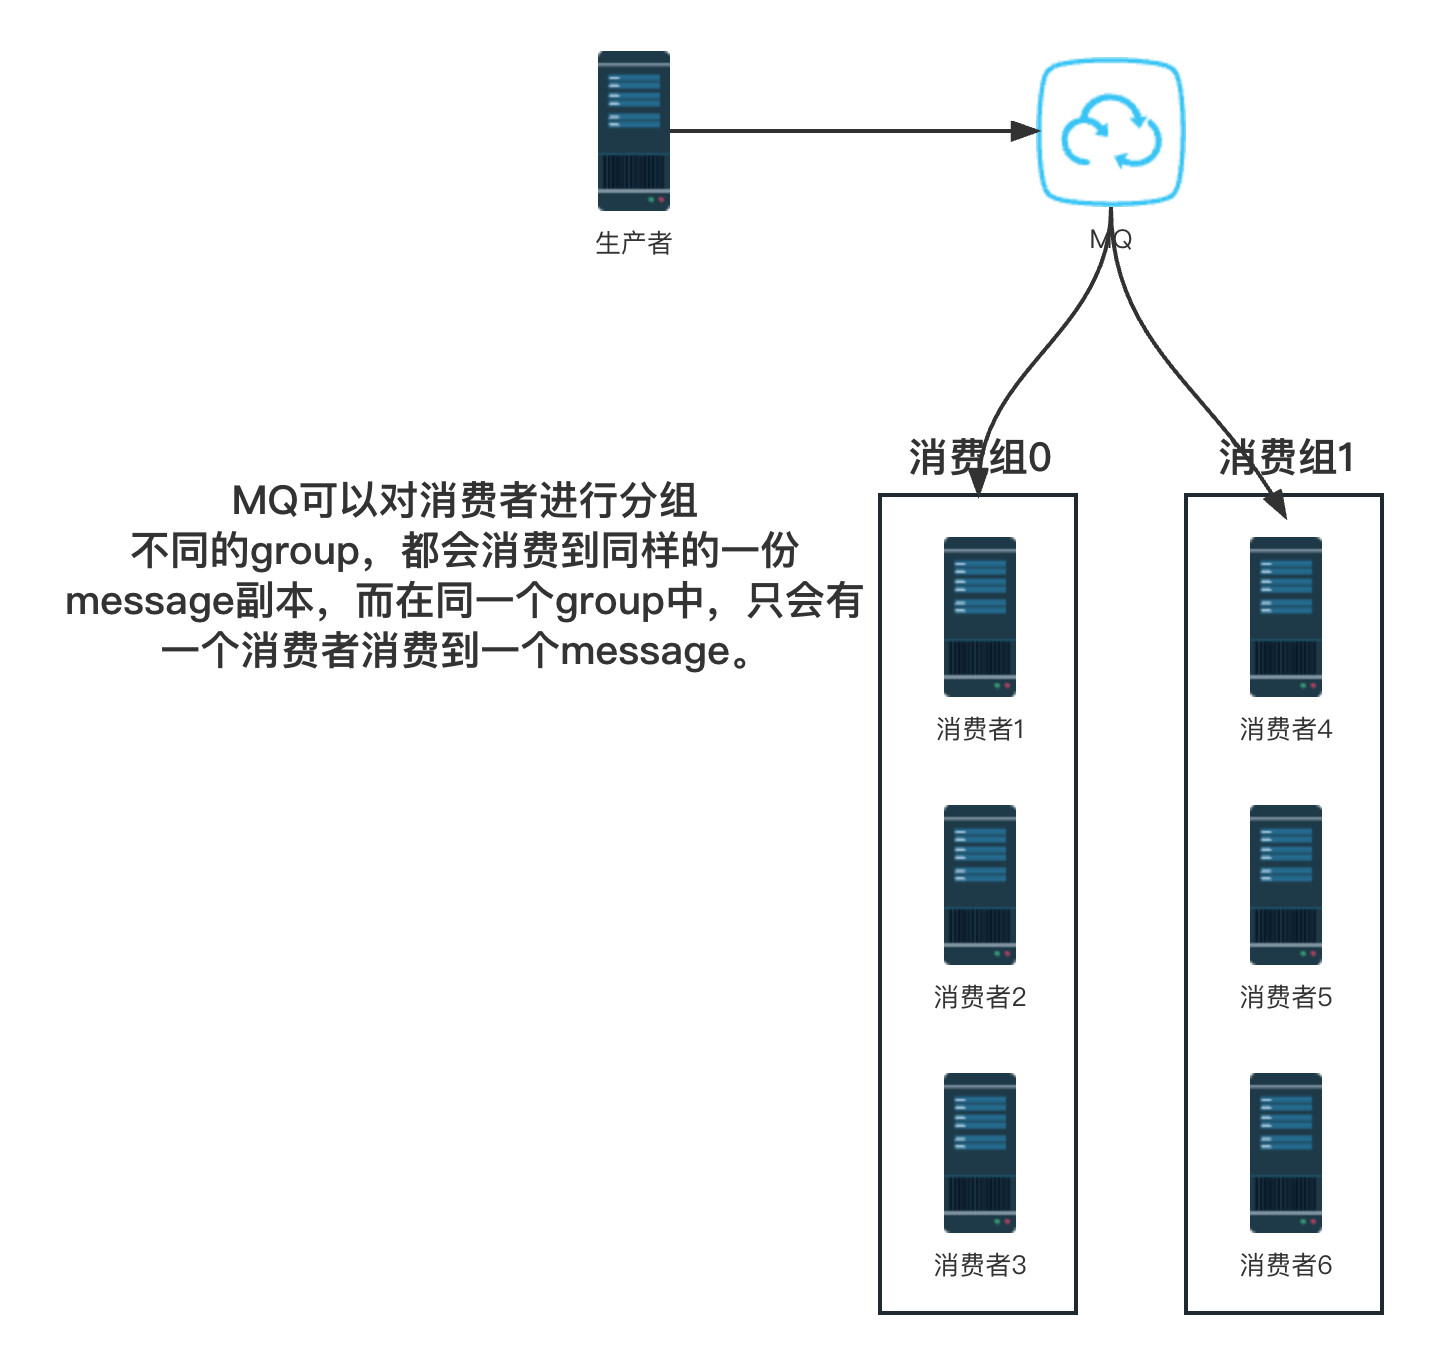
5)分组消费 RabbitMQ可以对消费者进行分组,不同的group,都会消费到同样的一份message副本,而在同一个group中,只会有一个消费者消费到一个message。
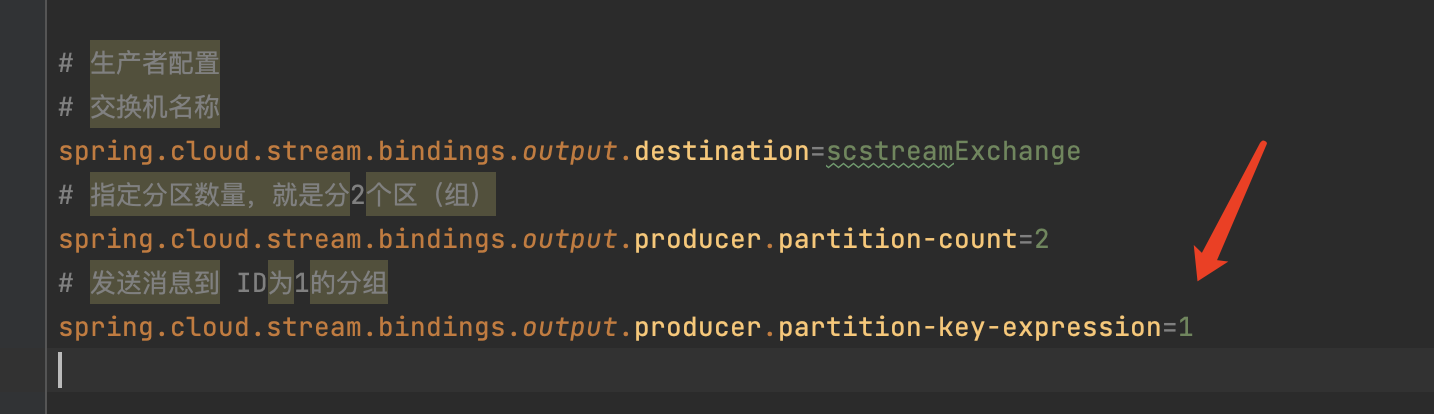
1.修改配置信息 1 2 3 4 5 6 7 8 9 10 11 12 13 14 15 16 17 18 19 20 21 22 23 24 25 26 27 28 29 30 31 spring.cloud.stream.binders.xingbinder.type =rabbit spring.cloud.stream.binders.xingbinder.environment.spring.rabbitmq.host =10.211.55.12,10.211.55.17,10.211.55.18 spring.cloud.stream.binders.xingbinder.environment.spring.rabbitmq.port =5672 spring.cloud.stream.binders.xingbinder.environment.spring.rabbitmq.virtual-host =/mirror spring.cloud.stream.binders.xingbinder.environment.spring.rabbitmq.username =admin spring.cloud.stream.binders.xingbinder.environment.spring.rabbitmq.password =123456 spring.cloud.stream.bindings.output.destination =scstreamExchange spring.cloud.stream.bindings.output.producer.partition-count =2 spring.cloud.stream.bindings.output.producer.partition-key-expression =1 spring.cloud.stream.bindings.input.destination =scstreamExchange spring.cloud.stream.bindings.input.group =myinput spring.cloud.stream.bindings.input.consumer.partitioned =true spring.cloud.stream.bindings.input.consumer.instance-count =2 spring.cloud.stream.bindings.input.consumer.instance-index =1
生产者:
消费者:
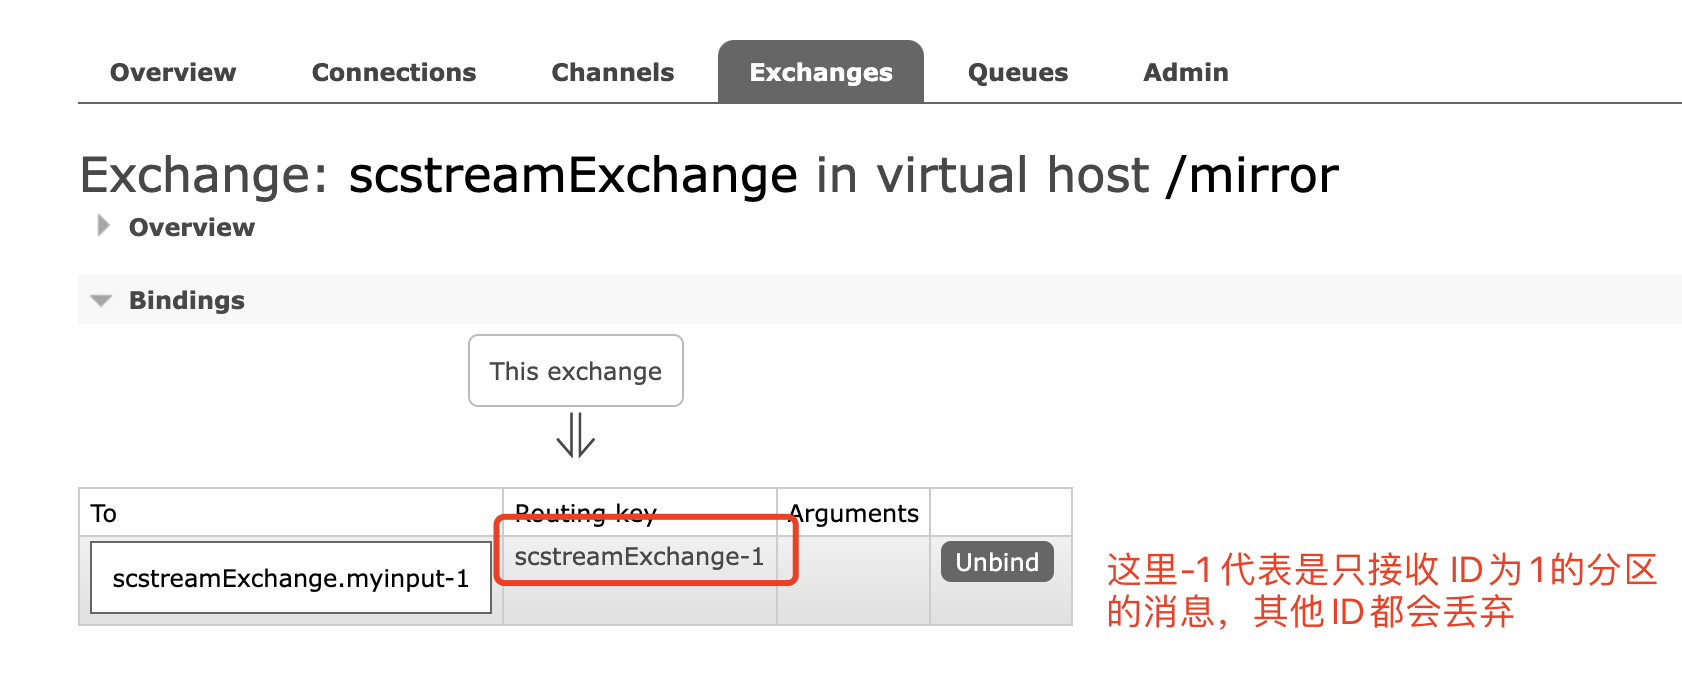
2.Web管理界面
3.生产者发送消息 4.消费者消费消息
5.分组消费优化 -> 动态发送分区
我们之前在配置文件里面配置 生产者的消息发送到哪个指定的分区,但是生产环境中,往往更多的是需要负载均衡的发送,如:第一条消息发给0分区,第二条消息发给1分区,以此类推 。
为此我们可以使用header头的形式,把分区ID放入到header头中,该方法类似于 routingKey的实现方式。
实现方法
1.修改分区ID,放入到header头
1 2 spring.cloud.stream.bindings.output.producer.partition-key-expression =headers.partitionkey
2.发送的时候指定header头
1 2 3 4 5 6 7 8 9 10 11 12 13 14 15 16 17 18 19 20 21 22 23 @RestController public class SendMessageController { @Autowired private Source source; @GetMapping("/send") public Object send () { User user = new User (); user.setUsername("aaaa" ); user.setPassword("123123" ); MessageBuilder<String> messageBuilder = MessageBuilder.withPayload(JSON.toJSONString(user)).setHeader("partitionkey" ,"1" ); source.output().send(messageBuilder.build()); return "message sendsuccess:" +JSON.toJSONString(user); } }
测试结果
生产者发出的 消息,指定了消息发到 分区1,消费者成功接收到了该消息。