ShardingSphere介绍 ShardingSphere是一款起源于当当网内部的应用框架,目前已经成为Apache软件基金会的顶级项目。
ShardingSphere包含三个重要的产品,ShardingJDBC、ShardingProxy和ShardingSidecar。
ShardingJDBC用于客户端分库分表,ShardingProxy用于服务端分库分表,ShardingSidecar是可视化的插件。
注意:随着数据库数据量增加,不要马上就考虑分库分表,而是应当考虑缓存、读写分离、索引等方式来提升数据库性能,如果实在不行才进行分库分表。
如:一旦部署了ShardingSphere,原本复杂的SQL、JOIN查询、聚合、Group by、子查询、排序等功能就很难在来执行
总而言之,分库分表的成本和代价非常昂贵,一定要考虑清楚是否要做分库分表,能否接受分库分表带来的代价(复杂的SQL无法执行等),技术团队是否能驾驭住(不见得团队其他人也会分库分表),分库分表之前要对现有的架构和SQL进行分析,设计出比较完善的架构后再来施工,否则将会 苦不堪言。
ShardingJDBC
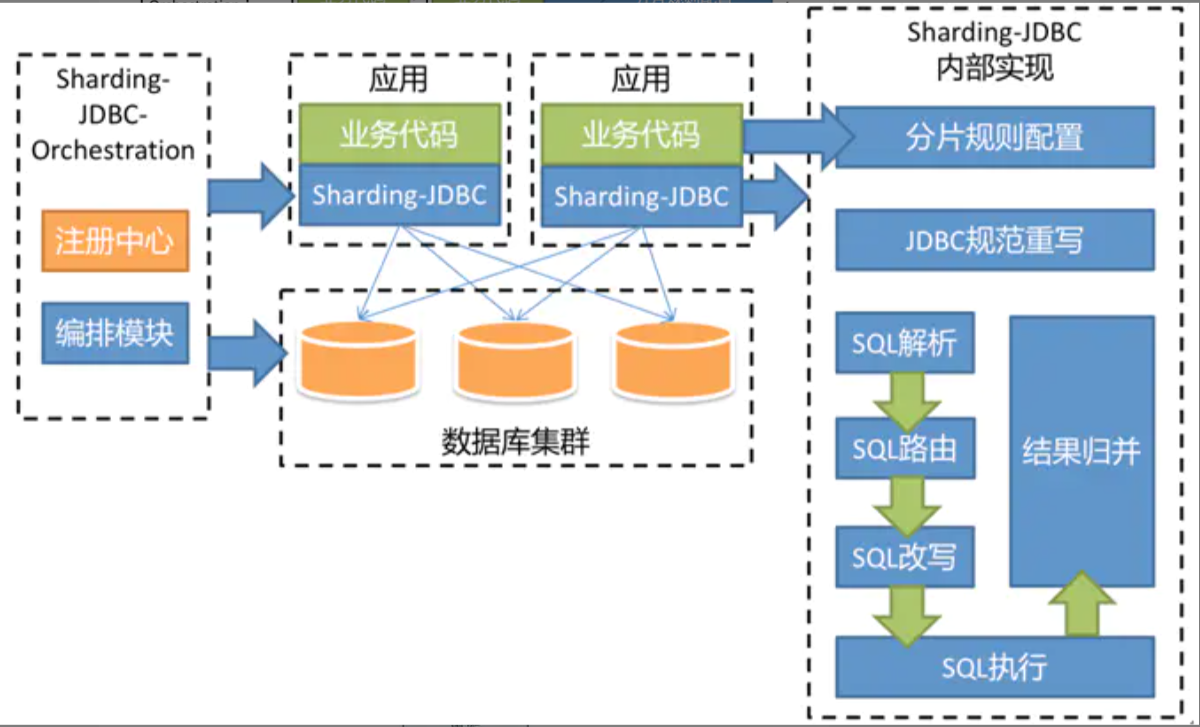
shardingJDBC定位为轻量级 Java 框架,可直接在java项目中以jar或pom的形式引入后使用,在 Java 的 JDBC 层提供的额外服务。
简单理解,这是一个java框架,需要在java项目中引入依赖后,对代码进行一定的调整后使用。
ShardingJDBC主要功能是数据分片和读写分离
ShardingProxy
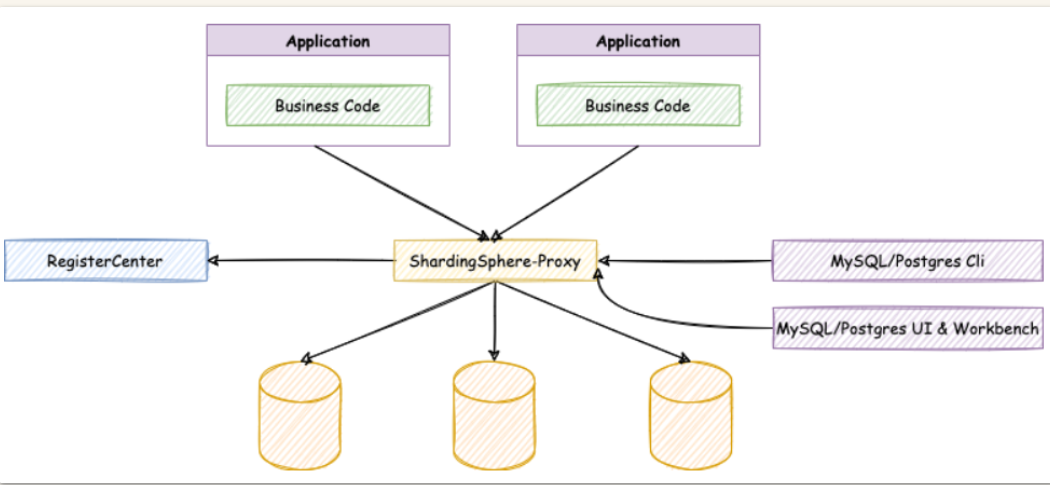
ShardingProxy定位为数据库代理端,类似于MyCat的中间件,起到了在客户端和数据库之间分库分表转发的作用。
在客户端上无代码修改和调整,只需要在数据库和客户端之间,配置Proxy并制定分库分表策略即可。
JDBC和Proxy的区别
Sharding-JDBC
Sharding-Proxy
数据库
任意
MySQL/PostgreSQL
连接消耗数
高
低
异构语言
仅java
任意
性能
损耗低
损耗略高
无中心化
是
否
静态入口
无
有
ShardingJDBC只是客户端的一个工具包,分库分表策略得程序员自己制定,对业务代码侵入大,但是支持的数据库多。
ShardingProxy是一个在 客户端和数据库之间的代理中间件,对代码无侵入,对开发人员友好,但是支持的数据库较少。
ShardingJDBC实战 1)核心术语
逻辑表:水平拆分的数据库的相同逻辑和数据结构表的总称
讲人话:在代码上的所有操作都是针对逻辑表进行操作,ShardingSphere会对我们操作进行转换,转发到 真实表上。
在代码上的逻辑表,如:course ,ShardingSphere会帮我们转发到 course_1 course_2 course_3
真实表:在分片的数据库中真实存在的物理表。
讲人话:在数据库中真实的表,如课程表 course -> course_1 course_2 course_3
数据节点:数据分片的最小单元。由数据源名称(数据库)和数据表组成
绑定表:分片规则一致的主表和子表。
广播表:也叫公共表,指素有的分片数据源中都存在的表,表结构和表中的数据在每个数据库中都完全一致。例如字典表。
分片键:用于分片的数据库字段,是将数据库(表)进行水平拆分的关键字段。SQL中若没有分片字段,将会执行全路由,性能会很差。
讲人话:真实表按照哪个字段进行分片,尽量选择唯一性较高的,如主键,订单号等来区分,像性别 只有男、女、未知的,不适合做分片键。
分片算法:通过分片算法将数据进行分片,支持通过=、BETWEEN和IN分片。分片算法需要由应用开发者自行实现,可实现的灵活度非常高。
分片策略:由 分片键+分片算法组成 分片策略。在ShardingJDBC中一般采用基于Groovy表达式的inline分片策略,通过一个包含分片键的算法表达式来制定分片策略,如t_user_$->{u_id%8}标识根据u_id模8,分成8张表,表名称为t_user_0到t_user_7。
2)SpringBoot - 单数据源 分库分表 源码地址:https://files.javaxing.com/Java%08Demo/ShardingJDBCTest.zip
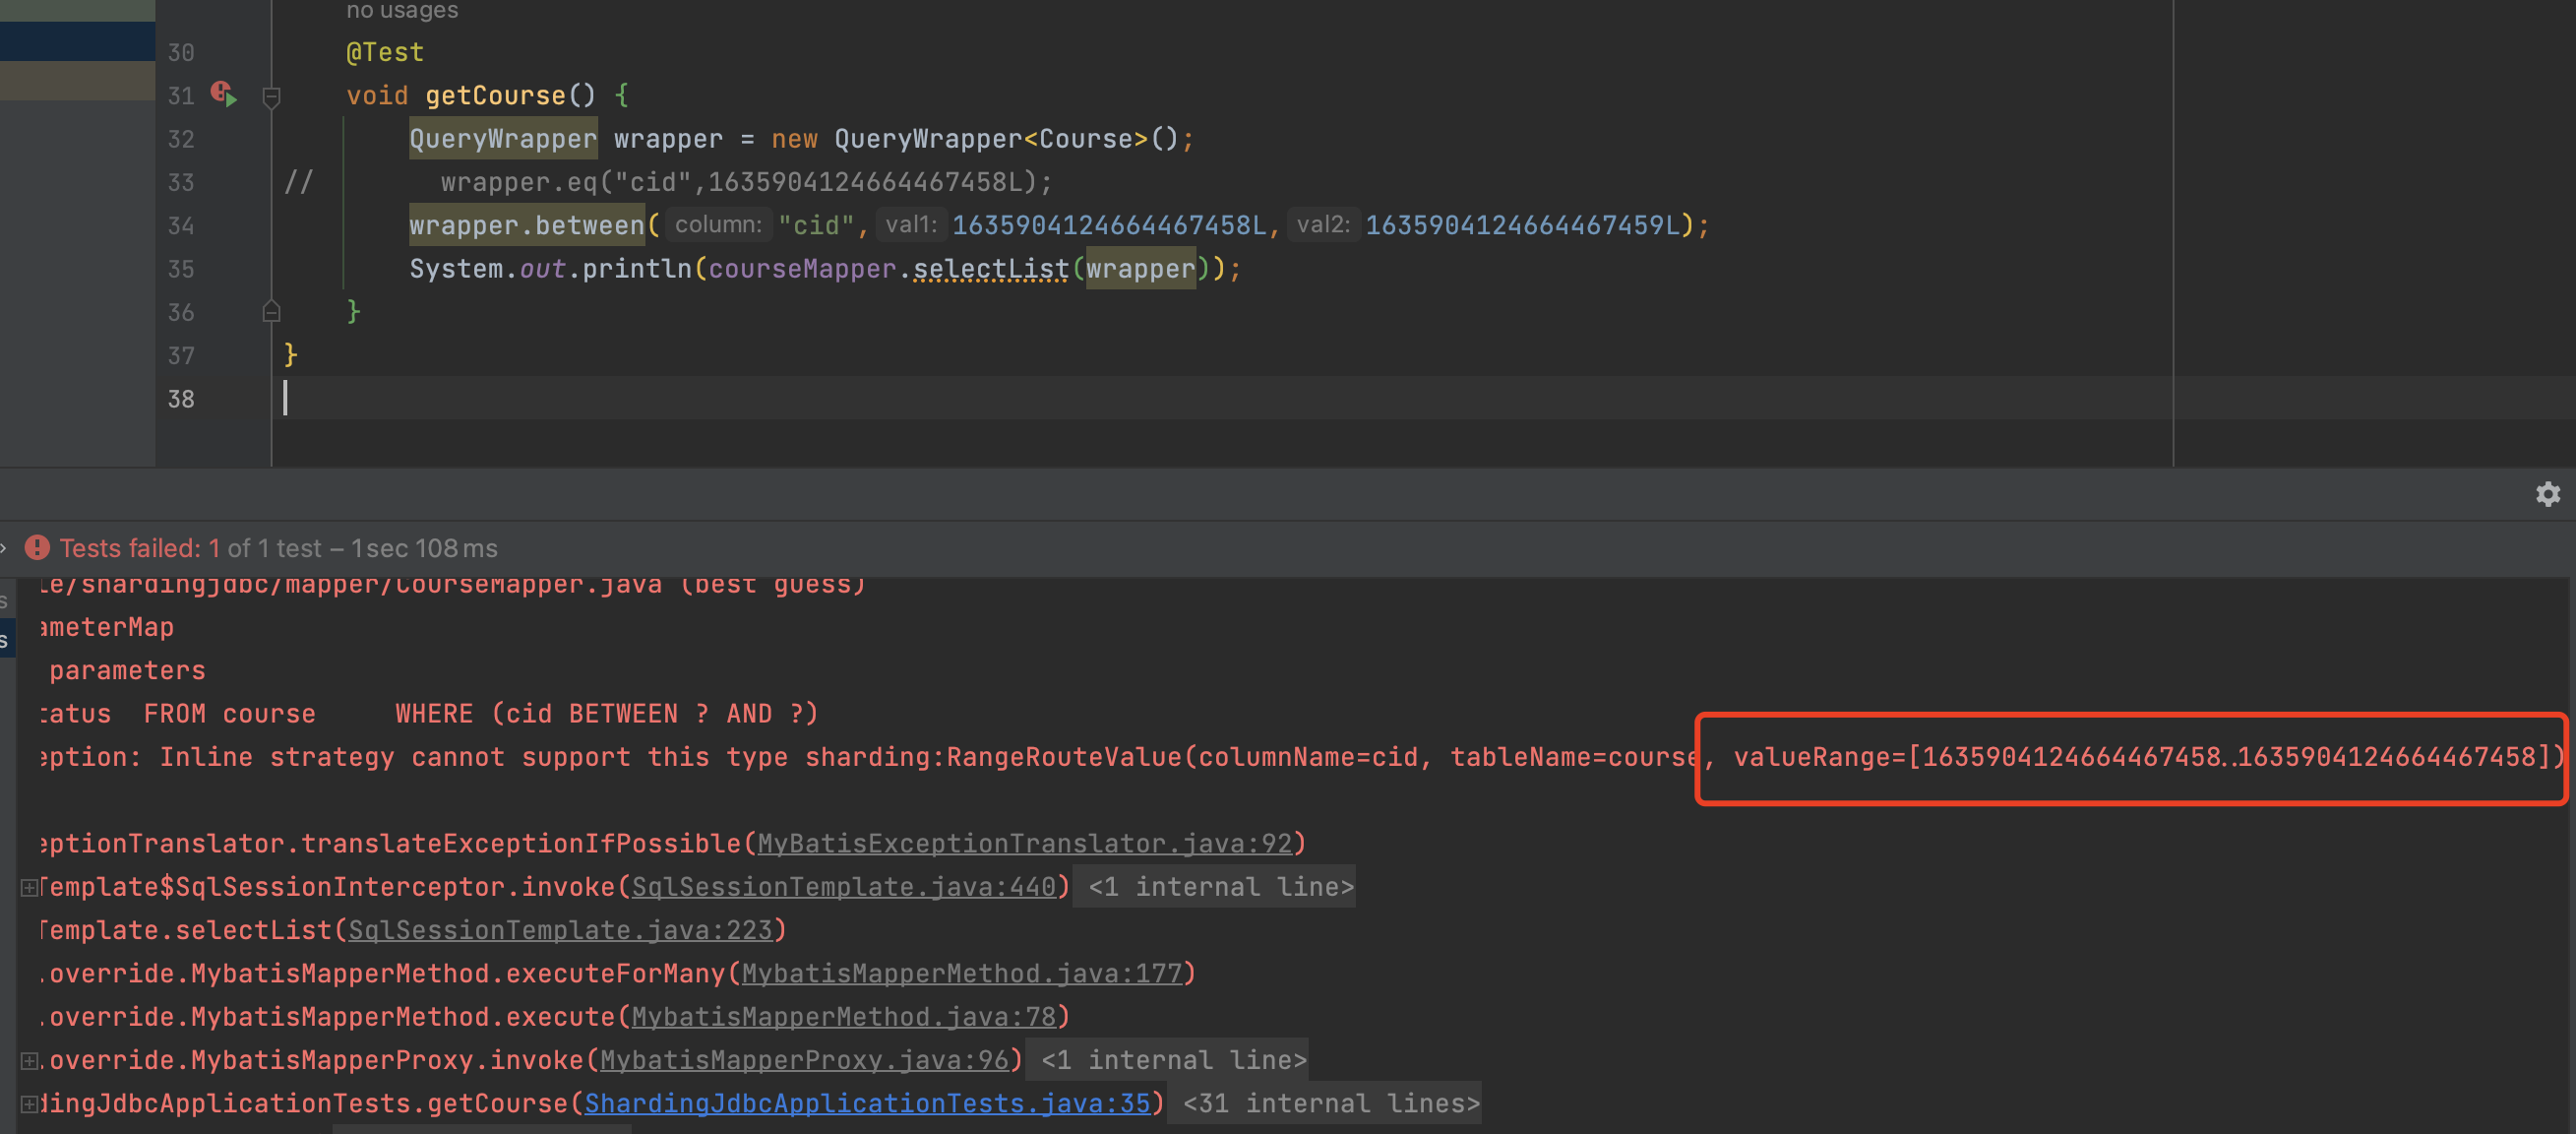
inline分片算法 注意:inline分片算法只能适用于 eq 等号查询
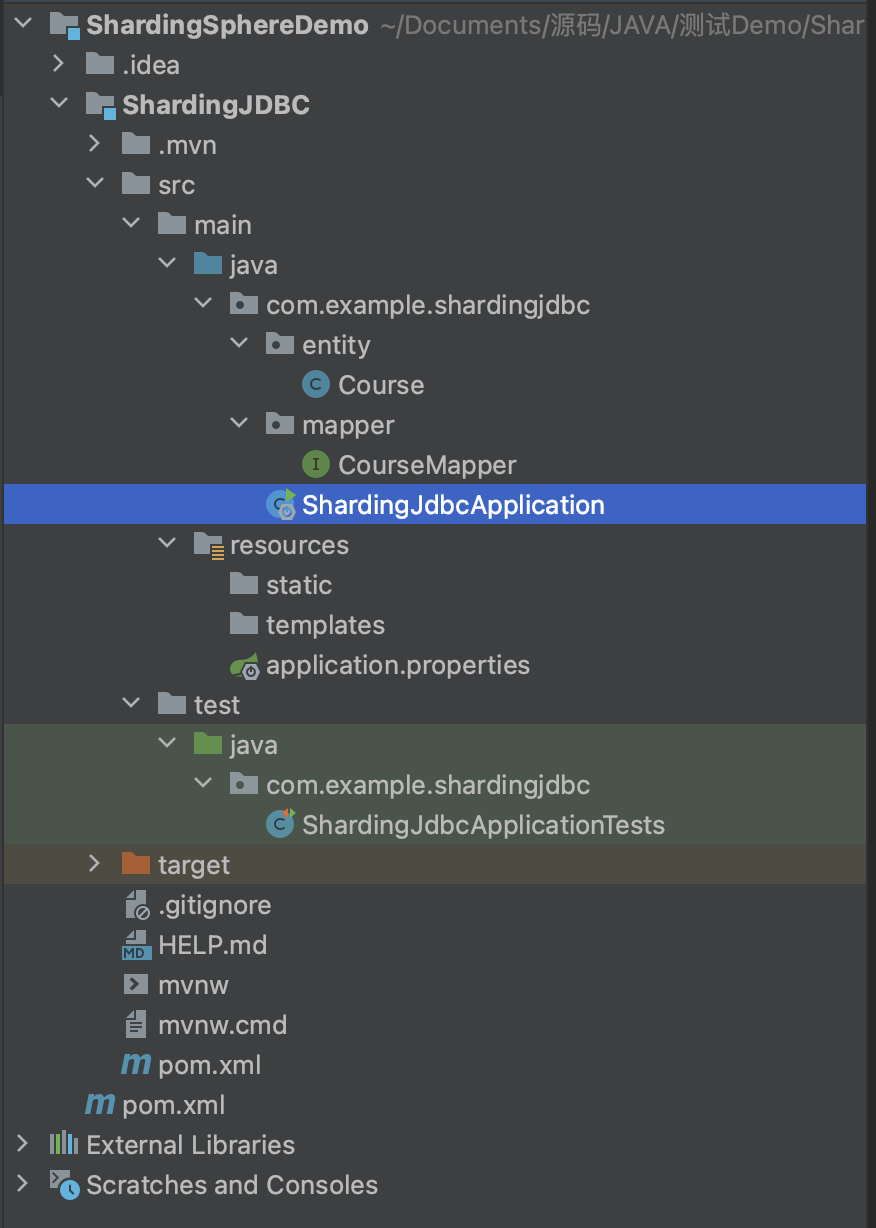
文件目录
1、引入mybatisplus依赖,方便我们做insert测试
2、entity实体类 Course 对应数据库里的course表
3、所有操作都是在JUnit的测试案例中执行
xml依赖:
1 2 3 4 5 6 7 8 9 10 11 12 13 14 15 16 17 18 19 20 21 22 23 24 25 26 27 28 29 30 31 <dependency > <groupId > org.springframework.boot</groupId > <artifactId > spring-boot-starter-test</artifactId > <scope > test</scope > </dependency > <dependency > <groupId > mysql</groupId > <artifactId > mysql-connector-java</artifactId > <version > 8.0.29</version > </dependency > <dependency > <groupId > com.baomidou</groupId > <artifactId > mybatis-plus-boot-starter</artifactId > <version > 3.3.2</version > </dependency > <dependency > <groupId > com.alibaba</groupId > <artifactId > druid</artifactId > <version > 1.2.9</version > </dependency > <dependency > <groupId > org.apache.shardingsphere</groupId > <artifactId > sharding-jdbc-spring-boot-starter</artifactId > <version > 4.1.1</version > </dependency >
application.properties:
1 2 3 4 5 6 7 8 9 10 11 12 13 14 15 16 17 18 19 20 21 22 23 24 25 spring.shardingsphere.datasource.names =m1 spring.shardingsphere.datasource.m1.type =com.alibaba.druid.pool.DruidDataSource spring.shardingsphere.datasource.m1.driver-class-name =com.mysql.cj.jdbc.Driver spring.shardingsphere.datasource.m1.url =jdbc:mysql://10.211.55.14:3306/user?serverTimezone=UTC spring.shardingsphere.datasource.m1.username =root spring.shardingsphere.datasource.m1.password =123123 spring.shardingsphere.sharding.tables.course.actual-data-nodes =m1.course_$->{1..2} spring.shardingsphere.sharding.tables.course.key-generator.column =cid spring.shardingsphere.sharding.tables.course.key-generator.type =SNOWFLAKE spring.shardingsphere.sharding.tables.course.key-generator.props.worker.id =1 spring.shardingsphere.sharding.tables.course.table-strategy.inline.sharding-column = cid spring.shardingsphere.sharding.tables.course.table-strategy.inline.algorithm-expression =course_$->{cid%2+1} spring.shardingsphere.props.sql.show =true
1、先定义一个数据源m1,并对m1设置JDBC信息
2、spring.shardingsphere.sharding.tables.course 这里的course是我们的逻辑表名,得和entity对应上,而后面是我们的映射关系,m1数据库的course表 映射到两张表 -> m1.course_1,m1.course_2
3、key-generator属性配置了他的主键列以及主键生成策略。ShardingJDBC默认提供了UUID和SNOWFLAKE两种分布式主键生成策略
4、table-strategy属性即配置他的分库分表策略。分片键为cid属性。分片算法为course_$->{cid%2+1},表示按照cid模2+1的结果,然后加上前面的course__ 部分作为前缀就是他的实际表结果,如 3%2+1 = course_2
+ 为什么要加1,是因为 不+1 的话 %的结果会下标0开始计算,但是我们真实表是 course_1 下标是从1开始的。
+ 注意,这个表达式计算出来的结果需要能够与实际数据分布中的一种情况对应上,否则就会报错。
entity:
1
2
3
4
5
6
7
8
9
10
11
12
13
14
15
16
17
18
19
20
21
22
23
24
25
26
27
28
29
30
31
32
33
34
35
36
37
38
39
40
41
42
43
44
45
46
47
48
49
50
package com.example.shardingjdbc.entity;public class Course { private Long cid; private String cname; private Long userid; private String cstatus; public Long getCid () { return cid; } public void setCid (Long cid) { this .cid = cid; } public String getCname () { return cname; } public void setCname (String cname) { this .cname = cname; } public Long getUserid () { return userid; } public void setUserid (Long userid) { this .userid = userid; } public String getCstatus () { return cstatus; } public void setCstatus (String cstatus) { this .cstatus = cstatus; } @Override public String toString () { return "CourseEntity{" + "cid=" + cid + ", cname='" + cname + '\'' + ", userid=" + userid + ", cstatus='" + cstatus + '\'' + '}' ; } }
mapper:
1
2
3
4
5
6
7
8
9
10
11
package com.example.shardingjdbc.mapper;import com.baomidou.mybatisplus.core.mapper.BaseMapper;import com.example.shardingjdbc.entity.Course;@Mapper public interface CourseMapper extends BaseMapper <Course> {}
如果在mapper上面增加@Mapper注解,那么在SpringBoot启动类上就可以不需要增加@MapperScan 来扫描mapper目录
ShardingJdbcApplication:
1
2
3
4
5
6
7
8
9
@SpringBootApplication @MapperScan("com.example.shardingjdbc.mapper") public class ShardingJdbcApplication { public static void main (String[] args) { SpringApplication.run(ShardingJdbcApplication.class, args); } }
ShardingJdbcApplicationTests方法:
1
2
3
4
5
6
7
8
9
10
11
12
13
14
15
16
17
@SpringBootTest class ShardingJdbcApplicationTests { @Autowired private CourseMapper courseMapper; @Test void testAddCourse () { for (int i = 0 ; i < 10 ; i++) { Course entity = new Course (); entity.setCname("name" +i); entity.setCstatus("1" ); entity.setUserid(1L ); courseMapper.insert(entity); } } }
执行结果 执行日志
1 2 3 4 5 6 7 8 9 10 11 2023 -03 -14 09:30 :35.084 INFO 17794 --- [ main] ShardingSphere-SQL : Logic SQL: INSERT INTO course ( cname, userid, cstatus ) VALUES ( ?,?, ? ) 2023 -03 -14 09:30 :35.084 INFO 17794 --- [ main] ShardingSphere-SQL : Actual SQL: m1 ::: INSERT INTO course_2 ( cname, userid, cstatus , cid) VALUES (?, ?, ?, ?) ::: [name9, 1 , 1 , 842332991999971329 ]
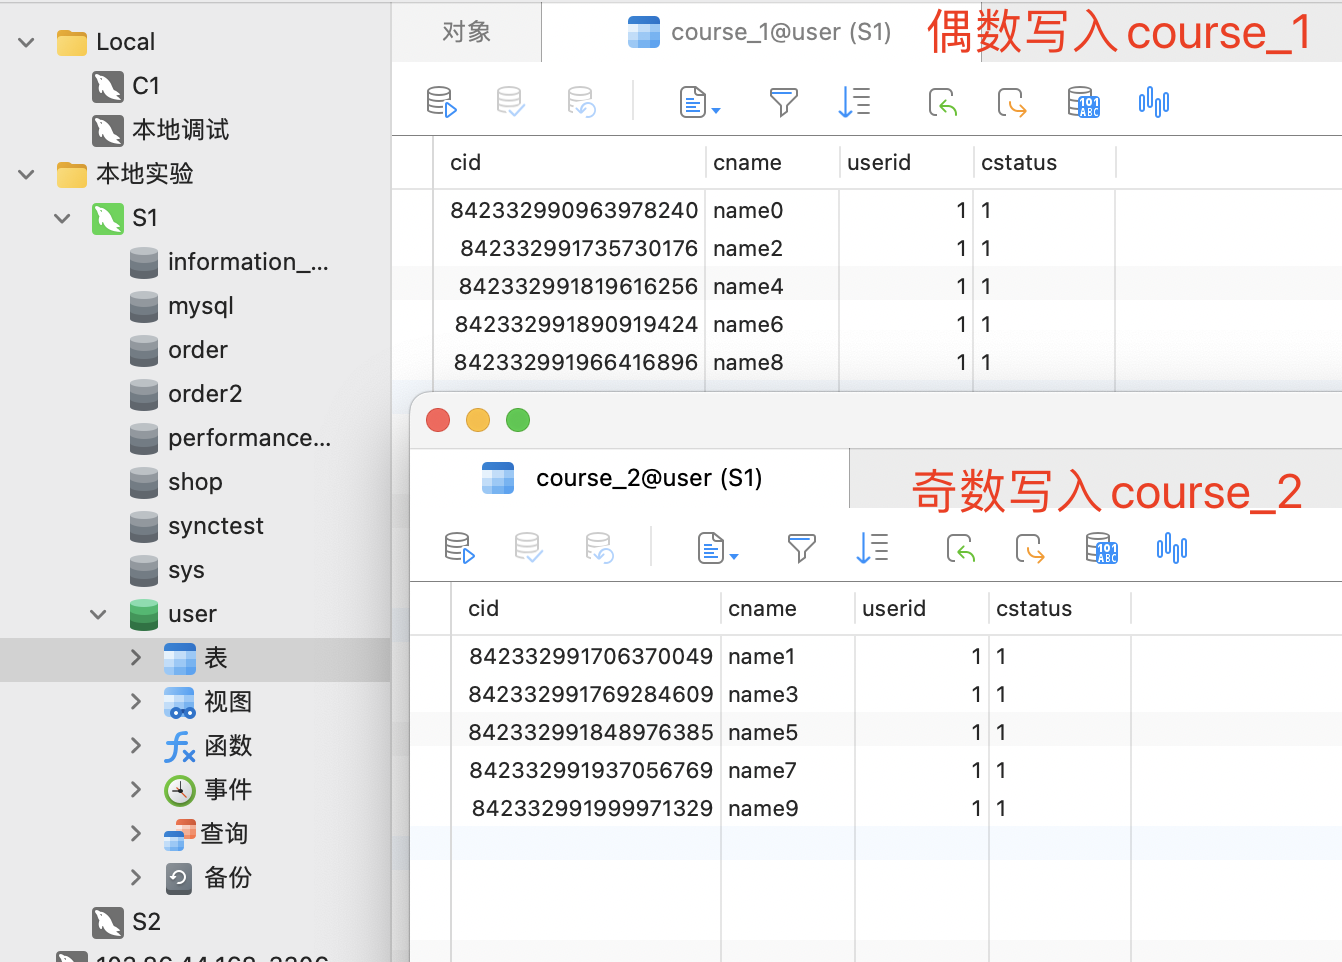
数据库结果
spring.shardingsphere.sharding.tables.course.table-strategy.inline.sharding-column= cid
在配置文件中,我们约定了分片策略,约定cid值为偶数添加到course_1表。如果是奇数添加到course_2表
注意事项
配置文件中的,映射关系
spring.shardingsphere.sharding.tables.course.actual-data-nodes=m1.course_$->{1..2}
course 是一个虚拟表 逻辑表,在数据库并不会真实存在,而在数据库的真实表则是:course_1 … 需要建立映射关系的真实表
这里的tables.course 的course 可以自行定义,但是得和entity对应上,指的是 逻辑表的名称
如果和entity不对应,shardingJDBC会找不到entity,无法映射到真实表,而Mybatis会去找以entity的名字取数据库中找数据表
查询方法 1 2 3 4 5 6 @Test void getCourse () { QueryWrapper wrapper = new QueryWrapper <Course>(); wrapper.eq("cid" ,1635904124664467458L ); System.out.println(courseMapper.selectList(wrapper)); }
日志
1 2 3 4 5 6 7 8 9 10 11 2023 -03 -15 15 :24 :21.290 INFO 65379 --- [ main] ShardingSphere-SQL : Logic SQL: SELECT cid,cname,userid,cstatus FROM course WHERE (cid = ?) 2023 -03 -15 15 :24 :21.292 INFO 65379 --- [ main] ShardingSphere-SQL : Actual SQL: m1 ::: SELECT cid,cname,userid,cstatus FROM course_1 WHERE (cid = ?) ::: [1635904124664467458 ] [CourseEntity{cid=1635904124664467458 , cname='name1' , userid=1 , cstatus='1' }]
注意:inline分片算法只能适用于 eq 等号查询
standard(支持范围查询)
standard支持范围查询,只需要修改配置文件并增加class文件即可
application.properties:
1 2 3 4 5 6 7 8 9 10 11 12 13 14 15 16 spring.shardingsphere.sharding.tables.course.database-strategy.standard.sharding-column =cid spring.shardingsphere.sharding.tables.course.database-strategy.standard.range-algorithm-class-name =com.example.shardingjdbc.algorithm.MyRangeDSShardingAlgorithm spring.shardingsphere.sharding.tables.course.database-strategy.standard.precise-algorithm-class-name =com.example.shardingjdbc.algorithm.MyPreciseDSShardingAlgorithm spring.shardingsphere.sharding.tables.course.table-strategy.standard.sharding-column = cid spring.shardingsphere.sharding.tables.course.table-strategy.standard.range-algorithm-class- name =com.example.shardingjdbc.algorithm.MyRangeTableShardingAlgorithm spring.shardingsphere.sharding.tables.course.table-strategy.standard.precise-algorithm-class-name =com.example.shardingjdbc.algorithm.MyPreciseTableShardingAlgorithm
MyRangeDSShardingAlgorithm:
1 2 3 4 5 6 7 8 9 10 11 12 13 14 15 16 17 18 19 20 21 22 23 24 25 26 27 28 29 30 package com.example.shardingjdbc.algorithm;import org.apache.shardingsphere.api.sharding.standard.RangeShardingAlgorithm;import org.apache.shardingsphere.api.sharding.standard.RangeShardingValue;import java.util.Arrays;import java.util.Collection;public class MyRangeDSShardingAlgorithm implements RangeShardingAlgorithm <Long> { @Override public Collection<String> doSharding (Collection<String> availableTargetNames, RangeShardingValue<Long> shardingValue) { Long lowerEndpoint = shardingValue.getValueRange().lowerEndpoint(); Long upperEndpoint = shardingValue.getValueRange().upperEndpoint(); return availableTargetNames; } }
MyPreciseDSShardingAlgorithm:
1 2 3 4 5 6 7 8 9 10 11 12 13 14 15 16 17 18 19 20 21 22 23 24 25 26 27 28 29 30 31 32 33 34 35 package com.example.shardingjdbc.algorithm;import org.apache.shardingsphere.api.sharding.standard.PreciseShardingAlgorithm;import org.apache.shardingsphere.api.sharding.standard.PreciseShardingValue;import java.math.BigInteger;import java.util.Collection;public class MyPreciseDSShardingAlgorithm implements PreciseShardingAlgorithm <Long> { @Override public String doSharding (Collection<String> availableTargetNames, PreciseShardingValue<Long> shardingValue) { BigInteger shardingValueB = BigInteger.valueOf(shardingValue.getValue()); BigInteger resB = (shardingValueB.mod(new BigInteger ("2" ))); String key = "m" +resB ; if (availableTargetNames.contains(key)){ return key; } throw new UnsupportedOperationException (" route " +key+" is not supported. please check your config" ); } }
MyRangeTableShardingAlgorithm:
1 2 3 4 5 6 7 8 9 10 11 12 13 14 15 16 17 18 19 20 21 22 23 24 25 26 27 28 29 30 31 32 33 34 package com.example.shardingjdbc.algorithm;import org.apache.shardingsphere.api.sharding.standard.RangeShardingAlgorithm;import org.apache.shardingsphere.api.sharding.standard.RangeShardingValue;import java.util.Arrays;import java.util.Collection;public class MyRangeTableShardingAlgorithm implements RangeShardingAlgorithm <Long> { @Override public Collection<String> doSharding (Collection<String> availableTargetNames, RangeShardingValue<Long> shardingValue) { Long lowerEndpoint = shardingValue.getValueRange().lowerEndpoint(); Long upperEndpoint = shardingValue.getValueRange().upperEndpoint(); return Arrays.asList(shardingValue.getLogicTableName()+"_1" ,shardingValue.getLogicTableName()+"_2" ); } }
MyPreciseTableShardingAlgorithm:
1 2 3 4 5 6 7 8 9 10 11 12 13 14 15 16 17 18 19 20 21 22 23 24 25 26 27 28 29 30 31 32 33 34 package com.example.shardingjdbc.algorithm;import org.apache.shardingsphere.api.sharding.standard.PreciseShardingAlgorithm;import org.apache.shardingsphere.api.sharding.standard.PreciseShardingValue;import java.math.BigInteger;import java.util.Collection;public class MyPreciseTableShardingAlgorithm implements PreciseShardingAlgorithm <Long> { @Override public String doSharding (Collection<String> availableTargetNames, PreciseShardingValue<Long> shardingValue) { BigInteger shardingValueB = BigInteger.valueOf(shardingValue.getValue()); BigInteger resB = (shardingValueB.mod(new BigInteger ("2" ))).add(new BigInteger ("1" )); String key = shardingValue.getLogicTableName()+"_" +resB ; if (availableTargetNames.contains(key)){ return key; } throw new UnsupportedOperationException (" route " +key+" is not supported. please check your config" ); } }
执行between 查询
1 2 3 4 5 6 7 @Test void getCourse () { QueryWrapper wrapper = new QueryWrapper <Course>(); wrapper.between("cid" ,1635904124664467458L ,1635904124945485825L ); System.out.println(courseMapper.selectList(wrapper)); }
执行结果:
1 2 3 4 5 6 7 8 9 CourseEntity{cid=1635904124664467458 , cname='name1' , userid=1 , cstatus='1' } CourseEntity{cid=1635904124735770626 , cname='name3' , userid=1 , cstatus='1' } CourseEntity{cid=1635904124823851010 , cname='name5' , userid=1 , cstatus='1' } CourseEntity{cid=1635904124840628226 , cname='name6' , userid=1 , cstatus='1' } CourseEntity{cid=1635904124916125698 , cname='name8' , userid=1 , cstatus='1' } CourseEntity{cid=1635904124702216193 , cname='name2' , userid=1 , cstatus='1' } CourseEntity{cid=1635904124794490881 , cname='name4' , userid=1 , cstatus='1' } CourseEntity{cid=1635904124869988353 , cname='name7' , userid=1 , cstatus='1' } CourseEntity{cid=1635904124945485825 , cname='name9' , userid=1 , cstatus='1' }
执行in 查询
1 2 3 4 5 6 7 8 @Test void getCourse () { QueryWrapper wrapper = new QueryWrapper <Course>(); wrapper.in("cid" ,1635904124664467458L ,1635904124945485825L ); for (Object o : courseMapper.selectList(wrapper)) { System.out.println(o); } }
执行结果:
1 2 CourseEntity{cid=1635904124664467458 , cname='name1' , userid=1 , cstatus='1' } CourseEntity{cid=1635904124945485825 , cname='name9' , userid=1 , cstatus='1' }
3)SpringBoot - 多数据源
多数据源与单数据源配置上的不同点在于,我们需要多配置一个数据源,并且配置数据库分片策略
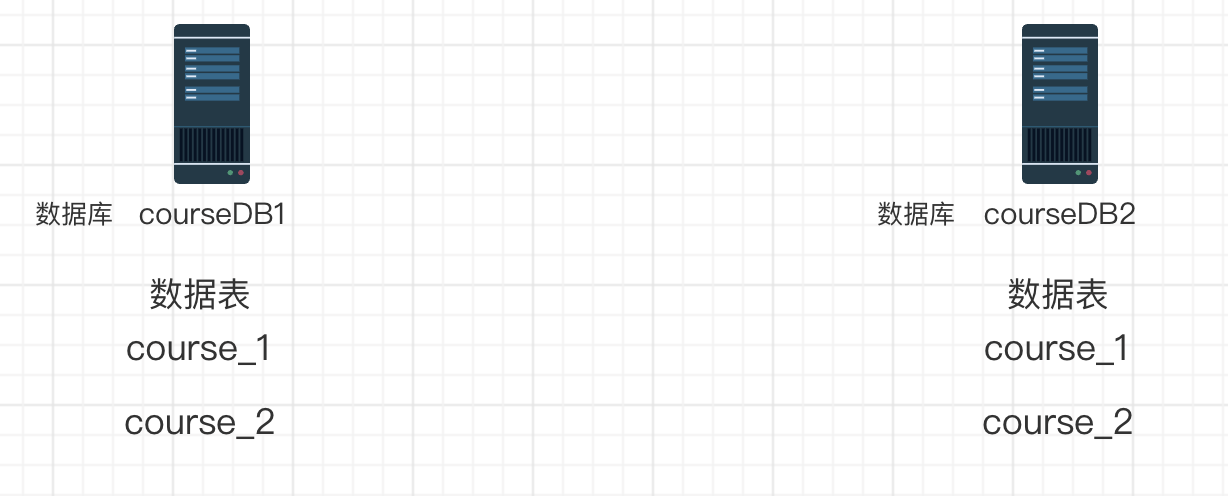
这里我们有2台数据库 courseDB1和courseDB2,每个数据库都有2张course表。
数据库分片策略以 userid进行分片,决定分片存储到哪台数据库上,以主键cid 为数据表分片策略,判断要存储在哪个表上。
配置数据源
1 2 3 4 5 6 7 8 9 10 11 12 13 14 15 16 17 18 19 20 21 22 23 24 25 26 27 28 29 30 31 32 33 34 35 36 37 38 39 40 41 spring.shardingsphere.datasource.names =m1,m2 spring.shardingsphere.datasource.m1.type =com.alibaba.druid.pool.DruidDataSource spring.shardingsphere.datasource.m1.driver-class-name =com.mysql.cj.jdbc.Driver spring.shardingsphere.datasource.m1.url =jdbc:mysql://10.211.55.14:3306/courseDB1?serverTimezone=GMT%2B8 spring.shardingsphere.datasource.m1.username =root spring.shardingsphere.datasource.m1.password =123123 spring.shardingsphere.datasource.m2.type =com.alibaba.druid.pool.DruidDataSource spring.shardingsphere.datasource.m2.driver-class-name =com.mysql.cj.jdbc.Driver spring.shardingsphere.datasource.m2.url =jdbc:mysql://10.211.55.14:3306/courseDB2?serverTimezone=GMT%2B8 spring.shardingsphere.datasource.m2.username =root spring.shardingsphere.datasource.m2.password =123123 spring.shardingsphere.sharding.tables.course.actual-data-nodes =m$->{1..2}.course_$->{1..2} spring.shardingsphere.sharding.tables.course.key-generator.column =cid spring.shardingsphere.sharding.tables.course.key-generator.type =SNOWFLAKE spring.shardingsphere.sharding.tables.course.table-strategy.inline.sharding-column =cid spring.shardingsphere.sharding.tables.course.table-strategy.inline.algorithm-expression =course_$->{cid % 2 + 1} spring.shardingsphere.sharding.tables.course.database-strategy.inline.sharding-column =userid spring.shardingsphere.sharding.tables.course.database-strategy.inline.algorithm-expression =m$->{userid %2 + 1} spring.shardingsphere.props.sql.show =true
这里为什么取模的时候都要+1,因为不论是数据库还是数据表我们的真实名称都是从1开始,而不是从0开始,如果不加1 取模结果就会从0开始算。
插入数据
1 2 3 4 5 6 7 8 9 10 11 @Test void addDataBase () { for (int i = 0 ; i < 10 ; i++) { Course course = new Course (); course.setCname("11" ); course.setUserid(System.currentTimeMillis()); course.setCstatus("1" ); courseMapper.insert(course); } }
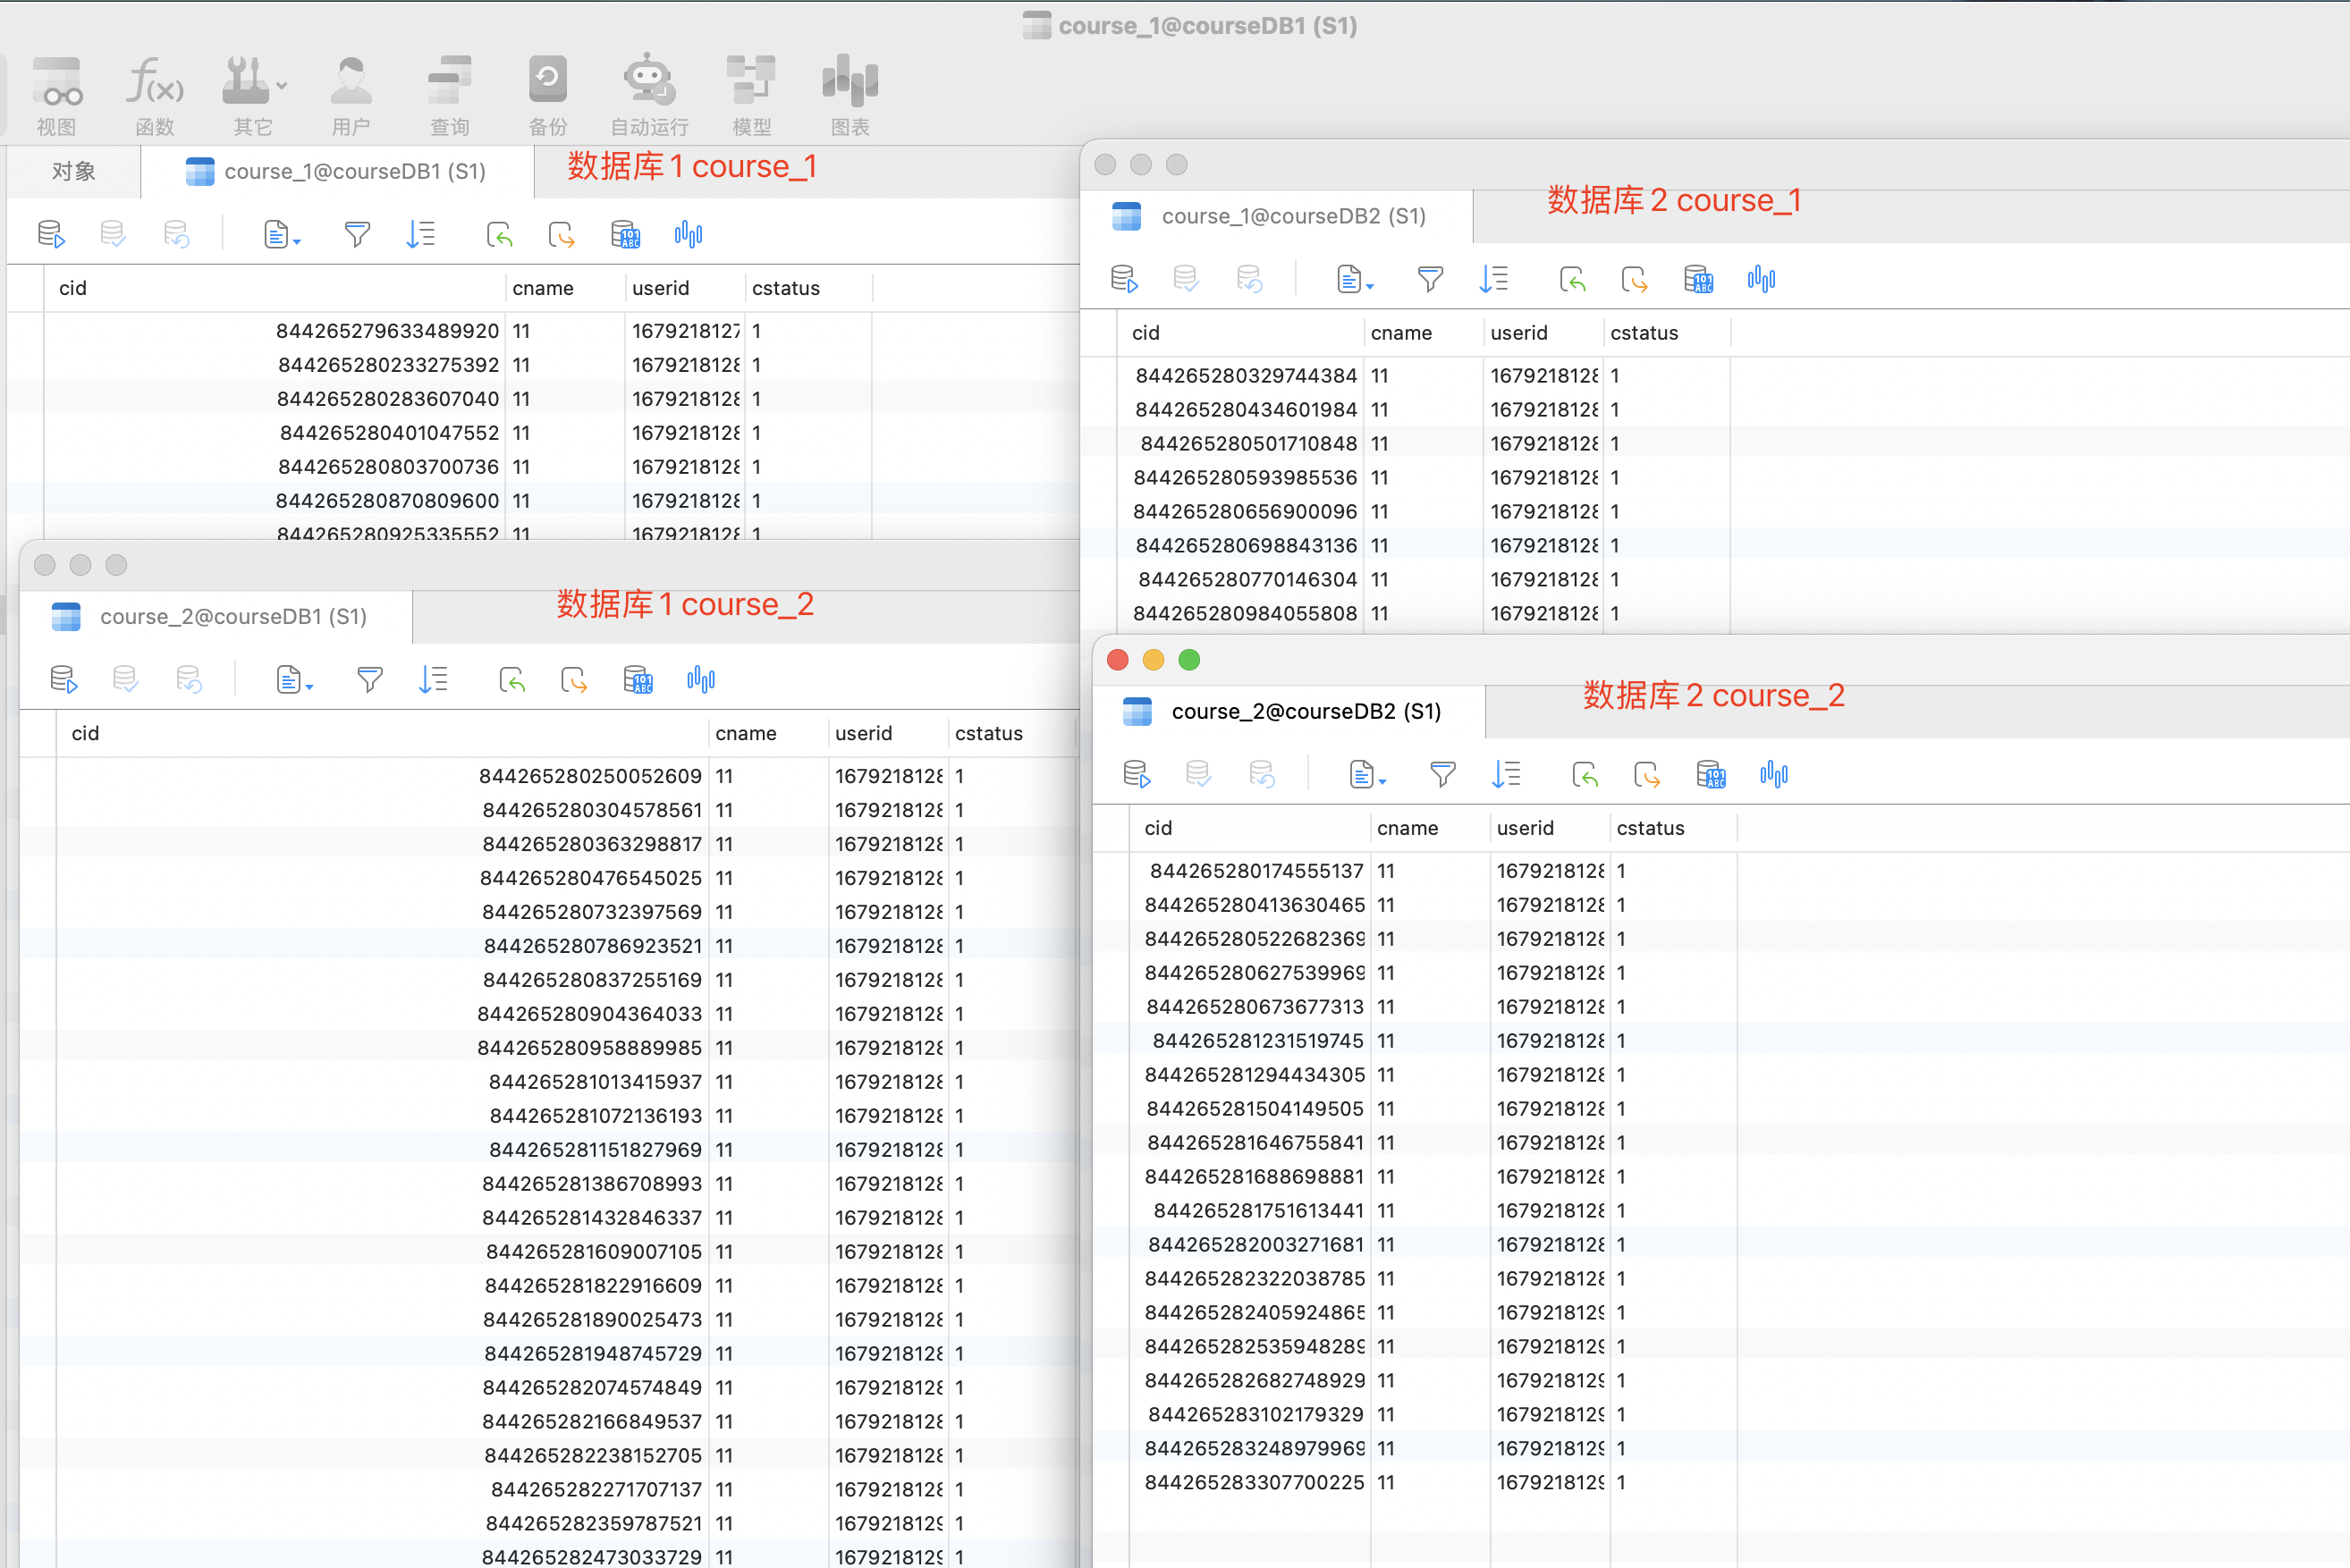
实验结果:
如图所示,我们在插入数据时候通过userid 取模后的结果判断要分片到哪个数据库中,随后在通过cid取模后的结果 判断 分片到哪个数据表中。
数据库查询
1 2 3 4 5 6 @Test void getDataBaseCourse () { QueryWrapper wrapper = new QueryWrapper <Course>(); wrapper.eq("cid" ,844265280304578561L ); System.out.println(courseMapper.selectList(wrapper)); }
如图所示,我们查询cid = 844265280304578561L时,没有指定userid 那他就不知道要去哪个数据库中查找,所以他都会去所有数据库中查询一次,然后进行数据汇总。
但是如果我们能指定userid,这样他会直接以userid进行取模的结果去找对应的数据库查询。
1 2 3 4 5 6 7 @Test void getDataBaseCourse () { QueryWrapper wrapper = new QueryWrapper <Course>(); wrapper.eq("cid" ,844265280304578561L ); wrapper.eq("userid" ,1679218128514L ); System.out.println(courseMapper.selectList(wrapper)); }
通过上面的截图,我们可以明确的发现他只去m1 数据库中查询,因为 userid取模后的结果 指向了 m1的数据库。
4)ShardingJDBC读写分离实战
主节点对外提供写操作,从节点对外提供读操作
把读和写的操作分离开,减少单节点的性能压力,增加slave节点读能力,提高数据高可用性
在MySQL主从架构中,是需要严格限制从服务的数据写入的,一旦从服务有数据写入,就会造成数据不一致。并且从服务在执行事务期间还很容易造成数据同步失败。
源码下载:https://files.javaxing.com/Java%08Demo/ShardingJDBCReadWriteSeparation.zip
1.配置xml依赖 1 2 3 4 5 6 7 8 9 10 11 12 13 14 15 16 17 18 19 20 21 22 23 24 25 26 27 28 29 30 31 32 33 34 35 36 37 38 39 40 41 42 43 44 45 46 47 48 49 <dependencies > <dependency > <groupId > org.springframework.boot</groupId > <artifactId > spring-boot-starter</artifactId > </dependency > <dependency > <groupId > org.springframework.boot</groupId > <artifactId > spring-boot-starter-test</artifactId > <scope > test</scope > </dependency > <dependency > <groupId > org.springframework.boot</groupId > <artifactId > spring-boot-starter-web</artifactId > </dependency > <dependency > <groupId > com.alibaba</groupId > <artifactId > druid</artifactId > <version > 1.2.9</version > </dependency > <dependency > <groupId > mysql</groupId > <artifactId > mysql-connector-java</artifactId > <version > 8.0.29</version > </dependency > <dependency > <groupId > org.apache.shardingsphere</groupId > <artifactId > sharding-jdbc-spring-boot-starter</artifactId > <version > 4.1.1</version > </dependency > <dependency > <groupId > com.baomidou</groupId > <artifactId > mybatis-plus-boot-starter</artifactId > <version > 3.0.5</version > </dependency > <dependency > <groupId > org.projectlombok</groupId > <artifactId > lombok</artifactId > </dependency > </dependencies >
2.创建数据库 1 2 3 4 5 6 7 CREATE TABLE `t_user` ( `id` bigint NOT NULL, `user_id` int DEFAULT NULL, `username` varchar(255) COLLATE utf8mb4_unicode_ci DEFAULT NULL, `birthday` varchar(255) COLLATE utf8mb4_unicode_ci DEFAULT NULL, PRIMARY KEY (`id`) ) ENGINE=InnoDB DEFAULT CHARSET=utf8mb4 COLLATE=utf8mb4_unicode_ci;
3.创建实体类 1 2 3 4 5 6 7 8 9 10 11 12 @Data @TableName(value = "t_user") public class User { private Long id; @TableField(value = "user_id") private Integer userId; private String username; private String birthday; }
4.创建mapper 1 2 3 4 5 6 7 8 9 10 11 package com.example.shardingjdbcreadwriteseparation.mapper;import java.util.List;import com.baomidou.mybatisplus.core.mapper.BaseMapper;import com.example.shardingjdbcreadwriteseparation.entity.User;import org.apache.ibatis.annotations.Mapper;@Mapper public interface UserMapper extends BaseMapper <User> { List<User> findAll () ; }
5.创建测试controller 1 2 3 4 5 6 7 8 9 10 11 12 13 14 15 16 17 18 19 20 21 22 23 24 25 26 27 28 29 30 31 32 33 @RestController @AllArgsConstructor public class TestController { @Autowired private UserMapper userMapper; @GetMapping("/insert") public void insert () { for (int i = 0 ; i < 100 ; i++) { User user = new User (); user.setId(System.currentTimeMillis()); user.setUserId(new Random ().nextInt()); user.setBirthday("" ); userMapper.insert(user); } } @GetMapping("/findAll") public void findAll () { for (int i = 0 ; i < 10 ; i++) { List<User> userList = userMapper.findAll(); System.out.println(userList); } } }
6.设置application.properties 1 2 3 4 5 6 7 8 9 10 11 12 13 14 15 16 17 18 19 20 21 22 23 24 25 26 27 28 29 30 31 32 33 34 35 36 37 38 39 mybatis-plus.mapper-locations =classpath:/mapper/*.xml spring.shardingsphere.datasource.names =master,slave1,slave2 spring.shardingsphere.datasource.master.type =com.alibaba.druid.pool.DruidDataSource spring.shardingsphere.datasource.master.driver-class-name =com.mysql.cj.jdbc.Driver spring.shardingsphere.datasource.master.url =jdbc:mysql://10.211.55.12:3306/shardingJDBCTest?serverTimezone=GMT%2B8 spring.shardingsphere.datasource.master.username =root spring.shardingsphere.datasource.master.password =123123 spring.shardingsphere.datasource.slave1.type =com.alibaba.druid.pool.DruidDataSource spring.shardingsphere.datasource.slave1.driver-class-name =com.mysql.cj.jdbc.Driver spring.shardingsphere.datasource.slave1.url =jdbc:mysql://10.211.55.17:3306/shardingJDBCTest?serverTimezone=GMT%2B8 spring.shardingsphere.datasource.slave1.username =root spring.shardingsphere.datasource.slave1.password =123123 spring.shardingsphere.datasource.slave2.type =com.alibaba.druid.pool.DruidDataSource spring.shardingsphere.datasource.slave2.driver-class-name =com.mysql.cj.jdbc.Driver spring.shardingsphere.datasource.slave2.url =jdbc:mysql://10.211.55.18:3306/shardingJDBCTest?serverTimezone=GMT%2B8 spring.shardingsphere.datasource.slave2.username =root spring.shardingsphere.datasource.slave2.password =123123 spring.shardingsphere.sharding.default-data-source-name =master spring.shardingsphere.masterslave.name =myds spring.shardingsphere.masterslave.master-data-source-name =master spring.shardingsphere.masterslave.slave-data-source-names =slave1,slave2 spring.shardingsphere.masterslave.load-balance-algorithm-type =ROUND_ROBIN spring.shardingsphere.props.sql.show =true
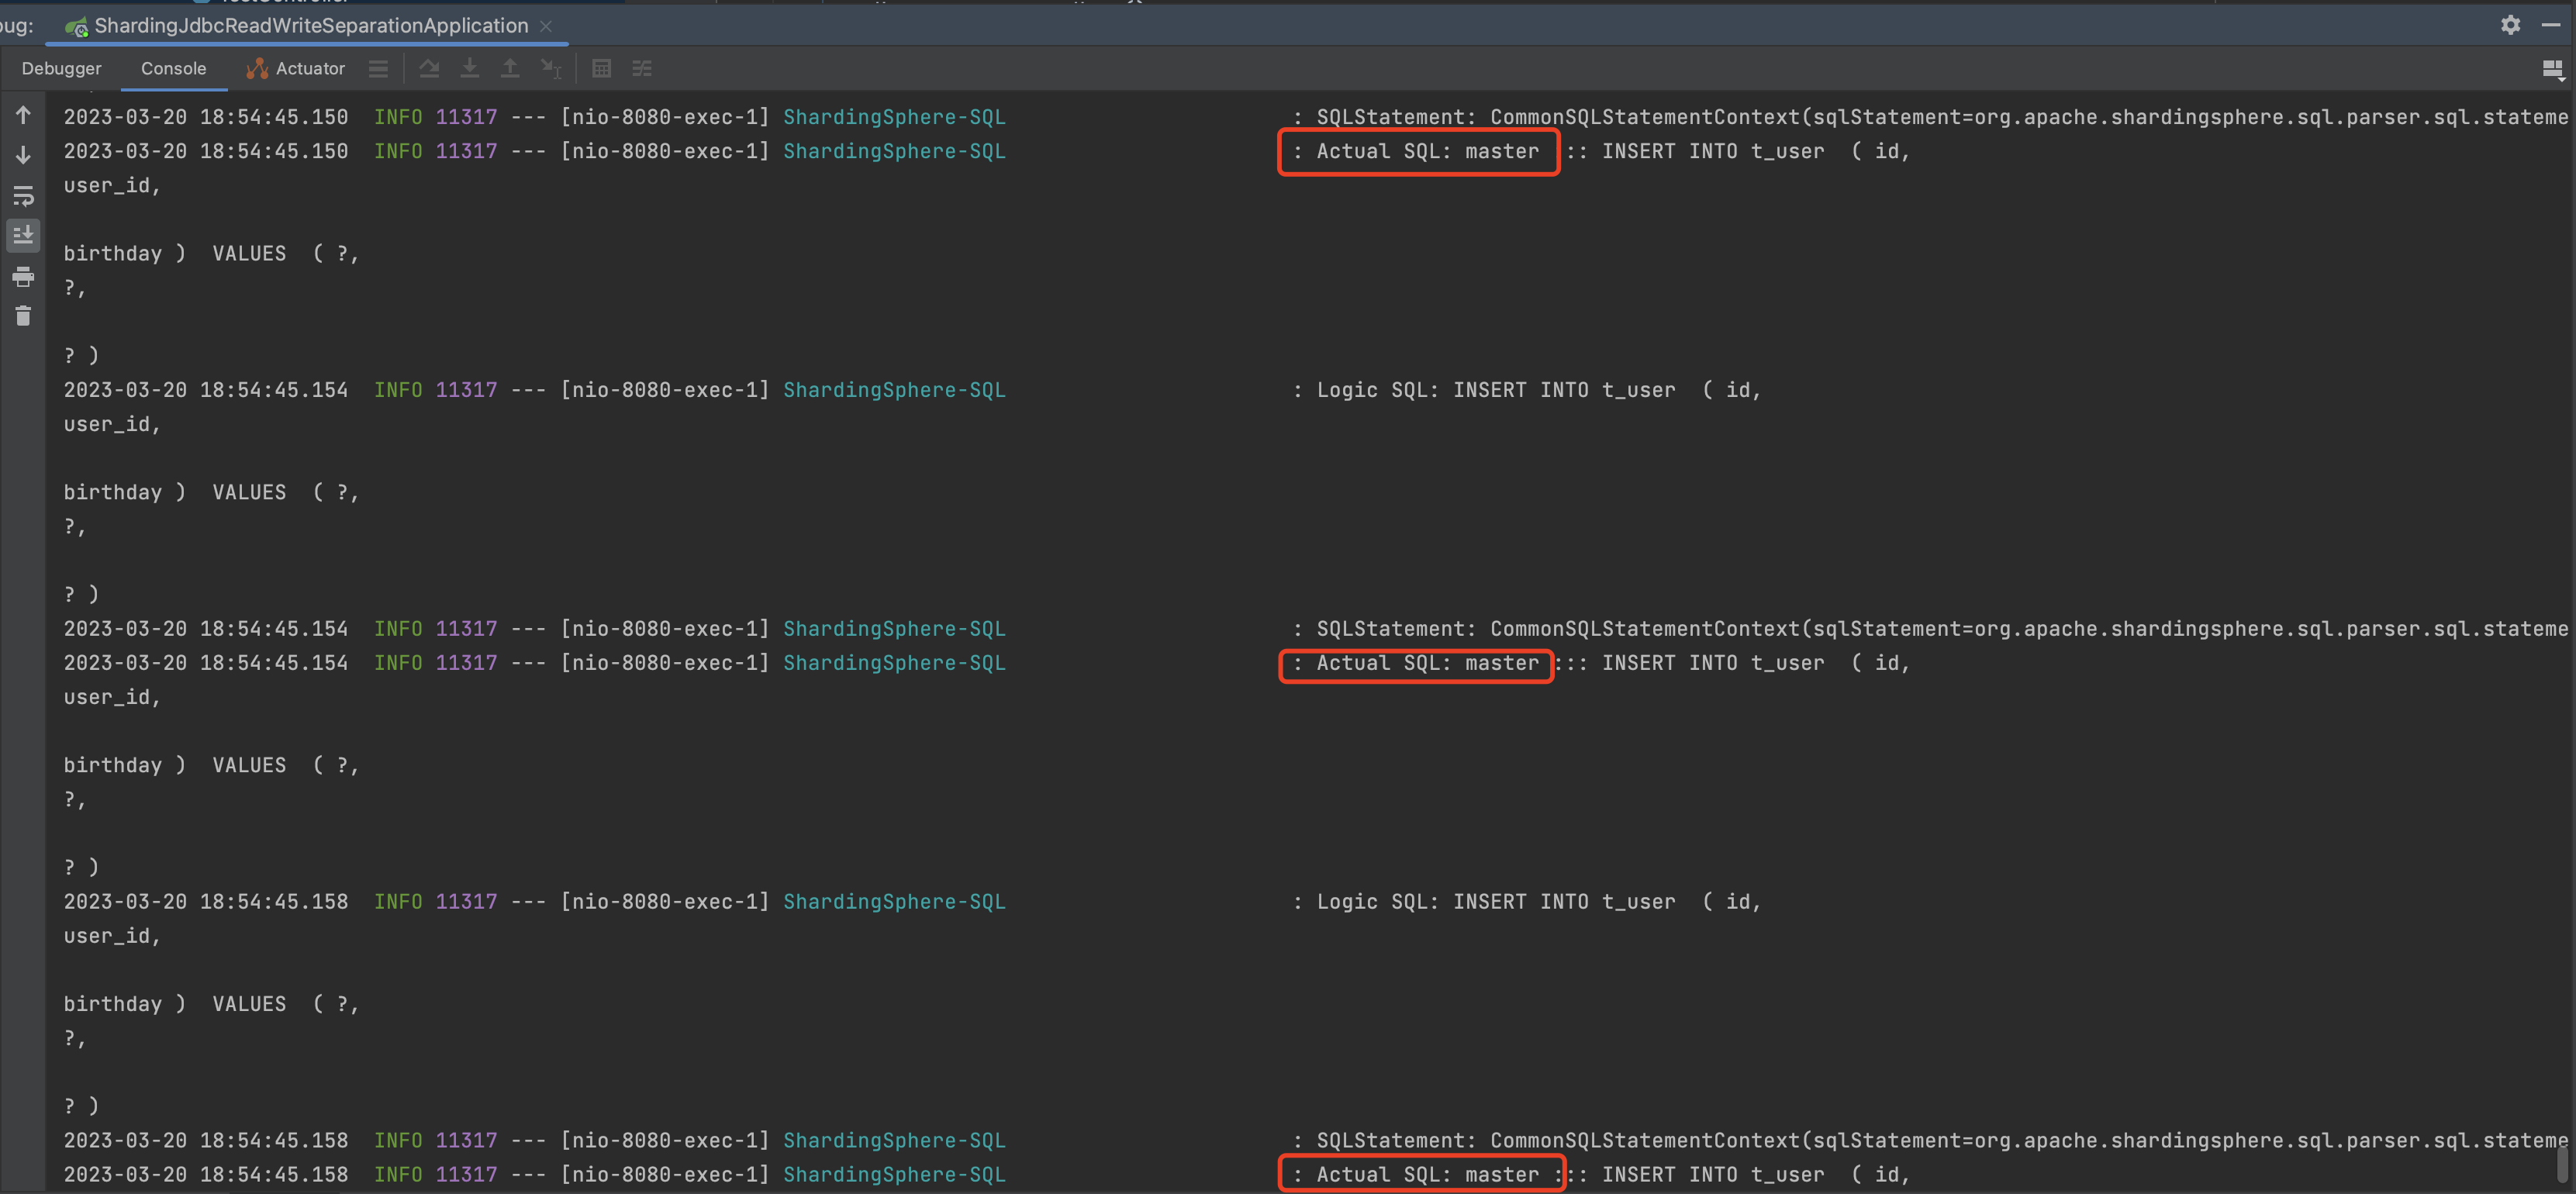
7.测试结果 数据插入测试
执行controller:http://localhost:8080/insert
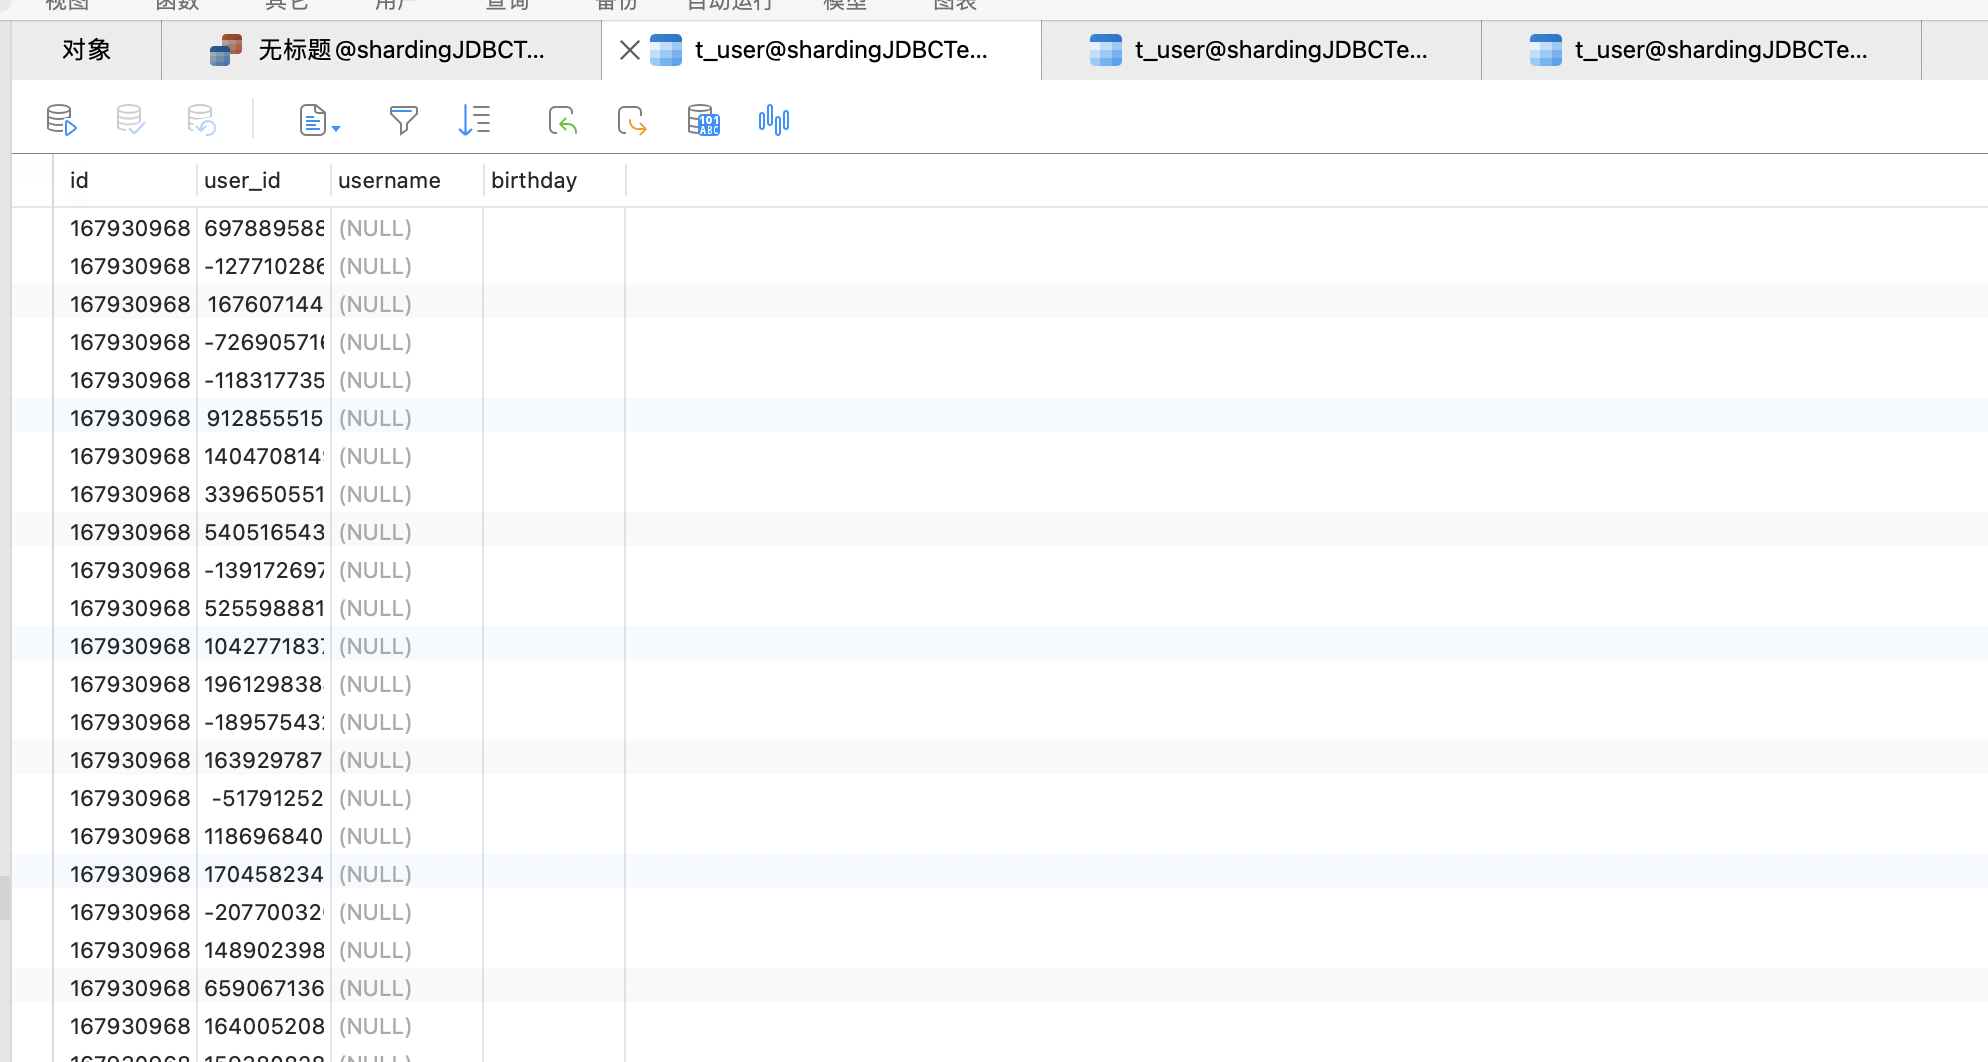
数据库插入结果:
springboot日志:
通过日志,我们可以明确的看到写入的操作,操作的数据源都是master。
查询所有测试:
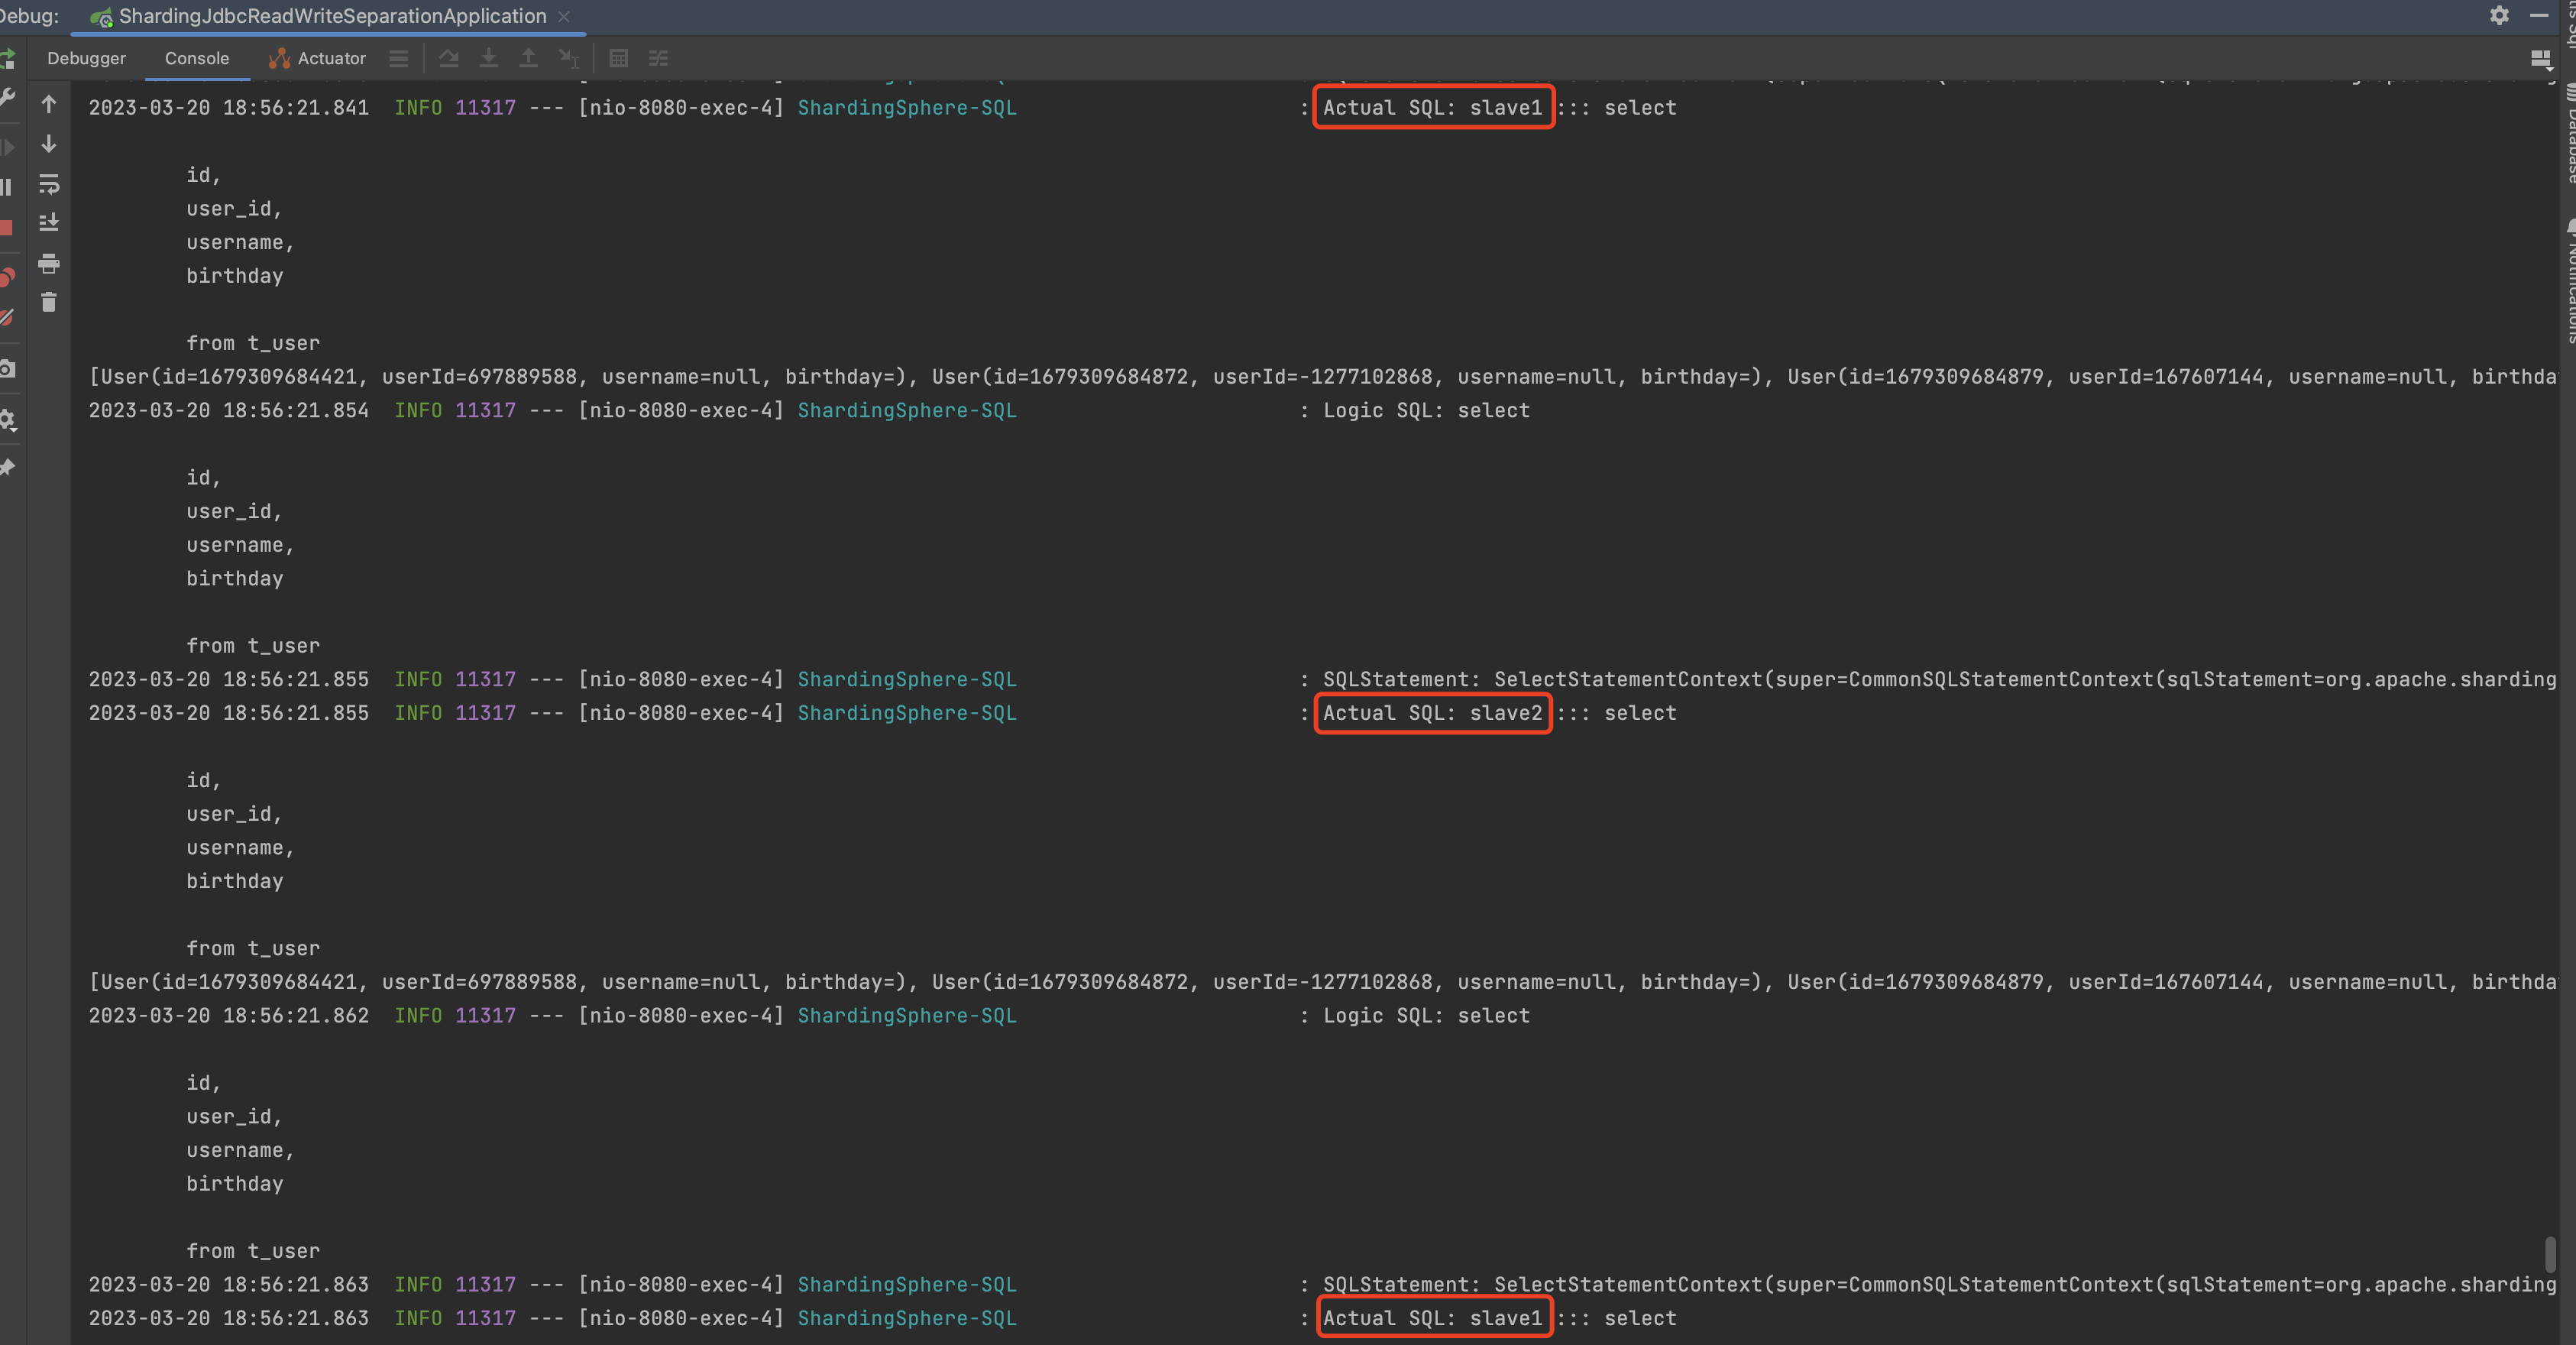
执行controller:http://localhost:8080/findAll
如图所示,执行查询的方法都是走的slave数据源,并且是轮询执行的。
5)ShardingJDBC实现按月份分库分表 1.inline 分片算法 注意:inline分片算法只能适用于 eq 等号查询
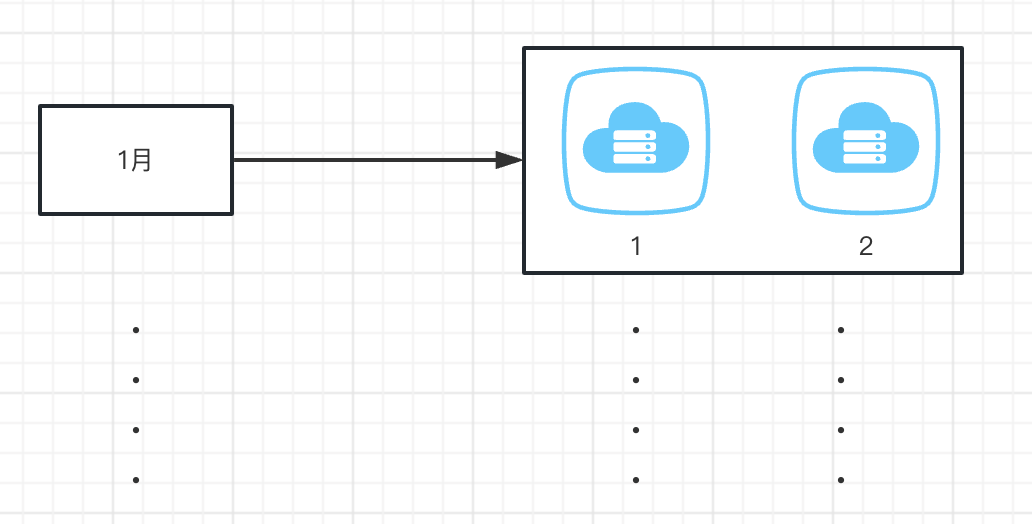
我们按照年月进行分表,分成12个数据表,并分库存储在2个不同的数据库上
按月份分表,按订单ID 根据数据库节点进行取模后存储在不同的数据库上
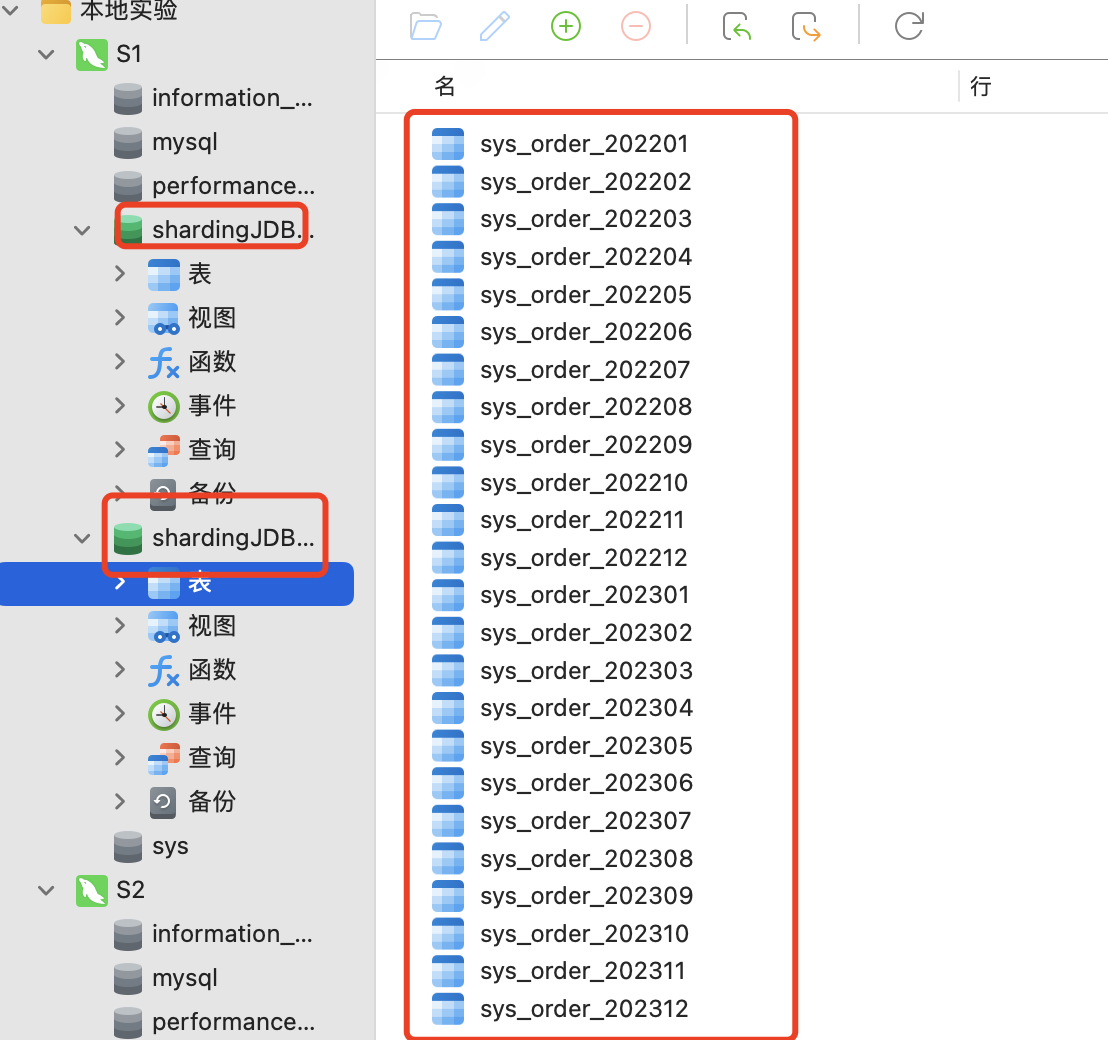
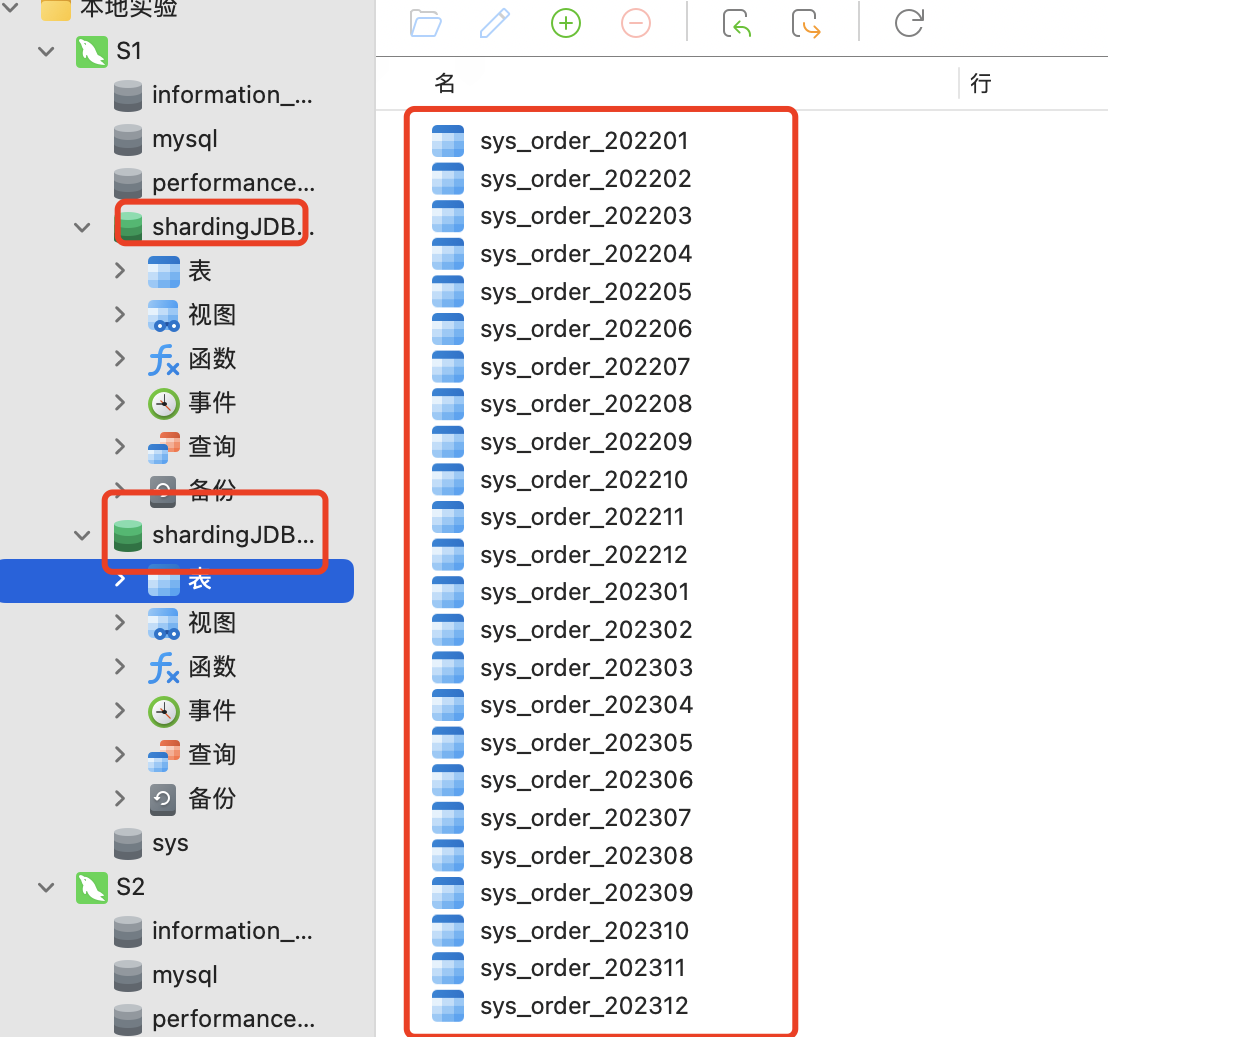
1.数据库设计截图 这里为了更好的数据扩展,我们就按2022-2023年的12个月进行分表,这样一共就有24张表,如果还想更多年份扩展,可以照葫芦画瓢。
2.entity 实体类 1 2 3 4 5 6 7 8 9 10 11 12 13 14 15 16 17 18 19 20 21 22 23 24 25 26 27 28 29 30 31 32 33 34 35 36 37 38 39 40 41 42 43 44 45 46 47 48 49 50 51 52 53 54 55 56 57 58 59 60 61 62 63 64 65 66 67 68 69 70 71 72 73 74 75 76 77 78 79 80 81 82 83 84 85 86 87 88 89 90 91 92 93 94 95 96 97 98 99 100 101 102 103 104 105 106 107 108 109 110 111 112 113 114 115 116 117 118 119 120 121 122 123 124 125 126 127 128 129 130 131 132 133 134 135 136 137 138 139 140 141 142 143 144 145 146 147 148 149 150 151 152 153 154 155 156 157 158 159 160 161 162 163 164 165 166 167 168 169 170 171 172 173 174 175 176 177 178 179 180 181 182 183 184 185 186 187 188 189 190 191 192 193 194 195 196 197 198 199 200 201 202 203 204 205 206 207 208 209 210 211 212 213 214 215 216 217 218 219 220 221 222 223 224 225 226 227 228 229 230 231 232 233 234 235 236 237 238 239 240 241 242 243 244 245 246 247 248 249 250 251 252 253 254 255 256 257 258 259 260 261 262 263 264 265 266 267 268 269 270 271 272 273 274 275 276 package com.example.shardingjdbcreadwriteanbranch.entity;import com.baomidou.mybatisplus.annotation.TableField;import com.baomidou.mybatisplus.annotation.TableName;import lombok.Data;import java.math.BigDecimal;import java.util.Date;@Data public class SysOrder { @TableField(value = "pay_id") private String payId; private Long payBindId; private Long payServiceBindId; private BigDecimal payAmt; private BigDecimal payAmtOld; private BigDecimal payAmtDown; private BigDecimal payHandlingAmt; private BigDecimal payChannelHandlingAmt; private BigDecimal payPlatformProfitAmt; private BigDecimal payActualAmt; private BigDecimal payProfitAmt; private BigDecimal payBranchAmt; private Long payServiceProvider; private String outTradeNo; private String outTransNo; private String currency; private String currencySymbol; private Integer methodId; private Integer channelId; private String deviceFlag; private String goodsTitle; private Integer tradeStatus; private Date tradeTime; private Date payTime; private String notifyUrl; private String returnUrl; private String requestParam; private Integer callBackStatus; private String callBackBody; private Integer callBackCount; private String website; private String attach; private Boolean isRefund; private BigDecimal refundAmt; private BigDecimal refundHandlingAmt; private Date refundTime; private String refundDesc; private Boolean isSettlement; private Boolean isServiceSettlement; private String settlementTime; private Integer isCirculation; private BigDecimal circulationAmt; private String circulationTime; private Boolean isBranchSettlement; private String payUrl; private String payTrpUrl; private String openId; private String ip; private Boolean isFirewall; private Long deptId; private Long tenantId; private String errorMsg; private Integer isExpress; private String yearmonth; private static final long serialVersionUID = 1L ; }
3.设置 分表配置 1 2 3 4 5 6 7 8 9 10 11 12 13 14 15 16 17 18 19 20 21 22 23 24 25 26 27 28 29 30 31 32 33 34 35 36 37 38 39 40 41 42 43 mybatis-plus.mapper-locations =classpath:/mapper/*.xml spring.shardingsphere.datasource.names =m1,m2 spring.shardingsphere.datasource.m1.type =com.alibaba.druid.pool.DruidDataSource spring.shardingsphere.datasource.m1.driver-class-name =com.mysql.cj.jdbc.Driver spring.shardingsphere.datasource.m1.url =jdbc:mysql://10.211.55.12:3306/shardingJDBCTest?serverTimezone=GMT%2B8 spring.shardingsphere.datasource.m1.username =root spring.shardingsphere.datasource.m1.password =123123 spring.shardingsphere.datasource.m2.type =com.alibaba.druid.pool.DruidDataSource spring.shardingsphere.datasource.m2.driver-class-name =com.mysql.cj.jdbc.Driver spring.shardingsphere.datasource.m2.url =jdbc:mysql://10.211.55.12:3306/shardingJDBCTest2?serverTimezone=GMT%2B8 spring.shardingsphere.datasource.m2.username =root spring.shardingsphere.datasource.m2.password =123123 spring.shardingsphere.props.sql.show =true spring.shardingsphere.sharding.tables.sys_order.actual-data-nodes =m$->{1..2}.sys_order_$->{2022..2023}${(1..12).collect{t ->t.toString().padLeft(2,'0')} } spring.shardingsphere.sharding.tables.sys_order.key-generator.column =pay_id spring.shardingsphere.sharding.tables.sys_order.key-generator.type =SNOWFLAKE spring.shardingsphere.sharding.tables.sys_order.key-generator.props.worker.id =1 spring.shardingsphere.sharding.tables.sysOrder.database-strategy.inline.sharding-column =pay_id spring.shardingsphere.sharding.tables.sysOrder.database-strategy.inline.algorithm-expression =m$->{pay_id%2+1} spring.shardingsphere.sharding.tables.sys_order.table-strategy.inline.sharding-column =yearmonth spring.shardingsphere.sharding.tables.sys_order.table-strategy.inline.algorithm-expression =sys_order_$->{yearmonth}
4.mapper 1 2 3 4 @Mapper public interface SysOrderMapper extends BaseMapper <SysOrder> { List<SysOrder> findAll () ; }
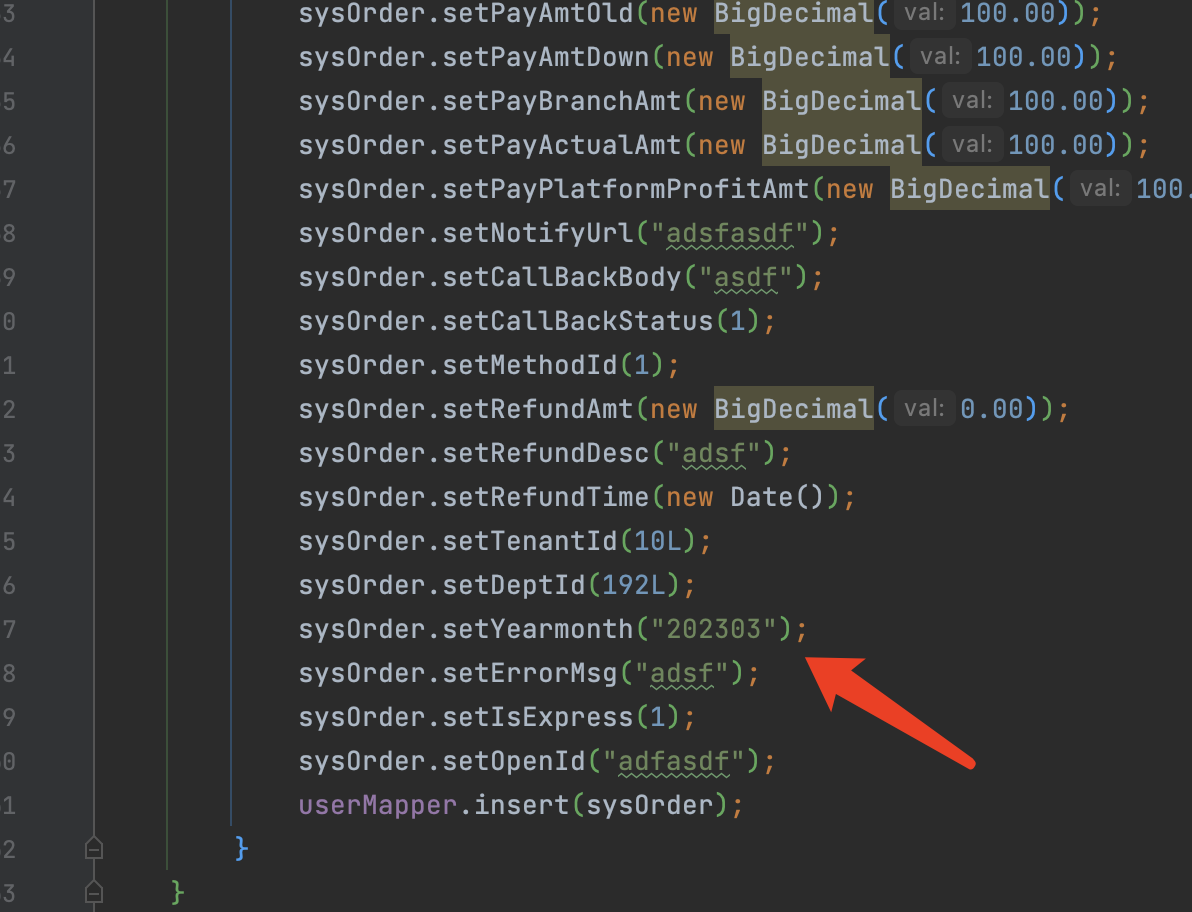
5.controller 1 2 3 4 5 6 7 8 9 10 11 12 13 14 15 16 17 18 19 20 21 22 23 24 25 26 27 28 29 30 31 32 33 34 35 36 37 38 39 40 41 42 43 44 45 @GetMapping("/insert") public void insert () { for (int i = 0 ; i < 10 ; i++) { SysOrder sysOrder = new SysOrder (); sysOrder.setPayBindId(1l ); sysOrder.setPayServiceBindId(1l ); sysOrder.setPayAmt(new BigDecimal (100.00 )); sysOrder.setPayAmtOld(new BigDecimal (100.00 )); sysOrder.setPayAmtDown(new BigDecimal (100.00 )); sysOrder.setPayBranchAmt(new BigDecimal (100.00 )); sysOrder.setPayActualAmt(new BigDecimal (100.00 )); sysOrder.setPayPlatformProfitAmt(new BigDecimal (100.00 )); sysOrder.setNotifyUrl("adsfasdf" ); sysOrder.setCallBackBody("asdf" ); sysOrder.setCallBackStatus(1 ); sysOrder.setMethodId(1 ); sysOrder.setRefundAmt(new BigDecimal (0.00 )); sysOrder.setRefundDesc("adsf" ); sysOrder.setRefundTime(new Date ()); sysOrder.setTenantId(10L ); sysOrder.setDeptId(192L ); sysOrder.setYearmonth("202303" ); sysOrder.setErrorMsg("adsf" ); sysOrder.setIsExpress(1 ); sysOrder.setOpenId("adfasdf" ); sysOrderMapper.insert(sysOrder); } } @GetMapping("/findAll") public void findAll () { QueryWrapper wrapper = new QueryWrapper <SysOrder>(); wrapper.eq("pay_id" ,844996497337487361L ); System.out.println(sysOrderMapper.selectList(wrapper)); }
6.执行结果 插入结果
查询结果
范围查询
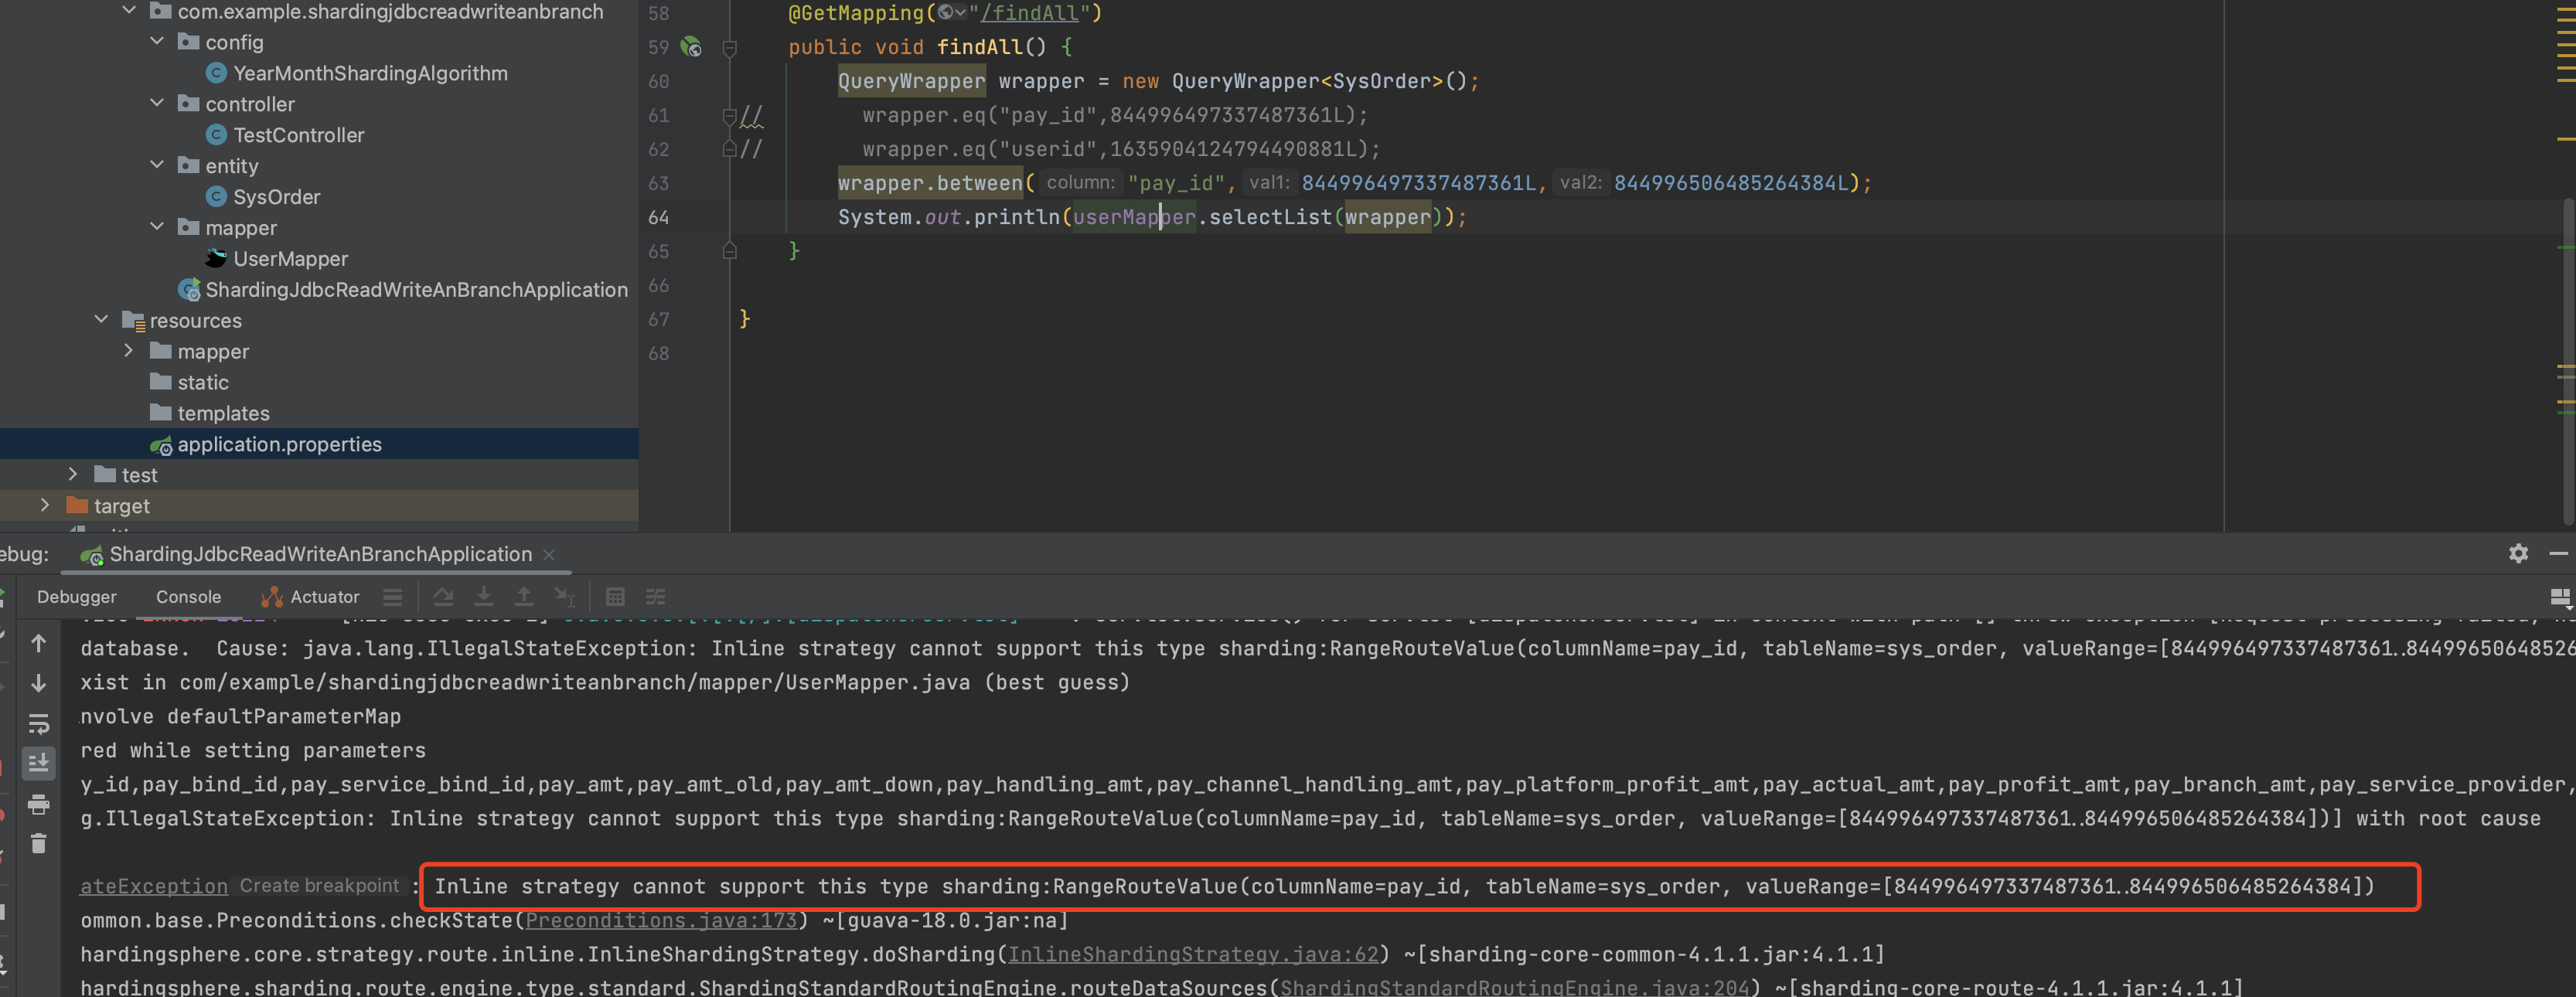
如图所示,inline的分片算法是不支持范围查询的,如果在inline分片算法下进行范围查询就会报错,为此我们需要用到其他的算法。
2.standard(支持范围查询)
standard和inline在配置上唯一的不同,就是我们需要创建分片策略配置文件并指定分片策略文件,在代码里来实现 分片策略
源码下载:https://files.javaxing.com/Java%08Demo/ShardingJDBCYearMonth.zip
1.数据库设计截图 这里为了更好的数据扩展,我们就按2022-2023年的12个月进行分表,这样一共就有24张表,如果还想更多年份扩展,可以照葫芦画瓢。
2.entity 实体类 1 2 3 4 5 6 7 8 9 10 11 12 13 14 15 16 17 18 19 20 21 22 23 24 25 26 27 28 29 30 31 32 33 34 35 36 37 38 39 40 41 42 43 44 45 46 47 48 49 50 51 52 53 54 55 56 57 58 59 60 61 62 63 64 65 66 67 68 69 70 71 72 73 74 75 76 77 78 79 80 81 82 83 84 85 86 87 88 89 90 91 92 93 94 95 96 97 98 99 100 101 102 103 104 105 106 107 108 109 110 111 112 113 114 115 116 117 118 119 120 121 122 123 124 125 126 127 128 129 130 131 132 133 134 135 136 137 138 139 140 141 142 143 144 145 146 147 148 149 150 151 152 153 154 155 156 157 158 159 160 161 162 163 164 165 166 167 168 169 170 171 172 173 174 175 176 177 178 179 180 181 182 183 184 185 186 187 188 189 190 191 192 193 194 195 196 197 198 199 200 201 202 203 204 205 206 207 208 209 210 211 212 213 214 215 216 217 218 219 220 221 222 223 224 225 226 227 228 229 230 231 232 233 234 235 236 237 238 239 240 241 242 243 244 245 246 247 248 249 250 251 252 253 254 255 256 257 258 259 260 261 262 263 264 265 266 267 268 269 270 271 272 273 274 275 276 package com.example.shardingjdbcreadwriteanbranch.entity;import com.baomidou.mybatisplus.annotation.TableField;import com.baomidou.mybatisplus.annotation.TableName;import lombok.Data;import java.math.BigDecimal;import java.util.Date;@Data public class SysOrder { @TableField(value = "pay_id") private String payId; private Long payBindId; private Long payServiceBindId; private BigDecimal payAmt; private BigDecimal payAmtOld; private BigDecimal payAmtDown; private BigDecimal payHandlingAmt; private BigDecimal payChannelHandlingAmt; private BigDecimal payPlatformProfitAmt; private BigDecimal payActualAmt; private BigDecimal payProfitAmt; private BigDecimal payBranchAmt; private Long payServiceProvider; private String outTradeNo; private String outTransNo; private String currency; private String currencySymbol; private Integer methodId; private Integer channelId; private String deviceFlag; private String goodsTitle; private Integer tradeStatus; private Date tradeTime; private Date payTime; private String notifyUrl; private String returnUrl; private String requestParam; private Integer callBackStatus; private String callBackBody; private Integer callBackCount; private String website; private String attach; private Boolean isRefund; private BigDecimal refundAmt; private BigDecimal refundHandlingAmt; private Date refundTime; private String refundDesc; private Boolean isSettlement; private Boolean isServiceSettlement; private String settlementTime; private Integer isCirculation; private BigDecimal circulationAmt; private String circulationTime; private Boolean isBranchSettlement; private String payUrl; private String payTrpUrl; private String openId; private String ip; private Boolean isFirewall; private Long deptId; private Long tenantId; private String errorMsg; private Integer isExpress; private String yearmonth; private static final long serialVersionUID = 1L ; }
3.设置 分表配置 1 2 3 4 5 6 7 8 9 10 11 12 13 14 15 16 17 18 19 20 21 22 23 24 25 26 27 28 29 30 31 32 33 34 35 36 37 38 39 40 41 42 43 44 mybatis-plus.mapper-locations =classpath:/mapper/*.xml spring.shardingsphere.datasource.names =m1,m2 spring.shardingsphere.datasource.m1.type =com.alibaba.druid.pool.DruidDataSource spring.shardingsphere.datasource.m1.driver-class-name =com.mysql.cj.jdbc.Driver spring.shardingsphere.datasource.m1.url =jdbc:mysql://10.211.55.12:3306/shardingJDBCTest?serverTimezone=GMT%2B8 spring.shardingsphere.datasource.m1.username =root spring.shardingsphere.datasource.m1.password =123123 spring.shardingsphere.datasource.m2.type =com.alibaba.druid.pool.DruidDataSource spring.shardingsphere.datasource.m2.driver-class-name =com.mysql.cj.jdbc.Driver spring.shardingsphere.datasource.m2.url =jdbc:mysql://10.211.55.12:3306/shardingJDBCTest2?serverTimezone=GMT%2B8 spring.shardingsphere.datasource.m2.username =root spring.shardingsphere.datasource.m2.password =123123 spring.shardingsphere.props.sql.show =true spring.shardingsphere.sharding.tables.sys_order.actual-data-nodes =m$->{1..2}.sys_order_$->{2022..2023}${(1..12).collect{t ->t.toString().padLeft(2,'0')} } spring.shardingsphere.sharding.tables.sys_order.key-generator.column =pay_id spring.shardingsphere.sharding.tables.sys_order.key-generator.type =SNOWFLAKE spring.shardingsphere.sharding.tables.sys_order.key-generator.props.worker.id =1 spring.shardingsphere.sharding.tables.sys_order.database-strategy.standard.sharding-column =pay_id spring.shardingsphere.sharding.tables.sys_order.database-strategy.standard.precise-algorithm-class-name =com.example.shardingjdbcreadwriteanbranch.algorithm.MyPreciseDSShardingAlgorithm spring.shardingsphere.sharding.tables.sys_order.database-strategy.standard.range-algorithm-class-name =com.example.shardingjdbcreadwriteanbranch.algorithm.MyRangeDSShardingAlgorithm spring.shardingsphere.sharding.tables.sys_order.table-strategy.standard.sharding-column =yearmonth spring.shardingsphere.sharding.tables.sys_order.table-strategy.standard.precise-algorithm-class-name =com.example.shardingjdbcreadwriteanbranch.algorithm.YearMonthShardingAlgorithm
4.mapper 1 2 3 4 @Mapper public interface SysOrderMapper extends BaseMapper <SysOrder> { List<SysOrder> findAll () ; }
5.controller 1 2 3 4 5 6 7 8 9 10 11 12 13 14 15 16 17 18 19 20 21 22 23 24 25 26 27 28 29 30 31 32 33 34 35 36 37 38 39 40 41 42 43 44 45 @GetMapping("/insert") public void insert () { for (int i = 0 ; i < 10 ; i++) { SysOrder sysOrder = new SysOrder (); sysOrder.setPayBindId(1l ); sysOrder.setPayServiceBindId(1l ); sysOrder.setPayAmt(new BigDecimal (100.00 )); sysOrder.setPayAmtOld(new BigDecimal (100.00 )); sysOrder.setPayAmtDown(new BigDecimal (100.00 )); sysOrder.setPayBranchAmt(new BigDecimal (100.00 )); sysOrder.setPayActualAmt(new BigDecimal (100.00 )); sysOrder.setPayPlatformProfitAmt(new BigDecimal (100.00 )); sysOrder.setNotifyUrl("adsfasdf" ); sysOrder.setCallBackBody("asdf" ); sysOrder.setCallBackStatus(1 ); sysOrder.setMethodId(1 ); sysOrder.setRefundAmt(new BigDecimal (0.00 )); sysOrder.setRefundDesc("adsf" ); sysOrder.setRefundTime(new Date ()); sysOrder.setTenantId(10L ); sysOrder.setDeptId(192L ); sysOrder.setYearmonth("202303" ); sysOrder.setErrorMsg("adsf" ); sysOrder.setIsExpress(1 ); sysOrder.setOpenId("adfasdf" ); sysOrderMapper.insert(sysOrder); } } @GetMapping("/findAll") public void findAll () { QueryWrapper wrapper = new QueryWrapper <SysOrder>(); wrapper.between("pay_id" ,845022919498141696L ,845022920127287297L ); System.out.println(sysOrderMapper.selectList(wrapper)); }
6.指定算法 MyPreciseDSShardingAlgorithm
自定义扩展的精确分片算法,用于 精准查询(eq等)
1 2 3 4 5 6 7 8 9 10 11 12 13 14 15 16 17 18 19 20 21 22 23 24 25 26 27 28 29 30 31 32 package com.example.shardingjdbcreadwriteanbranch.algorithm;import org.apache.shardingsphere.api.sharding.standard.PreciseShardingAlgorithm;import org.apache.shardingsphere.api.sharding.standard.PreciseShardingValue;import java.math.BigInteger;import java.util.Collection;public class MyPreciseDSShardingAlgorithm implements PreciseShardingAlgorithm <Long> { @Override public String doSharding (Collection<String> availableTargetNames, PreciseShardingValue<Long> shardingValue) { BigInteger shardingValueB = BigInteger.valueOf(shardingValue.getValue()); BigInteger resB = (shardingValueB.mod(new BigInteger ("2" ))).add(new BigInteger ("1" )); String key = "m" +resB ; if (availableTargetNames.contains(key)){ return key; } throw new UnsupportedOperationException (" route " +key+" is not supported. please check your config" ); } }
MyRangeDSShardingAlgorithm
自定义扩展的范围分片算法,用于范围查询,计算出分片的范围,返回的数据库节点
1 2 3 4 5 6 7 8 9 10 11 12 13 14 15 16 17 18 19 20 21 22 23 24 25 26 27 28 29 package com.example.shardingjdbcreadwriteanbranch.algorithm;import org.apache.shardingsphere.api.sharding.standard.RangeShardingAlgorithm;import org.apache.shardingsphere.api.sharding.standard.RangeShardingValue;import java.util.Collection;public class MyRangeDSShardingAlgorithm implements RangeShardingAlgorithm <Long> { @Override public Collection<String> doSharding (Collection<String> availableTargetNames, RangeShardingValue<Long> shardingValue) { Long lowerEndpoint = shardingValue.getValueRange().lowerEndpoint(); Long upperEndpoint = shardingValue.getValueRange().upperEndpoint(); return availableTargetNames; } }
MyRangeTableShardingAlgorithm
基于数据表的范围分片算法,实测这个用不上
1 2 3 4 5 6 7 8 9 10 11 12 13 14 15 16 17 18 19 20 21 22 23 24 25 26 27 28 29 package com.example.shardingjdbcreadwriteanbranch.algorithm;import org.apache.shardingsphere.api.sharding.standard.RangeShardingAlgorithm;import org.apache.shardingsphere.api.sharding.standard.RangeShardingValue;import java.util.Arrays;import java.util.Collection;public class MyRangeTableShardingAlgorithm implements RangeShardingAlgorithm <Long> { @Override public Collection<String> doSharding (Collection<String> availableTargetNames, RangeShardingValue<Long> shardingValue) { Long lowerEndpoint = shardingValue.getValueRange().lowerEndpoint(); Long upperEndpoint = shardingValue.getValueRange().upperEndpoint(); return Arrays.asList(shardingValue.getLogicTableName()+"_1" ,shardingValue.getLogicTableName()+"_2" ); } }
YearMonthShardingAlgorithm
返回 年份日期的数据库名,用于插入数据的时候 可以计算出分片的表
1 2 3 4 5 6 7 8 9 10 11 12 13 14 15 16 17 18 package com.example.shardingjdbcreadwriteanbranch.algorithm;import org.apache.shardingsphere.api.sharding.standard.PreciseShardingAlgorithm;import org.apache.shardingsphere.api.sharding.standard.PreciseShardingValue;import java.util.Collection;public class YearMonthShardingAlgorithm implements PreciseShardingAlgorithm <String> { private static final String SPLITTER = "_" ; @Override public String doSharding (Collection availableTargetNames, PreciseShardingValue shardingValue) { String tbName = shardingValue.getLogicTableName() + "_" + shardingValue.getValue(); System.out.println("Sharding input:" + shardingValue.getValue() + ", output:{}" + tbName); return tbName; } }
7.执行结果
查询结果
范围查询
8.count测试 controller:
1 2 3 4 5 6 7 @GetMapping("/count") public void count () { System.out.println("count:" +sysOrderMapper.count()); }
Mapper:
1 2 3 4 5 6 7 @Mapper public interface SysOrderMapper extends BaseMapper <SysOrder> { List<SysOrder> findAll () ; Integer count () ; }
xml:
1 2 3 4 <select id="count" resultType="java.lang.Integer" > select count (1 ) from sys_order </select>
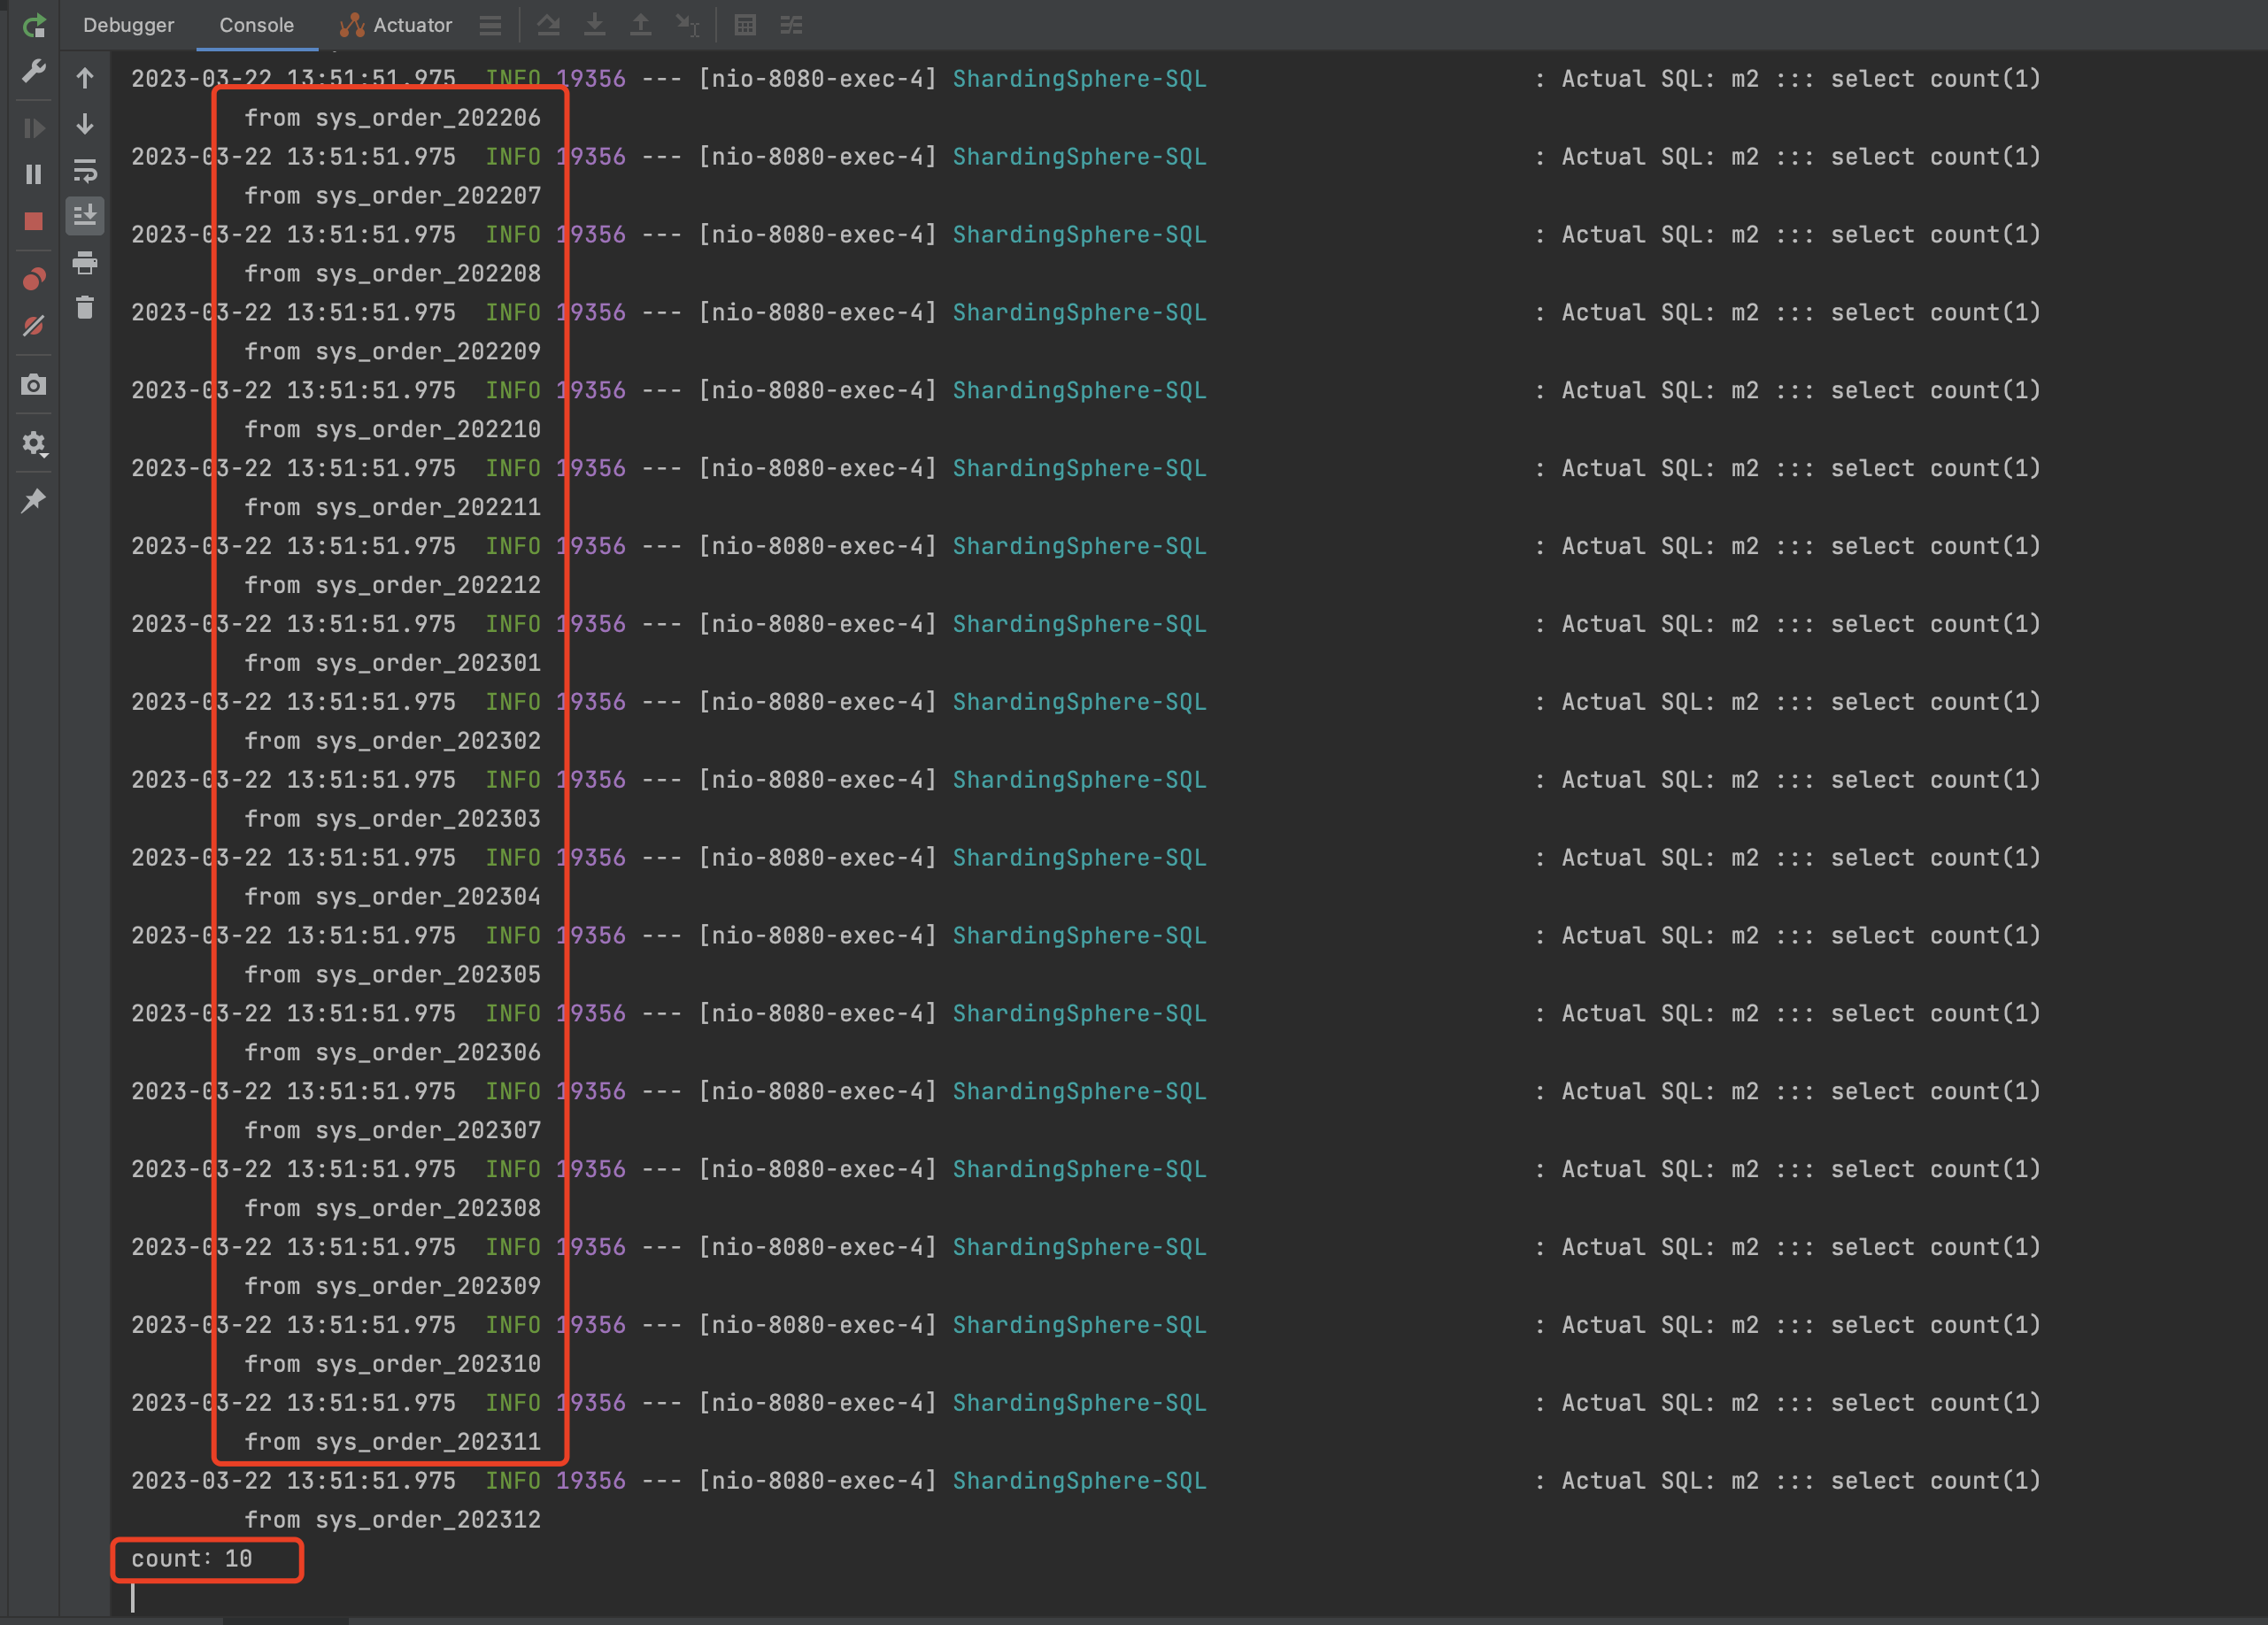
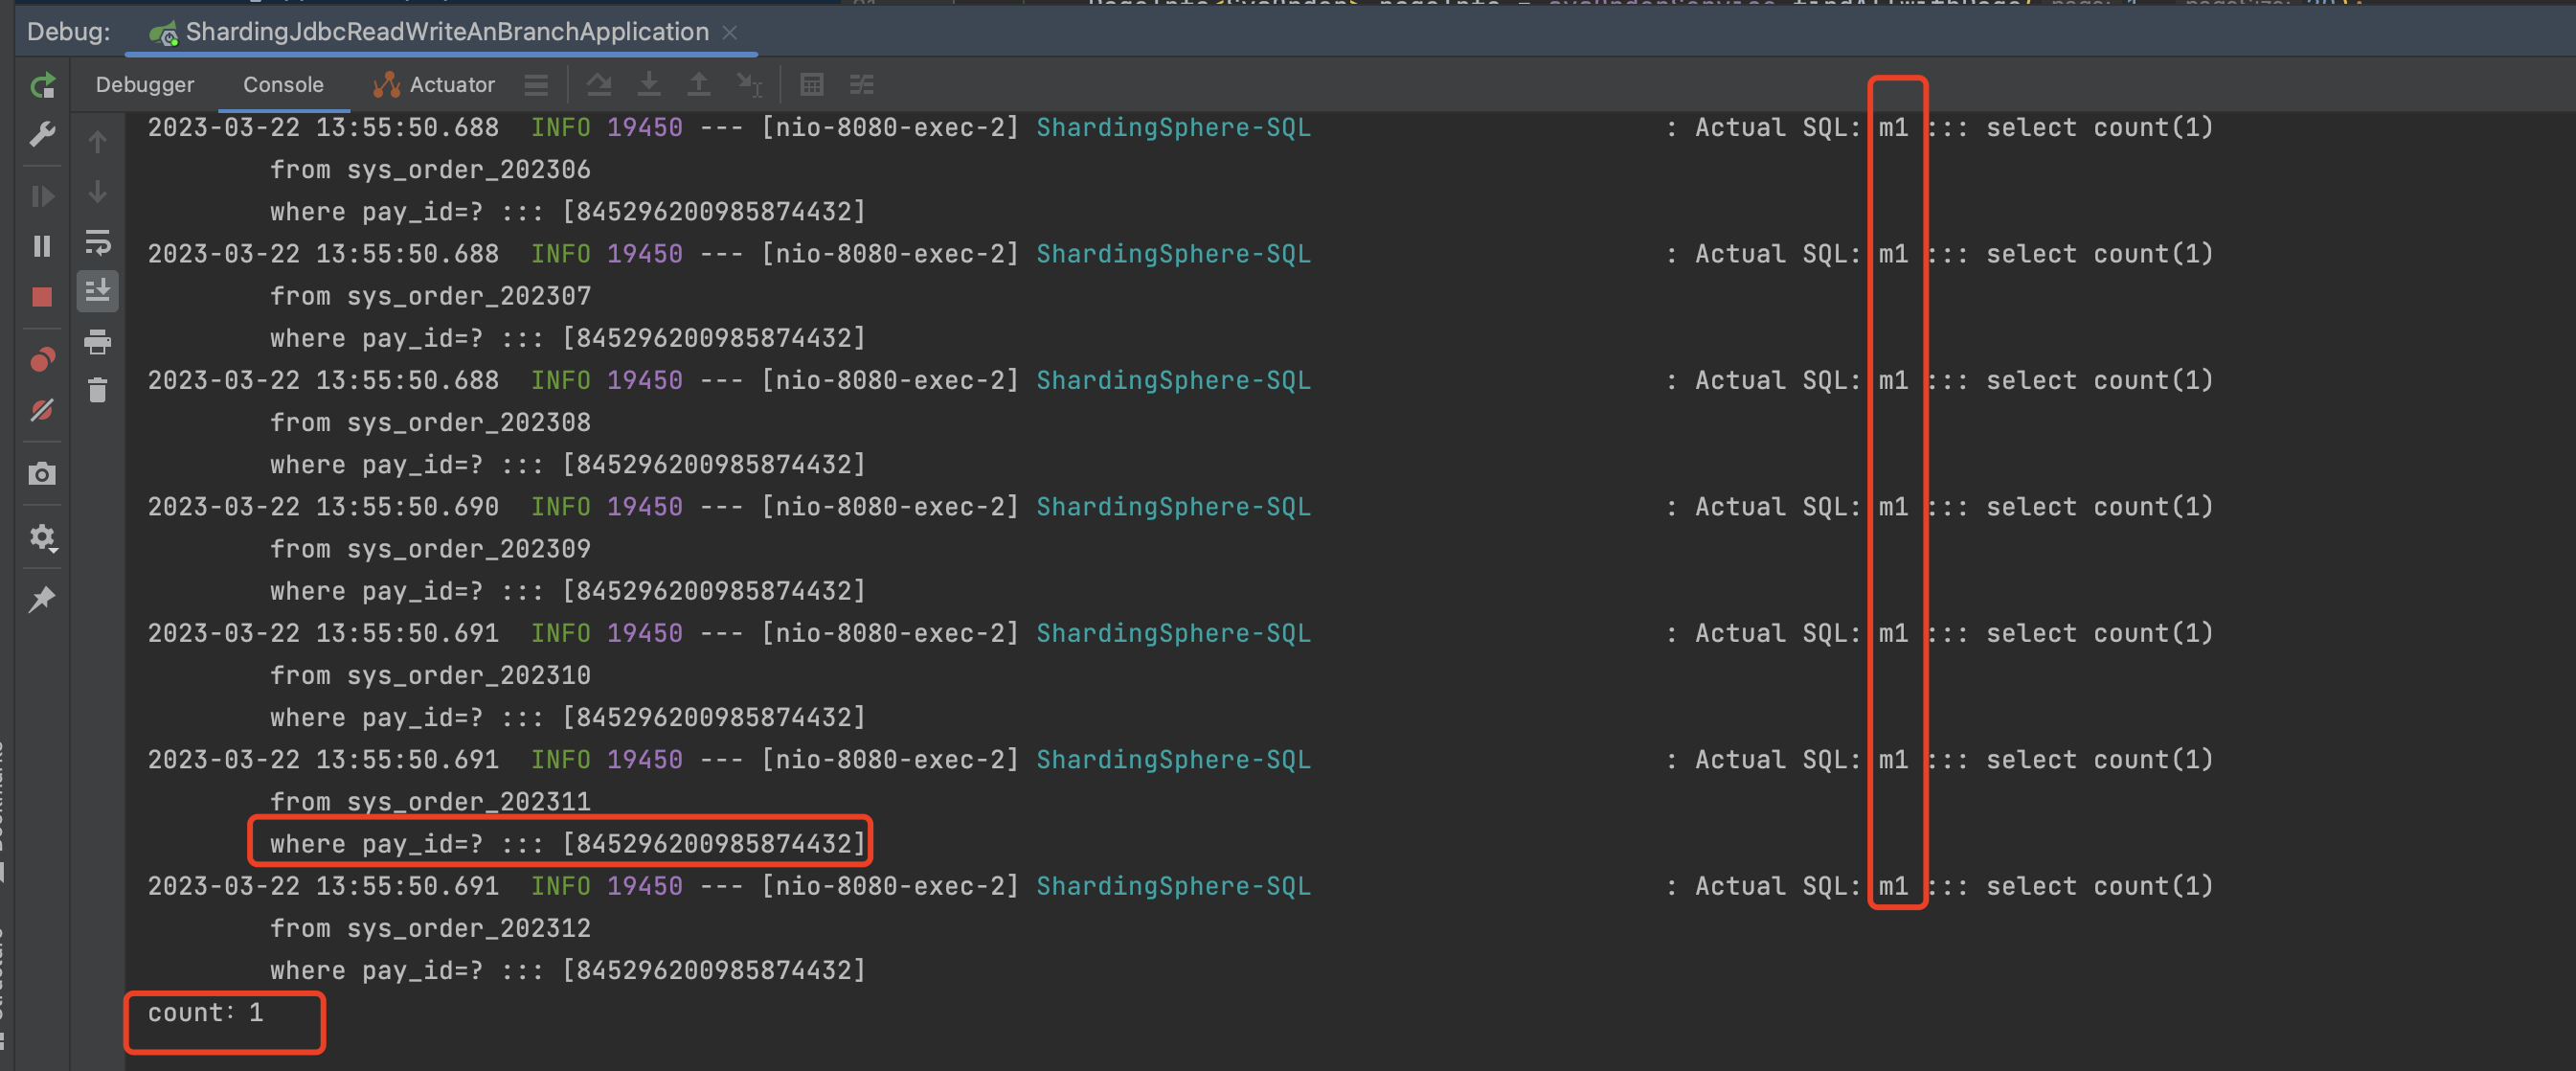
不指定分键片执行结果:
如图所示,我们count *的话没有指定分片键的话,他会去所有的真实表中进行查询,查询后进行数据汇总 ,得出count值。
指定分键片执行结果:
1 2 3 4 5 6 7 @GetMapping("/countByPayId") public void countByPayId () { System.out.println("count:" +sysOrderMapper.countByPayId(Long.parseLong("845296200985874432" ))); }
当我们指定分片键后,很明显的发现,他只会去取模后的数据库中查询,而不会所有数据库所有表都进行查询。
9.分页查询测试 依赖xml:
1 2 3 4 5 6 7 8 9 10 11 12 <dependency > <groupId > com.github.pagehelper</groupId > <artifactId > pagehelper-spring-boot-starter</artifactId > <version > 1.2.10</version > <exclusions > <exclusion > <artifactId > jsqlparser</artifactId > <groupId > com.github.jsqlparser</groupId > </exclusion > </exclusions > </dependency >
Controller:
1 2 3 4 5 6 7 8 @GetMapping("/pageTest") public List<SysOrder> pageTest () { PageInfo<SysOrder> pageInfo = sysOrderService.findAllwithPage(1 , 20 ); return pageInfo.getList(); }
service:
1 2 3 4 5 6 7 8 9 10 11 12 13 14 15 16 17 18 19 package com.example.shardingjdbcreadwriteanbranch.service;import com.example.shardingjdbcreadwriteanbranch.entity.SysOrder;import com.example.shardingjdbcreadwriteanbranch.mapper.SysOrderMapper;import com.github.pagehelper.PageHelper;import com.github.pagehelper.PageInfo;import org.springframework.beans.factory.annotation.Autowired;import org.springframework.stereotype.Service;@Service public class SysOrderServiceImpl { @Autowired private SysOrderMapper sysOrderMapper; public PageInfo<SysOrder> findAllwithPage (int page, int pageSize) { PageHelper.startPage(page, pageSize); return new PageInfo <>(sysOrderMapper.findAll()); } }
mapper:
1 2 3 4 5 6 @Mapper public interface SysOrderMapper extends BaseMapper <SysOrder> { List<SysOrder> findAll () ; Integer count () ; Integer countByPayId (@Param("payId") Long payId) ; }
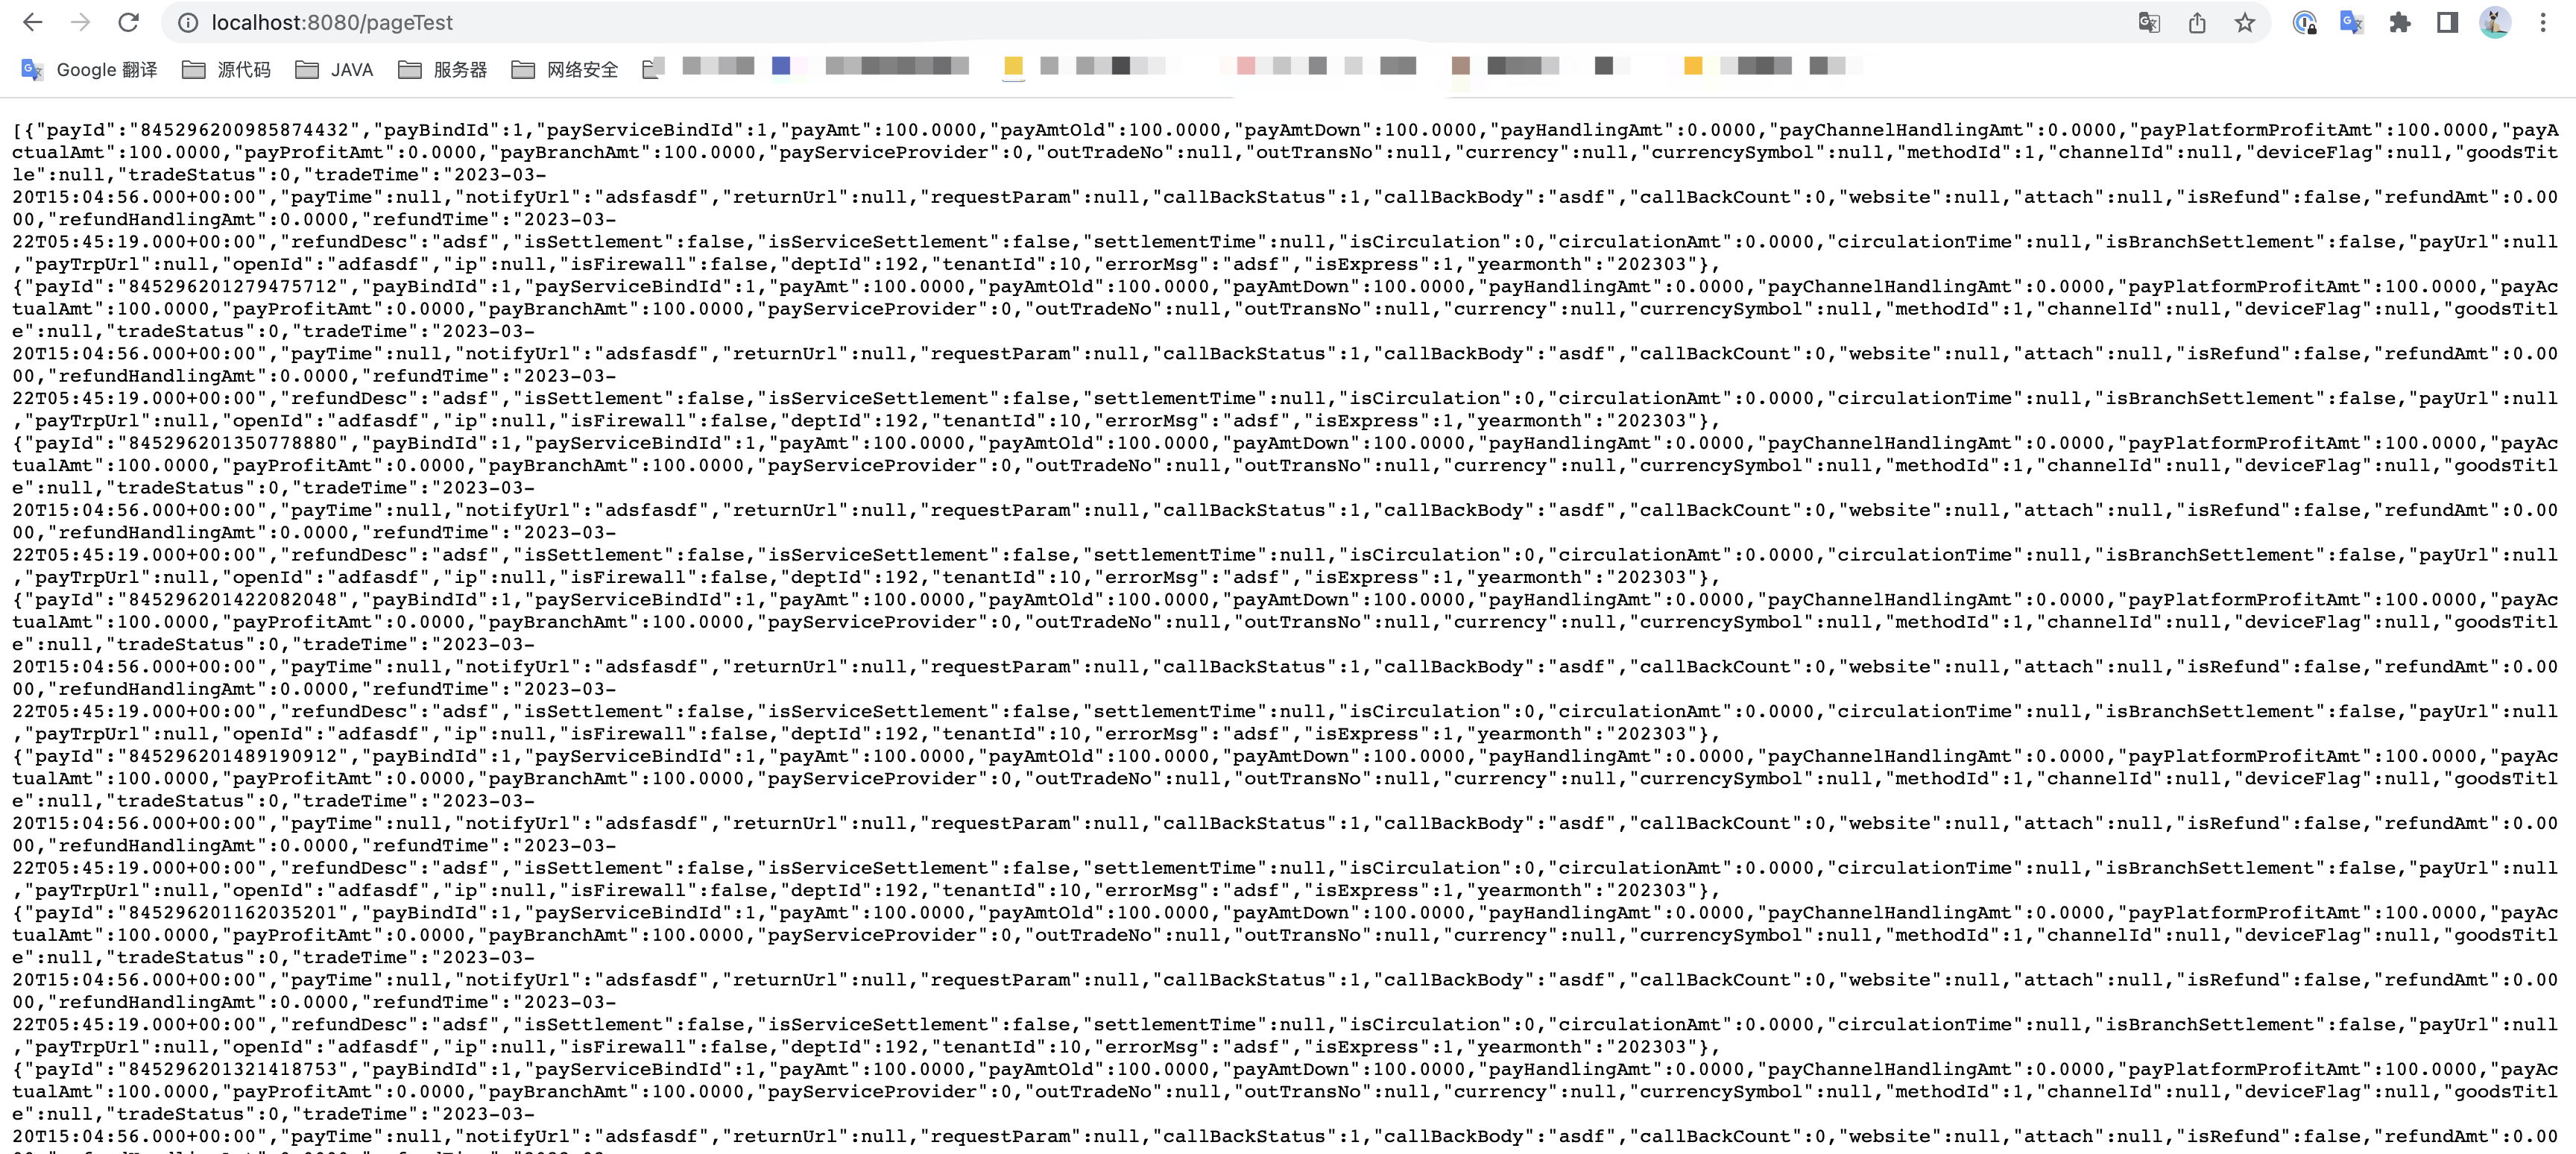
测试结果:
但是值得注意的是,这里和上面的count一样,如果我们没有指定分片键,他就没有办法取模找到准确的数据库,他会所有的逻辑数据源和逻辑表都去查询,然后进行汇总,如果要解决这个问题,我们可以把分片键当做参数传递进去。
10.关联表查询 contrller:
1 2 3 4 5 6 7 8 @GetMapping("/joinQueryTest") public List<Map> joinQueryTest () { List<Map> queryTest = sysOrderMapper.joinQueryTest(); return queryTest; }
mapper:
1 List<Map> joinQueryTest () ;
xml:
1 2 3 4 <select id ="joinQueryTest" resultType ="java.util.Map" > SELECT sd.id,t.pay_id from sys_order t left join sys_order_details sd on t.pay_id = sd.pay_id </select >
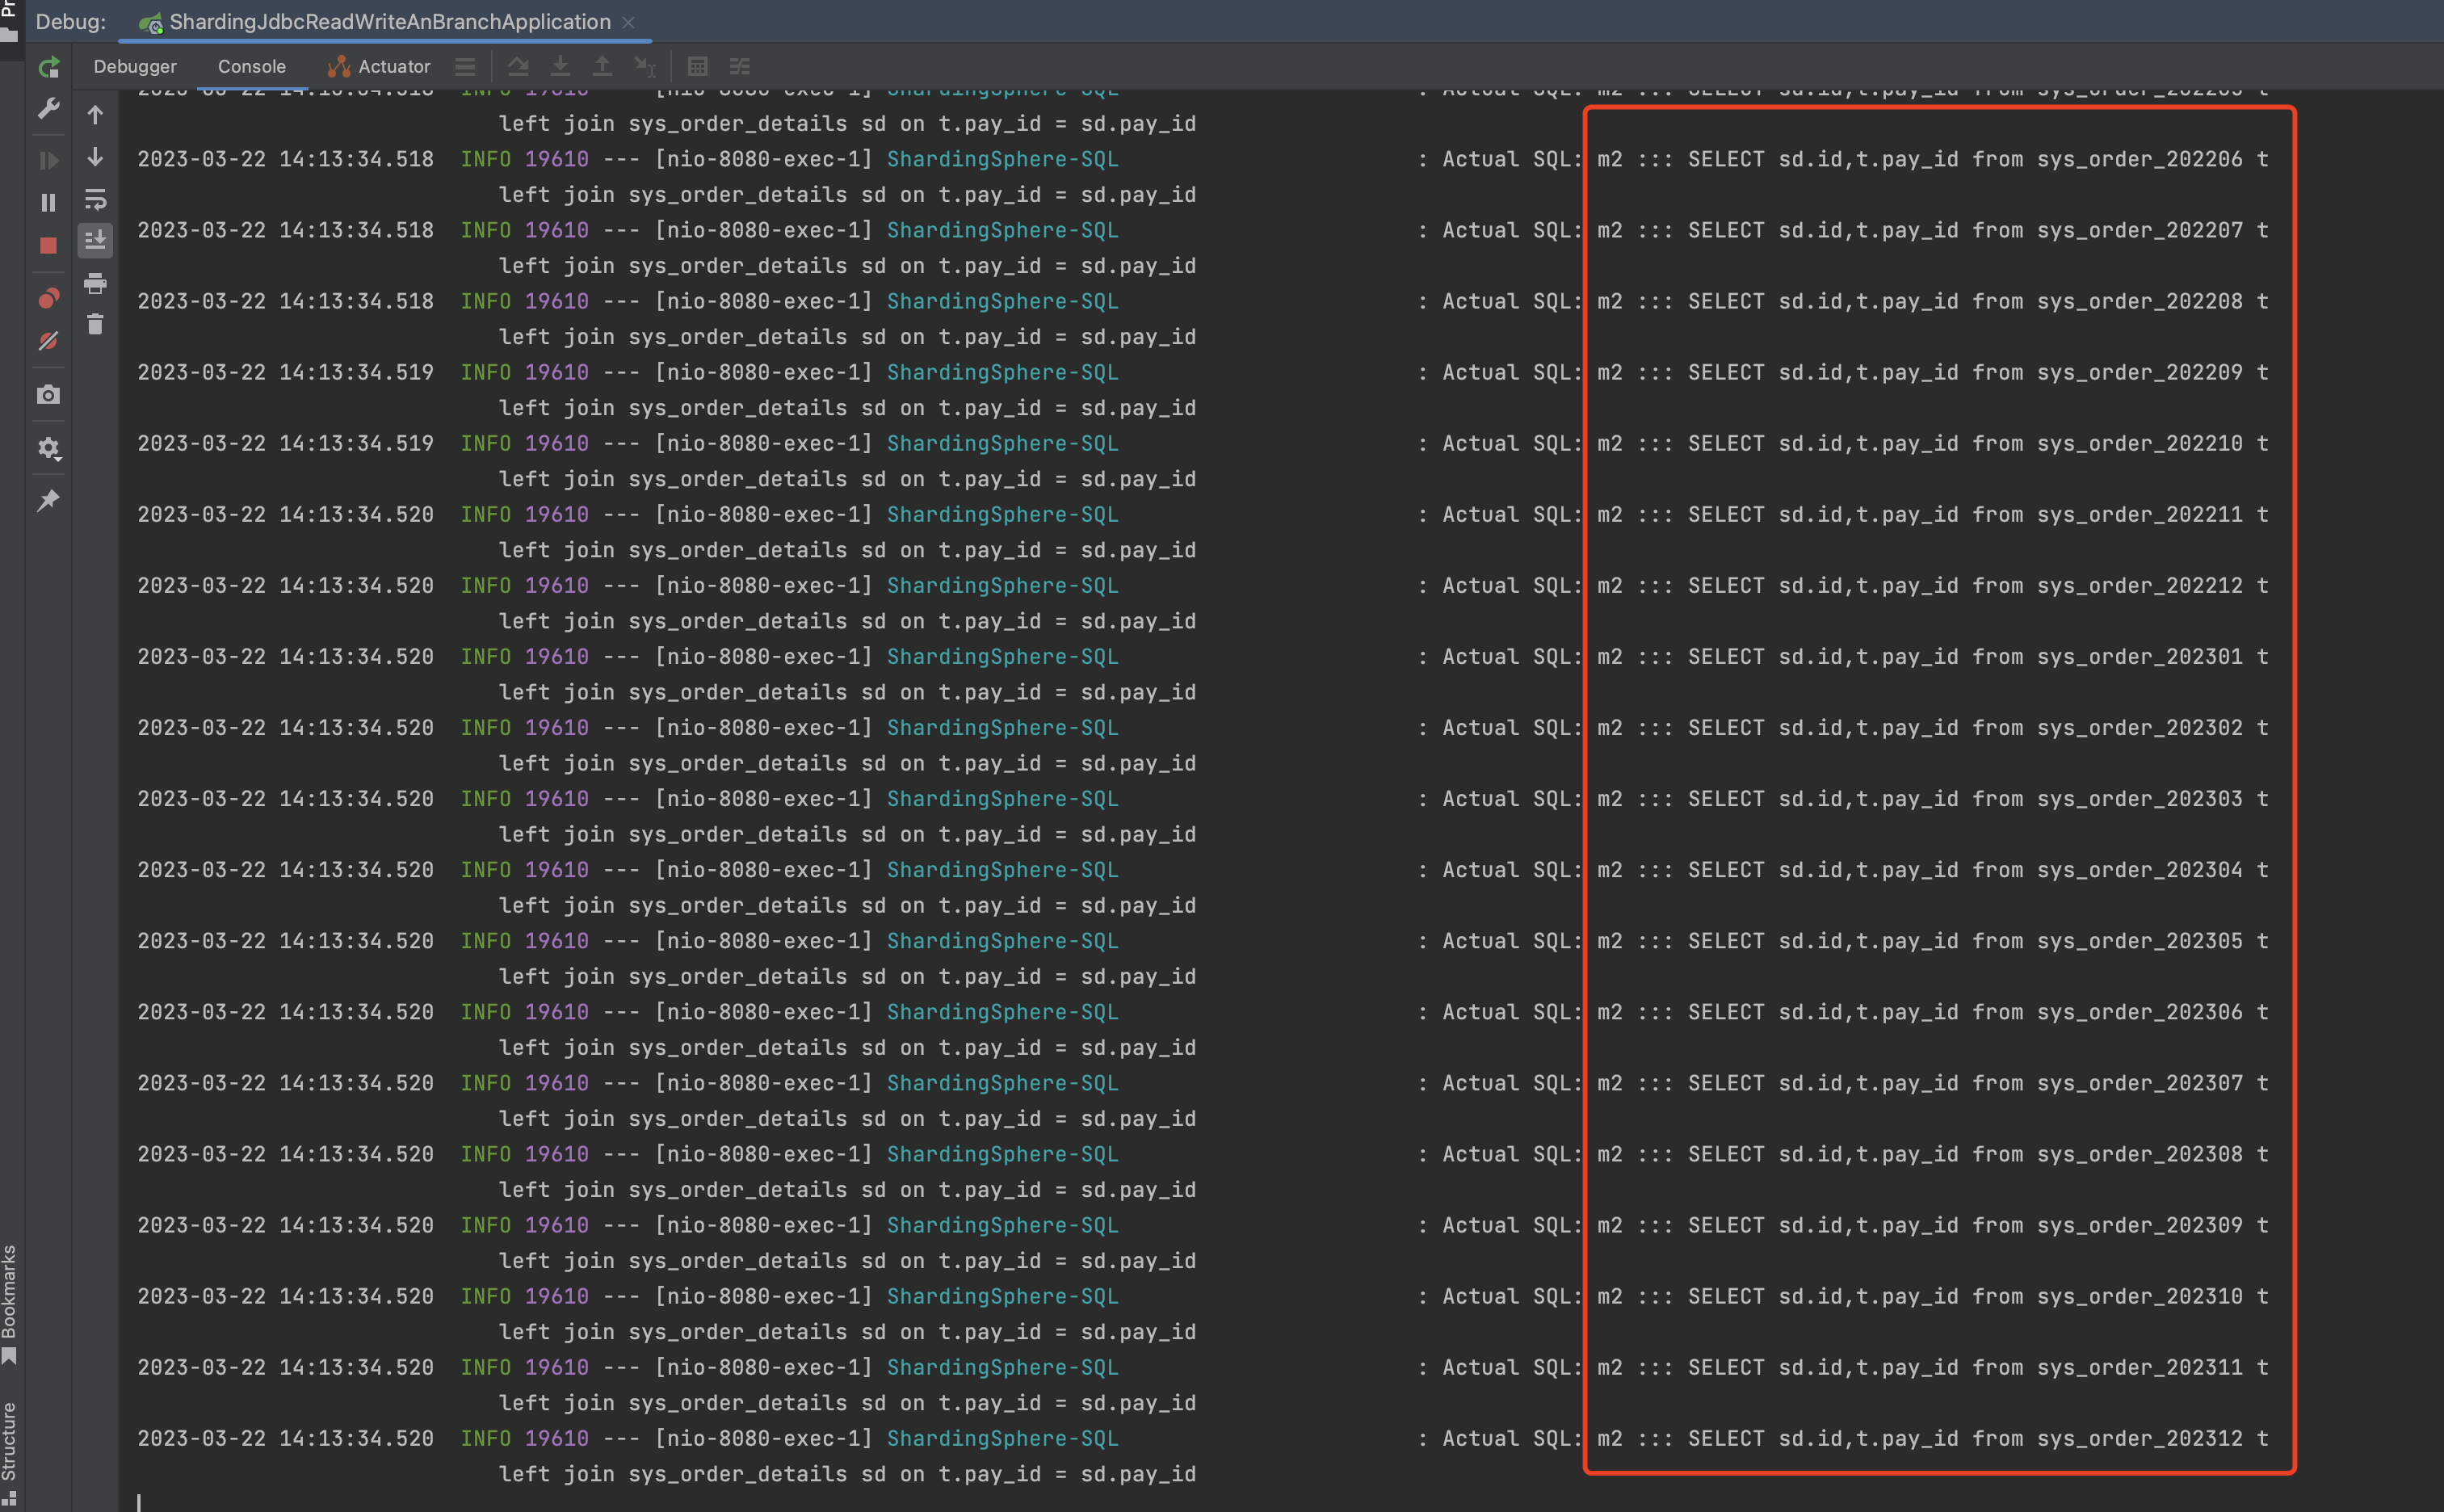
测试结果:
和count、分页查询一样,如果不指定分片键,他会去所有数据源里面找,然后进行汇总,如果想提升性能,可以指定分片键。
ShardingProxy ShardingProxy是一个独立部署的服务端,起到了数据代理、数据转发的作用,ShardingProxy目前只支持MySQL和PostgreSQL。
ShardingJDBC是面向开发人员,而ShardingProxy是面向运营人员,我们可以通过在proxy上制定一些策略,而不需要修改原有的代码实现 分库分表。
1)ShardingProxy部署 1.下载ShardingProxy Proxy下载地址
官网下载地址:https://shardingsphere.apache.org/document/current/en/downloads/
这里我们部署的demo使用的是4.1.1的版本,下载地址:
https://files.javaxing.com/apache-shardingsphere-4.1.1-sharding-proxy-bin.tar.gz
MySQL JDBC驱动包
MySQL JDBC驱动包下载地址:https://files.javaxing.com/mysql-connector-java-8.0.29.jar
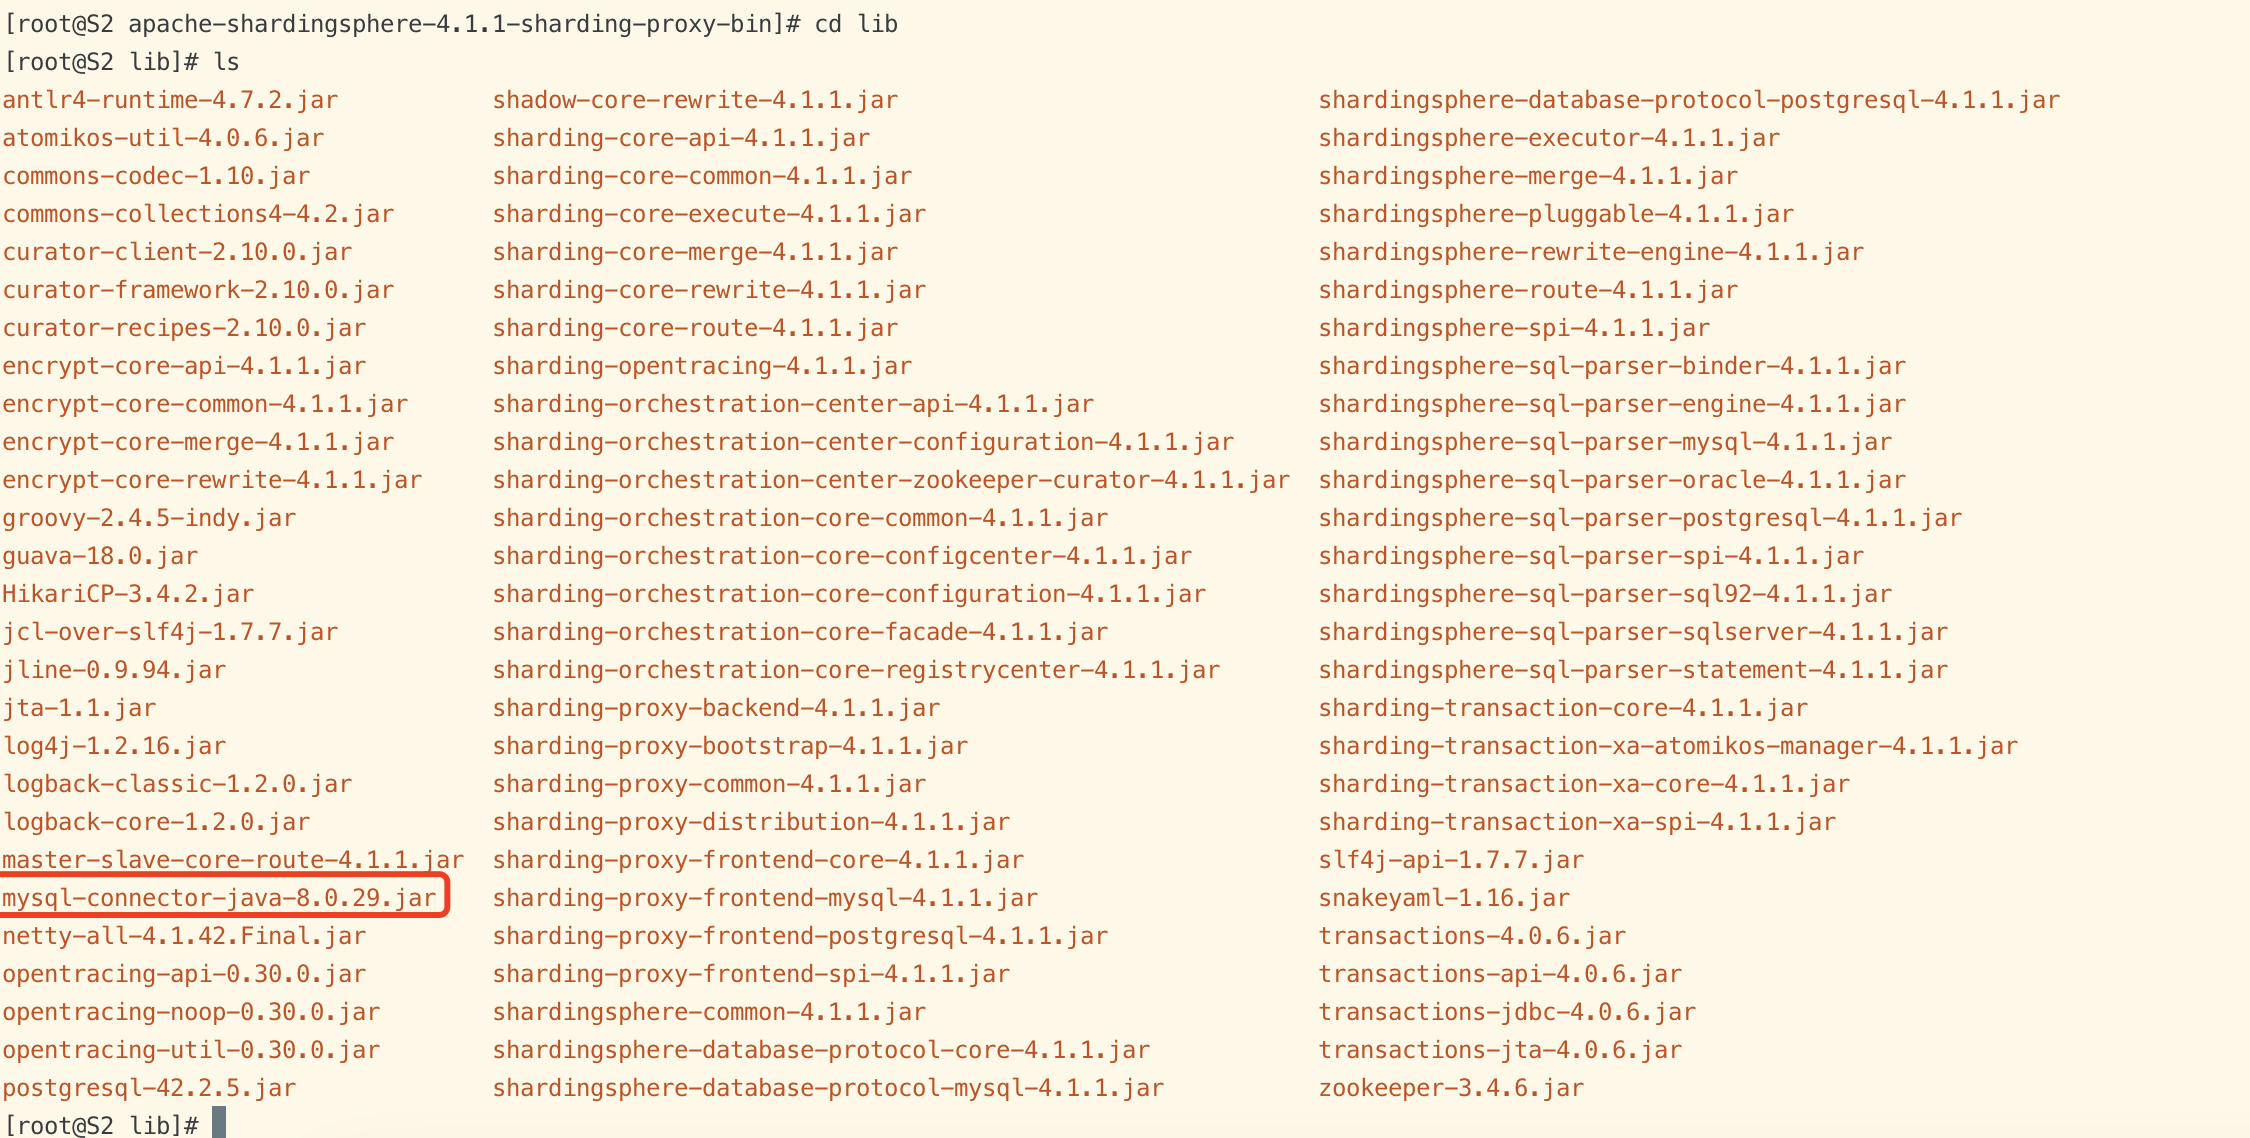
ShardingProxy默认只附带了PostgreSQL的JDBC驱动包,而不包含MySQL的JDBC驱动包。所以如果我们想使用MySQL 数据库,需要把MySQL的JDBC驱动包复制到 ShardingProxy的Lib目录下。
2.配置ShardingProxy Config config-sharding.yaml
1 2 3 4 5 6 7 8 9 10 11 12 13 14 15 16 17 18 19 20 21 22 23 24 25 26 27 28 29 30 31 schemaName: sharding_db dataSources: m1: url: jdbc:mysql://10.211.55.14:3306/user?serverTimezone=GMT%2B8&useSSL=false&allowPublicKeyRetrieval=true username: root password: 123123 connectionTimeoutMilliseconds: 30000 idleTimeoutMilliseconds: 60000 maxLifetimeMilliseconds: 1800000 maxPoolSize: 50 shardingRule: tables: course: actualDataNodes: m1.course_$->{1..2} tableStrategy: inline: shardingColumn: cid algorithmExpression: course_$->{cid % 2 +1} keyGenerator: type: SNOWFLAKE column: cid props: mykey-offset: 88 worker.id: 1
server.yaml
1 2 3 4 5 6 7 8 authentication: users: root: password: root sharding: password: sharding authorizedSchemas: sharding_db
3.启动proxy 1 2 3 4 [root@S2 bin]# ls start.bat start.sh stop.sh [root@S2 bin]# [root@S2 bin]# ./start.sh 3316
查看启动状态
MySQL Client
我们通过客户端连接到proxy,查看proxy 服务端是否正常
1 2 3 4 5 6 7 8 9 10 11 12 13 14 15 16 17 [root@S2 bin]# mysql -h 127.0.0.1 -P 3316 -u root -p -A mysql> show databases; +-------------+ | Database | +-------------+ | sharding_db | +-------------+ 1 row in set (0.04 sec) # 进入数据库查看数据表 mysql> use sharding_db; # 查看数据表,数据表是空的 mysql> show tables; Empty set (0.02 sec)
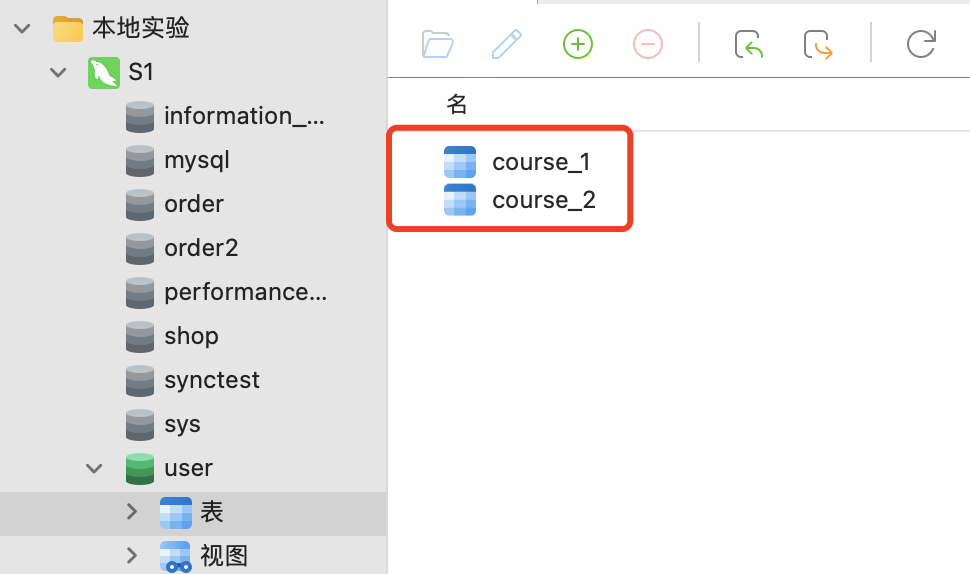
在数据库中创建物理表
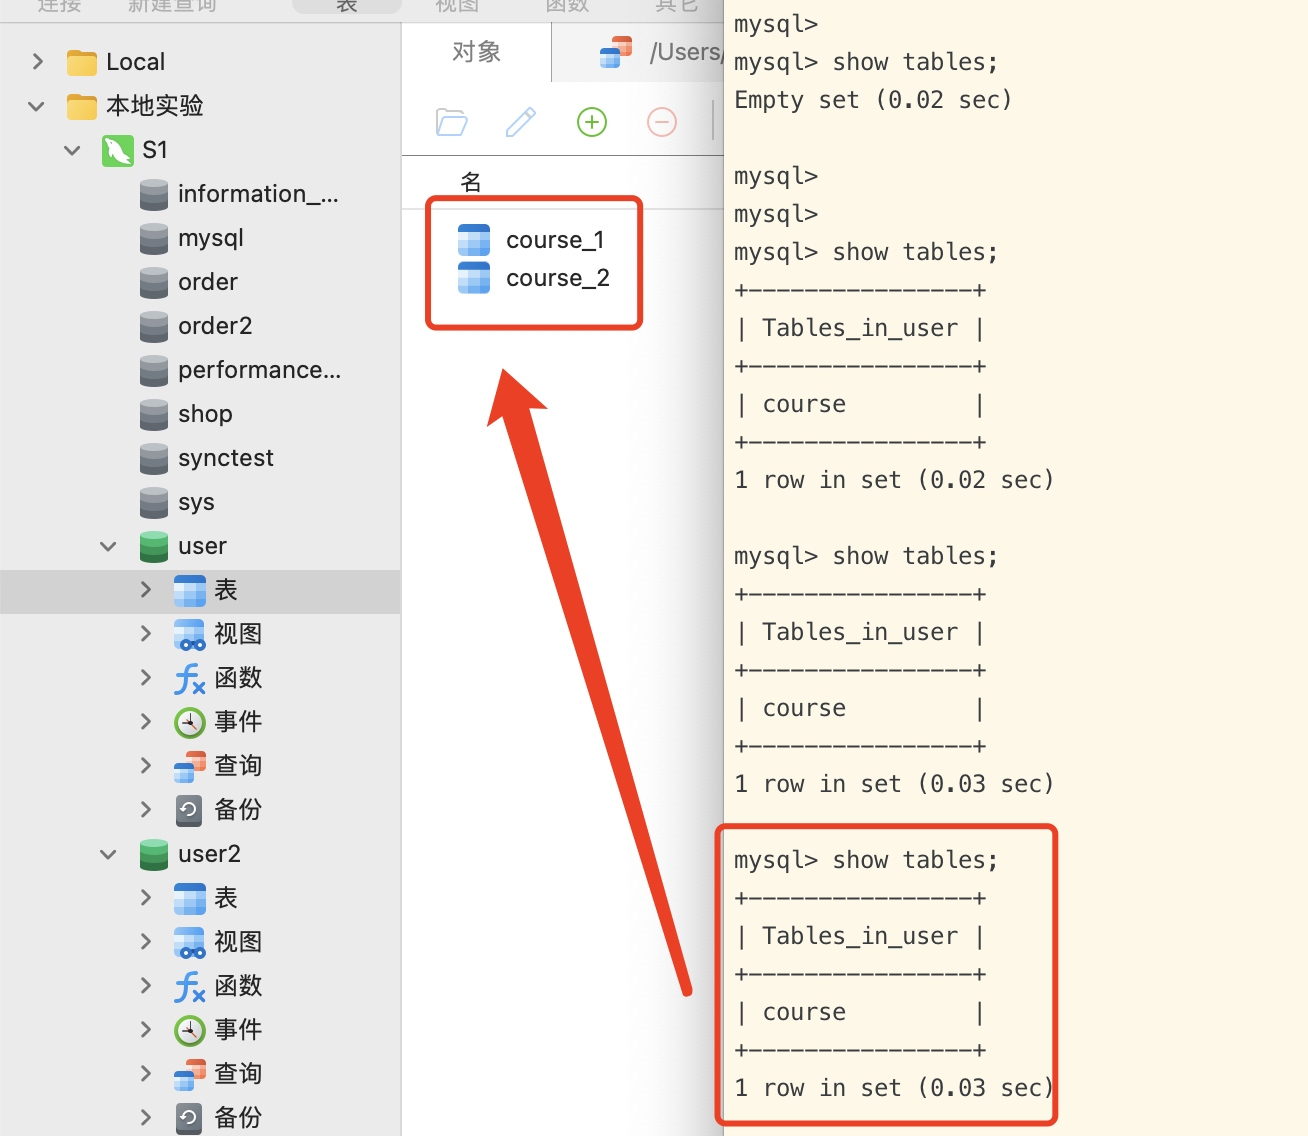
再次查看 proxy server中的数据表:
1 2 3 4 5 6 7 8 mysql> show tables; # 查出了逻辑表 +----------------+ | Tables_in_user | +----------------+ | course | +----------------+ 1 row in set (0.03 sec)
如图所示,真实表是course_1和course_2,而proxy 服务端中的逻辑表则是course。
4.插入数据 查询当前数据表
1 2 3 mysql> select * from course; Empty set (0.03 sec) # 数据表是空的
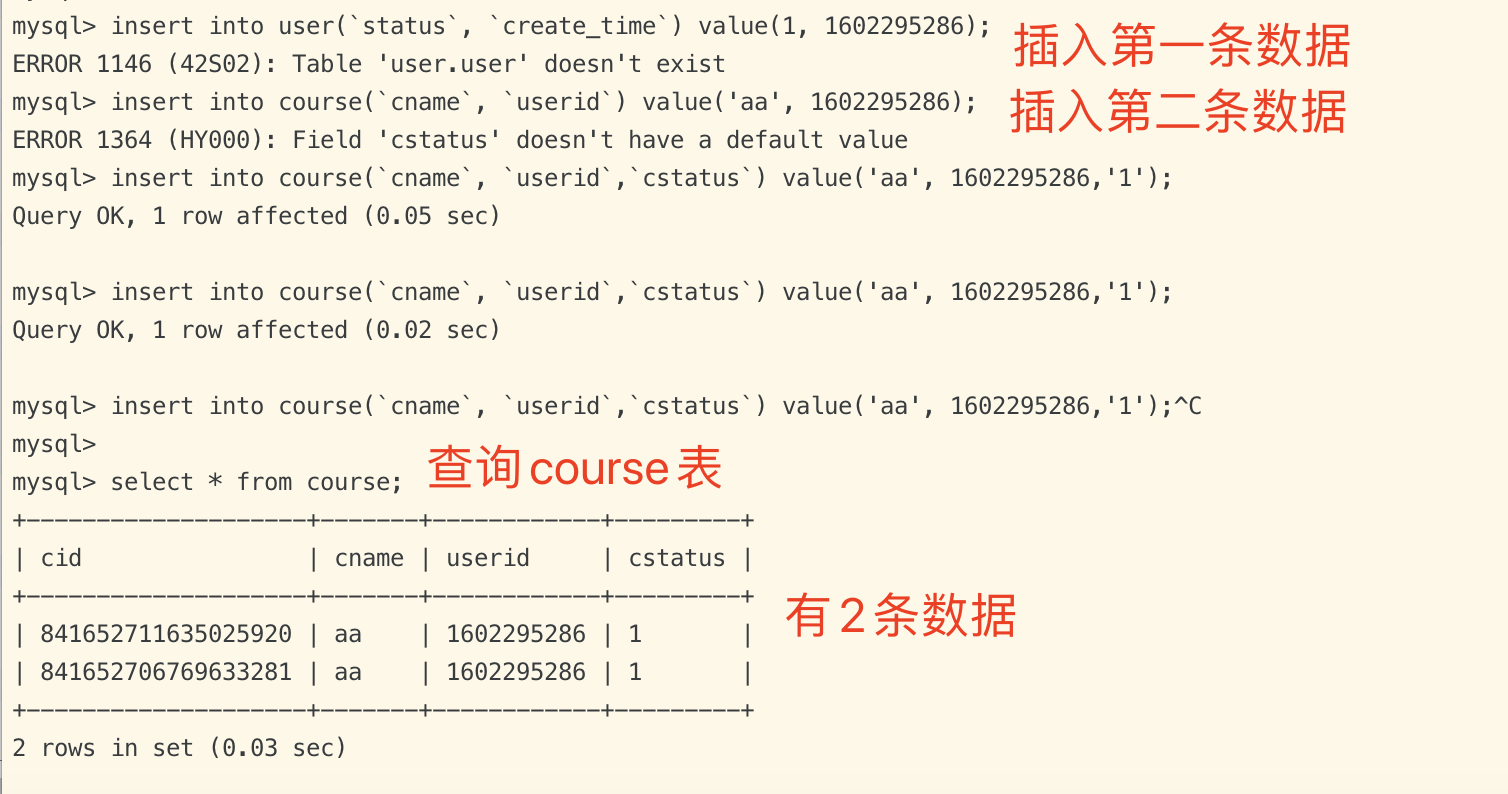
插入数据
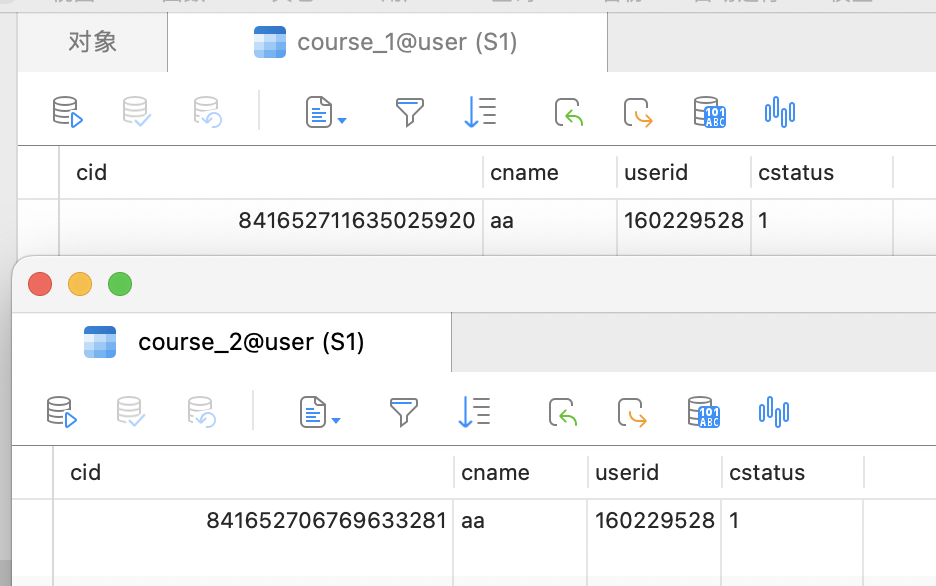
查看真实表
如图所示,我们刚才插入了2条数据,proxy 分到了2张真实表中,每张真实表各有一条数据。
2)ShardingProxy的服务治理 ShardingSphere支持将分库分表配置上传到统一的注册中心中集中管理。
目前支持的注册中心有Zookeeper和Etcd。而ShardingSphere也提供了SPI扩展接口,可以快速接入Nacos、Apollo等注册中心。
一旦加入注册中心后,可以确保ShardingProxy高可用性。注册中心会检测集群下所有proxy服务器,当其中一台proxy宕机后,会暂时断开该节点,不影响到其他proxy对外提供服务。
ShardingProxy conf 目录下的server.yaml :
1 2 3 4 5 6 7 8 9 10 11 12 13 14 orchestration: orchestration_ds: orchestrationType: registry_center,config_center,distributed_lock_manager instanceType: zookeeper serverLists: localhost:2181 namespace: orchestration props: overwrite: false retryIntervalMilliseconds: 500 timeToLiveSeconds: 60 maxRetries: 3 operationTimeoutMilliseconds: 500
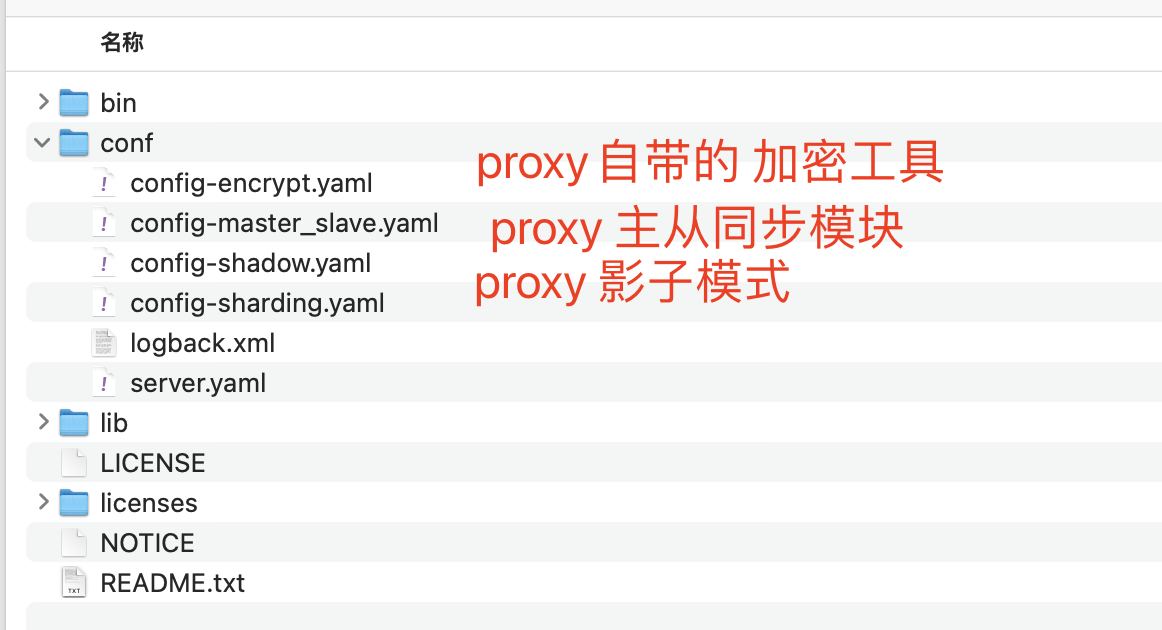
3)Shardingproxy的其他功能 这里只是简单的描述一下其他配置文件的作用,因为生产环境很少会用到,所以就不过多的描述和去实验。
影子库 这部分功能主要是用于进行压测的。通过给生产环境上的关键数据库表配置一个影子库,就可以将写往生产环境的数据全部转为写入影子库中,而影子库通常会配置成跟生产环境在同一个库,这样就可以在生产环境上直接进行压力测试,而不会影响生产环境的数据。
在conf/config-shadow.yaml中有配置影子库的示例。其中最核心的就是下面的shadowRule这一部分。
1 2 3 4 5 6 7 8 9 10 11 12 13 14 15 16 17 18 19 20 21 22 23 24 25 26 schemaName: sharding_db dataSources: ds: url: jdbc:mysql://127.0.0.1:3306/demo_ds_0?serverTimezone=UTC&useSSL=false username: root password: connectionTimeoutMilliseconds: 30000 idleTimeoutMilliseconds: 60000 maxLifetimeMilliseconds: 1800000 maxPoolSize: 50 shadow_ds: url: jdbc:mysql://127.0.0.1:3306/demo_ds_1?serverTimezone=UTC&useSSL=false username: root password: connectionTimeoutMilliseconds: 30000 idleTimeoutMilliseconds: 60000 maxLifetimeMilliseconds: 1800000 maxPoolSize: 50 shadowRule: column: shadow shadowMappings: ds: shadow_ds
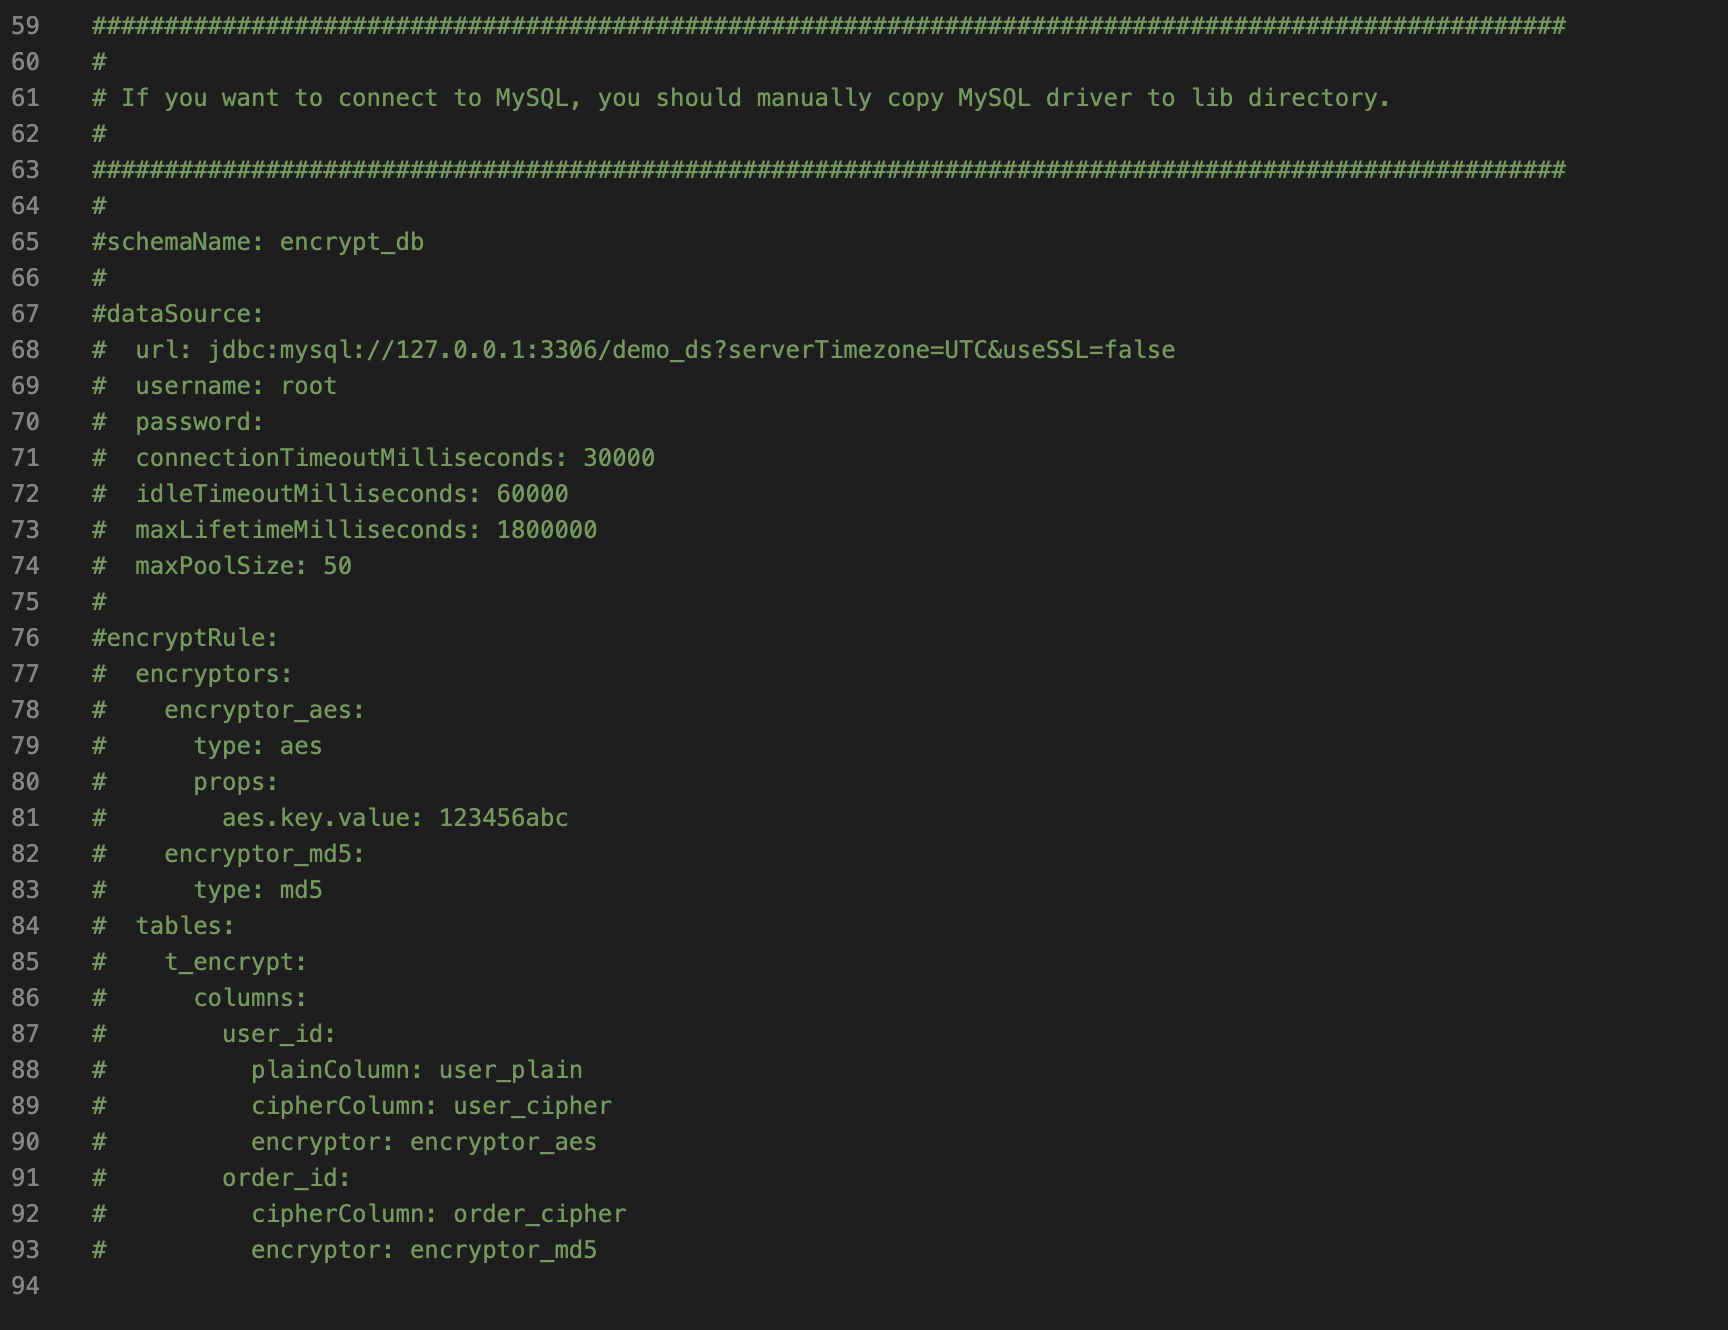
数据加密 在conf/config-encrypt.yaml中还演示了ShardingProxy的另一个功能,数据加密。默认集成了AES对称加密和MD5加密。还可以通过SPI机制自行扩展更多的加密算法,但是实际上 加密的过程我们一般都在 业务代码上就完成,所以不推荐使用。
高级特性 根据生产环境的实际情况,适当的调整下面的参数,可提高执行性能。
1 2 3 4 5 6 7 8 9 10 11 12 13 14 props: max.connections.size.per.query: 1 acceptor.size: 16 executor.size: 16 proxy.frontend.flush.threshold: 128 proxy.transaction.type: LOCAL proxy.opentracing.enabled: false proxy.hint.enabled: false query.with.cipher.column: true sql.show: false allow.range.query.with.inline.sharding: false
max.connections.size.per.query:生产环境中的数据库的节点每10台,就增加1,如果20台 这里就写2,这个是线程数量
默认情况下,是单线程执行,如果节点多的话,可以考虑 使用多线程
4)分库分表其他产品
业界组件
原厂
功能特性
备注
DBLE
爱可生开源社区
专注于mysql的高可扩展性的分布式中间件
基于MyCAT开发出来的增强版。
Meituan Atlas
美团
读写分离、单库分表
目前已经在原厂逐步下架。
Cobar
阿里(B2B)
Cobar 中间件以 Proxy 的形式位于前台应用和实际数据库之间,对前台的开放的接口是 MySQL 通信协议
开源版本中数据库只支持 MySQL,并且不支持读写分离。
MyCAT
阿里
是一个实现了 MySQL 协议的服务器,前端用户可以把它看作是一个数据库代理,用 MySQL 客户端工具和命令行访问,而其后端可以用MySQL 原生协议与多个 MySQL 服务器通信
MyCAT 基于阿里开源的 Cobar 产品而研发
Atlas
360
读写分离、静态分表
Kingshard
由 Go 开发高性能 MySQL Proxy 项目,在满足基本的读写分离的功能上,Kingshard 的性能是直连 MySQL 性能的80%以上。
TDDL
阿里淘宝
动态数据源、读写分离、分库分表
TDDL 分为两个版本, 一个是带中间件的版本, 一个是直接 JAVA library 的版本。
Zebra
美团点评
实现动态数据源、读写分离、分库分表、CAT监控
功能齐全且有监控,接入复杂、限制多。
MTDDL
美团点评
动态数据源、读写分离、分布式唯一主键生成器、分库分表、连接池及SQL监控
Vitess
谷歌、Youtube
集群基于ZooKeeper管理,通过RPC方式进行数据处理,总体分为,server,command line,gui监控 3部分
Youtube 大量应用
DRDS
阿里
DRDS(Distributed Relational Database Service)专注于解决单机关系型数据库扩展性问题,具备轻量(无状态)、灵活、稳定、高效等特性,是阿里巴巴集团自主研发的中间件产品。
5)ShardingProxy总结 ShardingSphere只能解决单机数据库容量和单表大数据问题,但是随着分表分库的进行也会产生很多问题。
ShardingJDBC 对后端代码入侵比较大,需要修改的东西比较多,但是自定义程度高。
ShardingProxy 对后端代码 0入侵,不需要修改任何代码,只需要部署ShardingProxy服务端并设置分片策略,但功能没有JDBC强。
如:一旦部署了ShardingSphere,原本复杂的SQL、JOIN查询、聚合、Group by、子查询、排序等功能就很难在来执行,不一定能在ShardingSphere上运行起来,开发人员得重新拆分SQL,在一定程度上会增加一定的开发成本。
总而言之,分库分表的成本和代价非常昂贵,一定要考虑清楚是否要做分库分表,能否接受分库分表带来的代价(复杂的SQL无法执行等),技术团队是否能驾驭住(不见得团队其他人也会分库分表),分库分表之前要对现有的架构和SQL进行分析,设计出比较完善的架构后再来施工,否则将会 苦不堪言。
